Chapter 1. Getting to know Strype
This chapter will show you how to get started with Python programming in Strype. We will work on our first project and start to see what programming in Strype is like, and what we can do with it.
1.1. Getting started
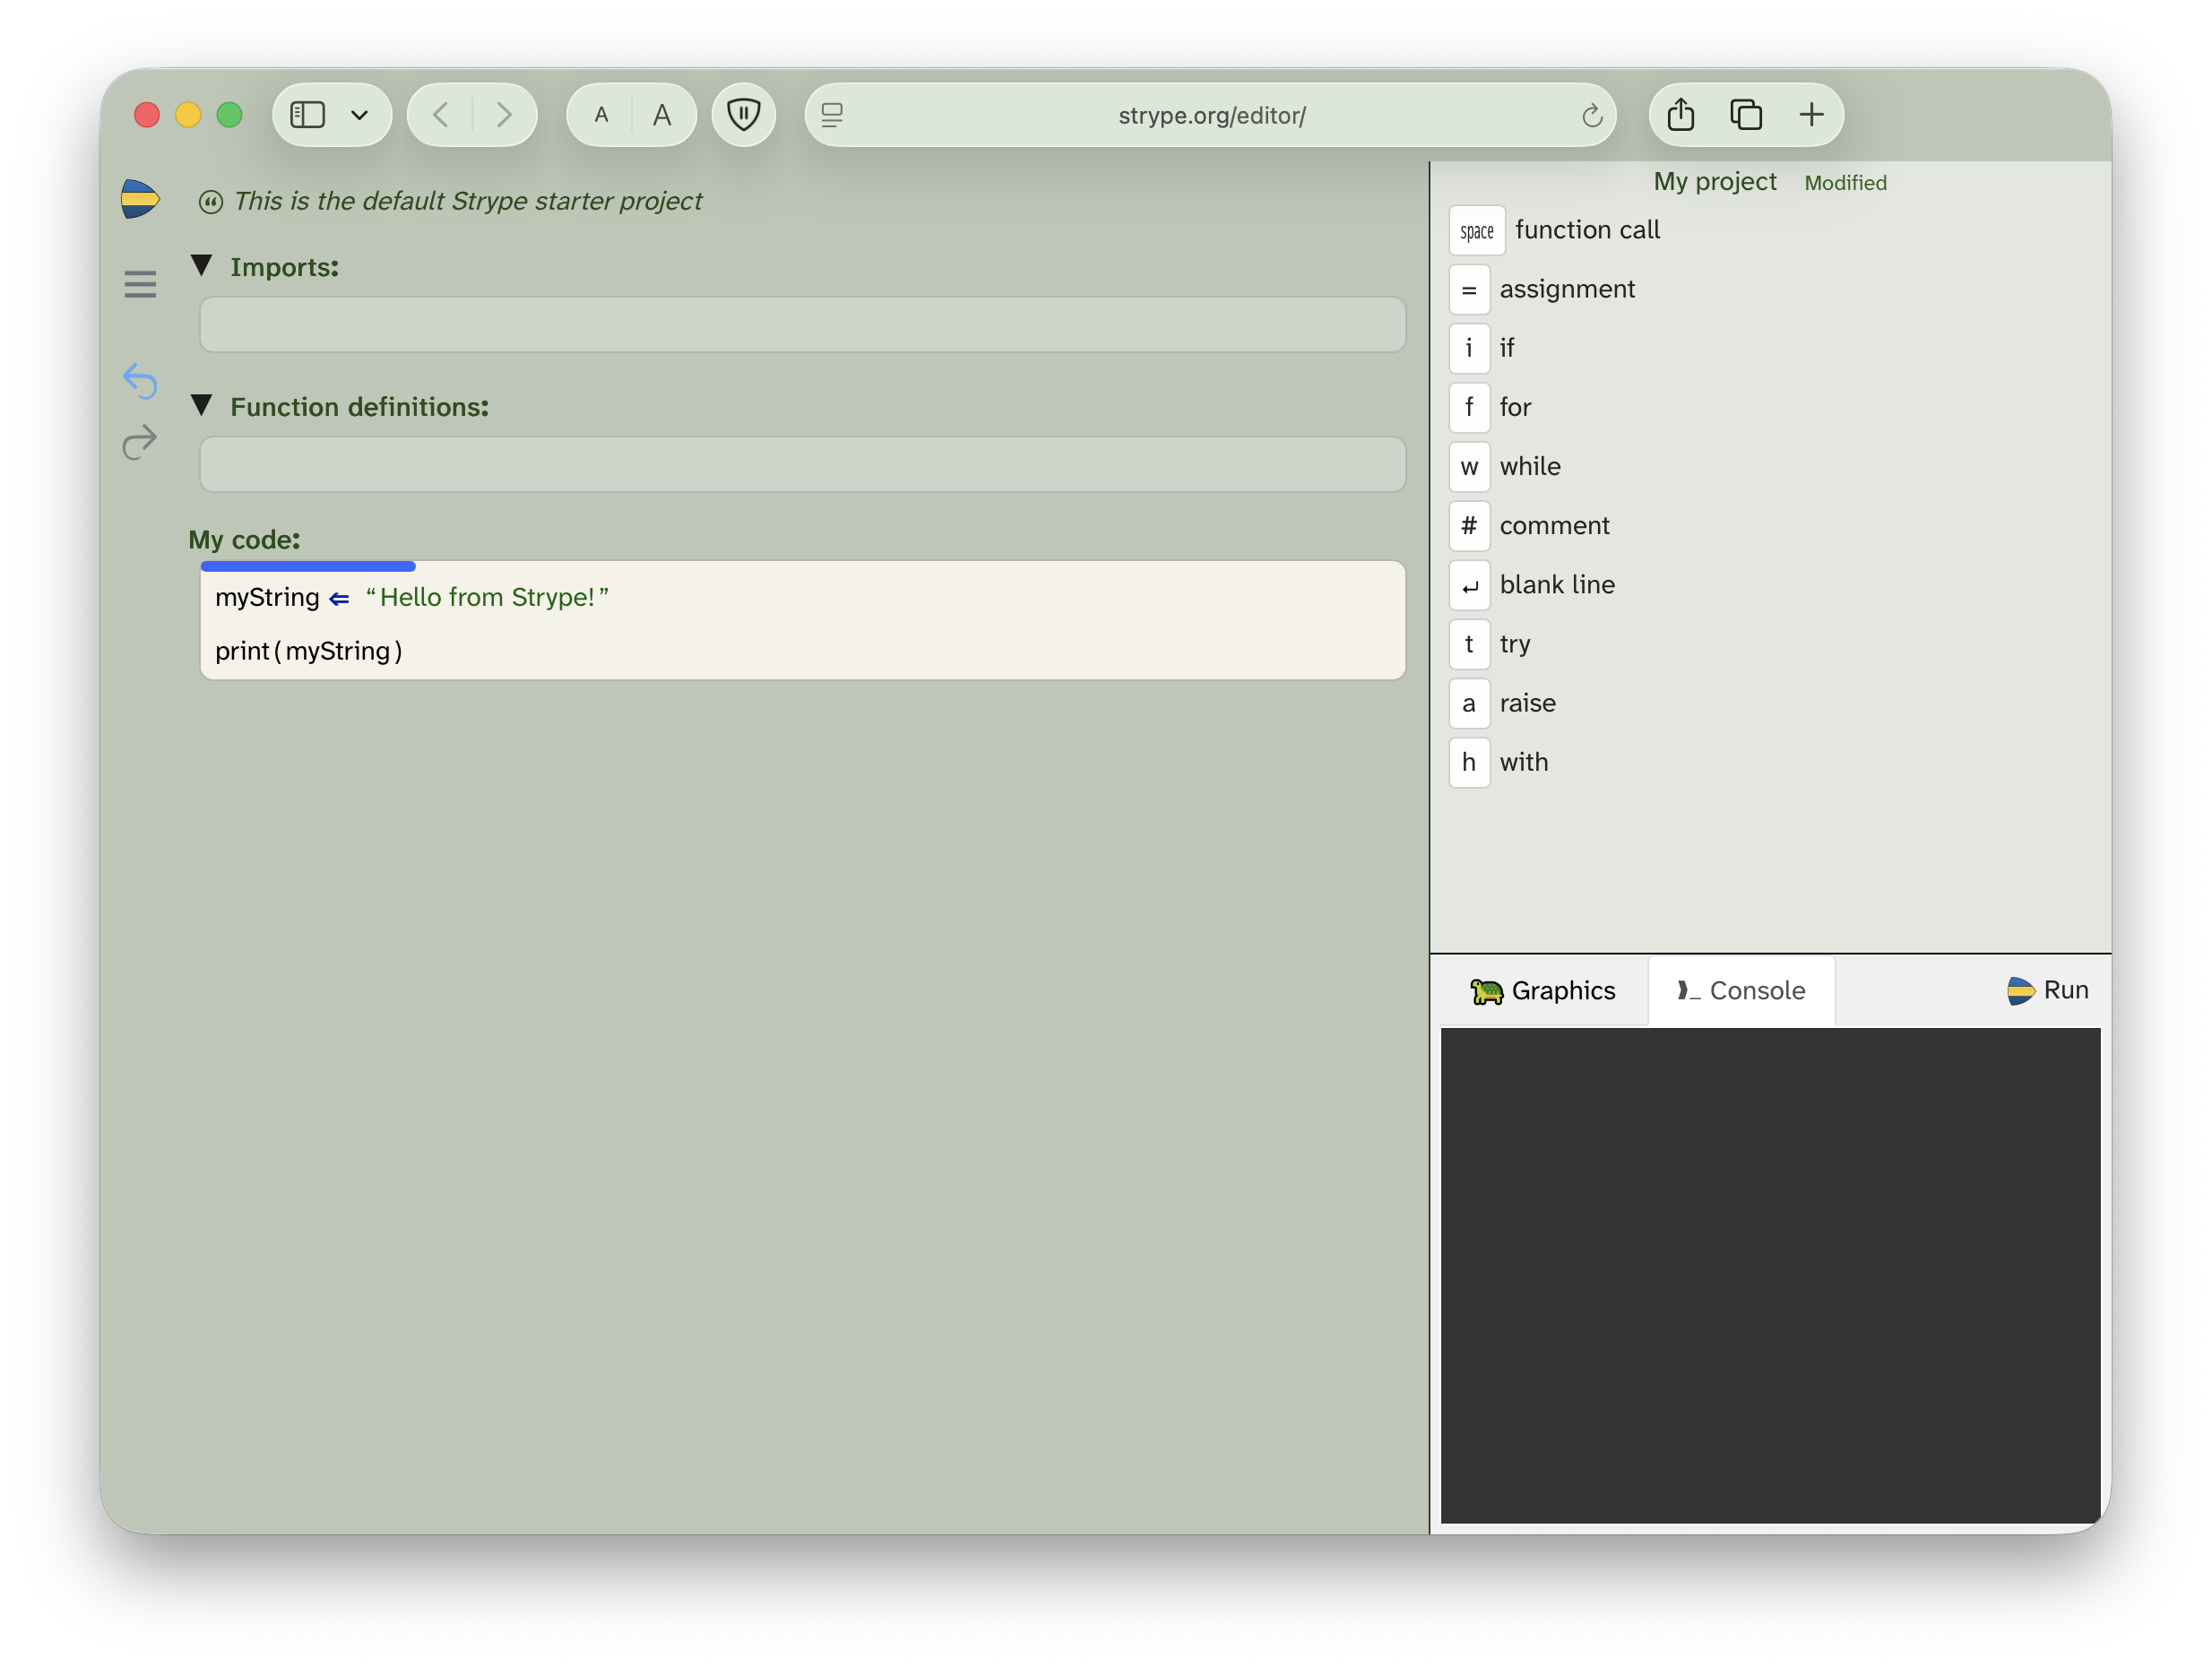
Getting started with programming in Strype is easy: Point your web browser to strype.org, click on the "Start coding now" button, and you will see the Strype editor. Here, you can enter, edit and run Strype programs. Figure 1.1 shows a screenshot of the editor.
When you first open Strype, you will see a short program to get you started.
1.1.1. Running a program
The first thing to try out is to run the sample program. To do this, click the "Run" button on the right and observe what happens.
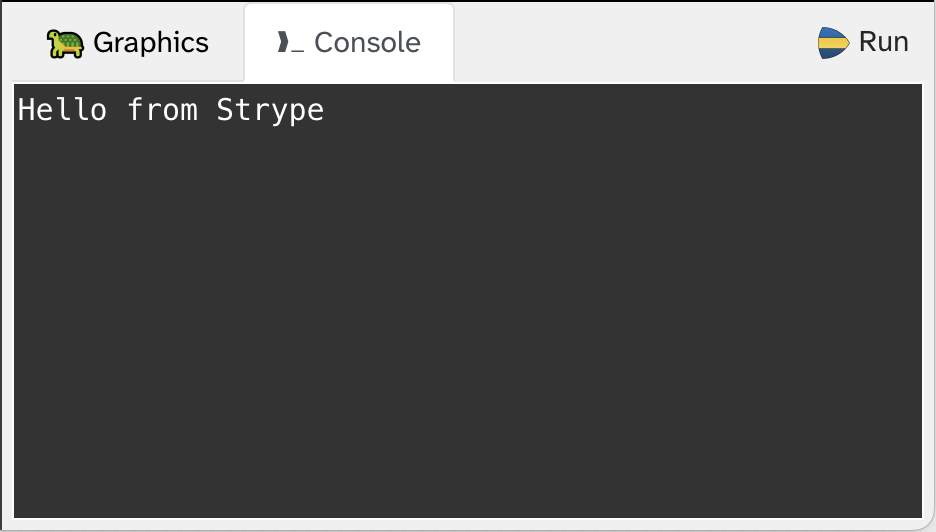
After clicking "Run", you should see the text "Hello from Strype" appear in the bottom right area of the window (Figure 1.2). This area is called the "Console", and it is where Strype will display text output. (You will note that there is also a "Graphics" tab next to the Console –- this is for graphical output, and we will use this shortly.)
Clicking the "Run" button executes the program shown in the editor and displays its results.
 Sometimes we will tell you "run" a program, or to "execute" a program. These mean the same thing — you do this by clicking the "Run" button.
 There is a keyboard shortcut for running a program: You can type Ctrl-Enter (on Windows) or Command-Enter (on macOS) to run the current program.
1.1.2. Editing a program
You can also change (edit) the current program and then run it again. For example, you could change the text that is printed by the sample program to print something different. Try this now. (If you are not familiar with the basics of editing in Strype, you should read Appendix A: Frame-based editing – the basics first.)
Exercise 1.1 In the Strype editor, change the green text that reads "Hello from Strype" to say Hello, followed by your own name. Make sure to leave the double quotes around the text you wish to print out. When you have done this, run the program again.
Exercise 1.2 Add a new function call frame at the end of the program. In it, call the print function and print out the words "How are you today?" You should now see two lines of text printed to the Console.
You can add a frame to the code by moving the frame cursor (the blue bar) to the intended location using the up and down cursor keys, and then typing Space followed by the frame shortcut for the desired frame. The shortcuts are shown in the top right.
Now that we know how to edit and run programs, we can, of course, write many more programs that produce text output (and much more interesting programs too), and we will do so later in this book. First, however, let us look at another type of output: graphics.
 If you are new to programming, you will be surprised how often it happens that we make errors in our programs. If you are not used to dealing with programming errors, you should read Appendix C: Dealing with errors first.
1.2. Starting with graphics
We will start our exploration of graphics programming in Strype with a very simple program that demonstrates some of the basic concepts.
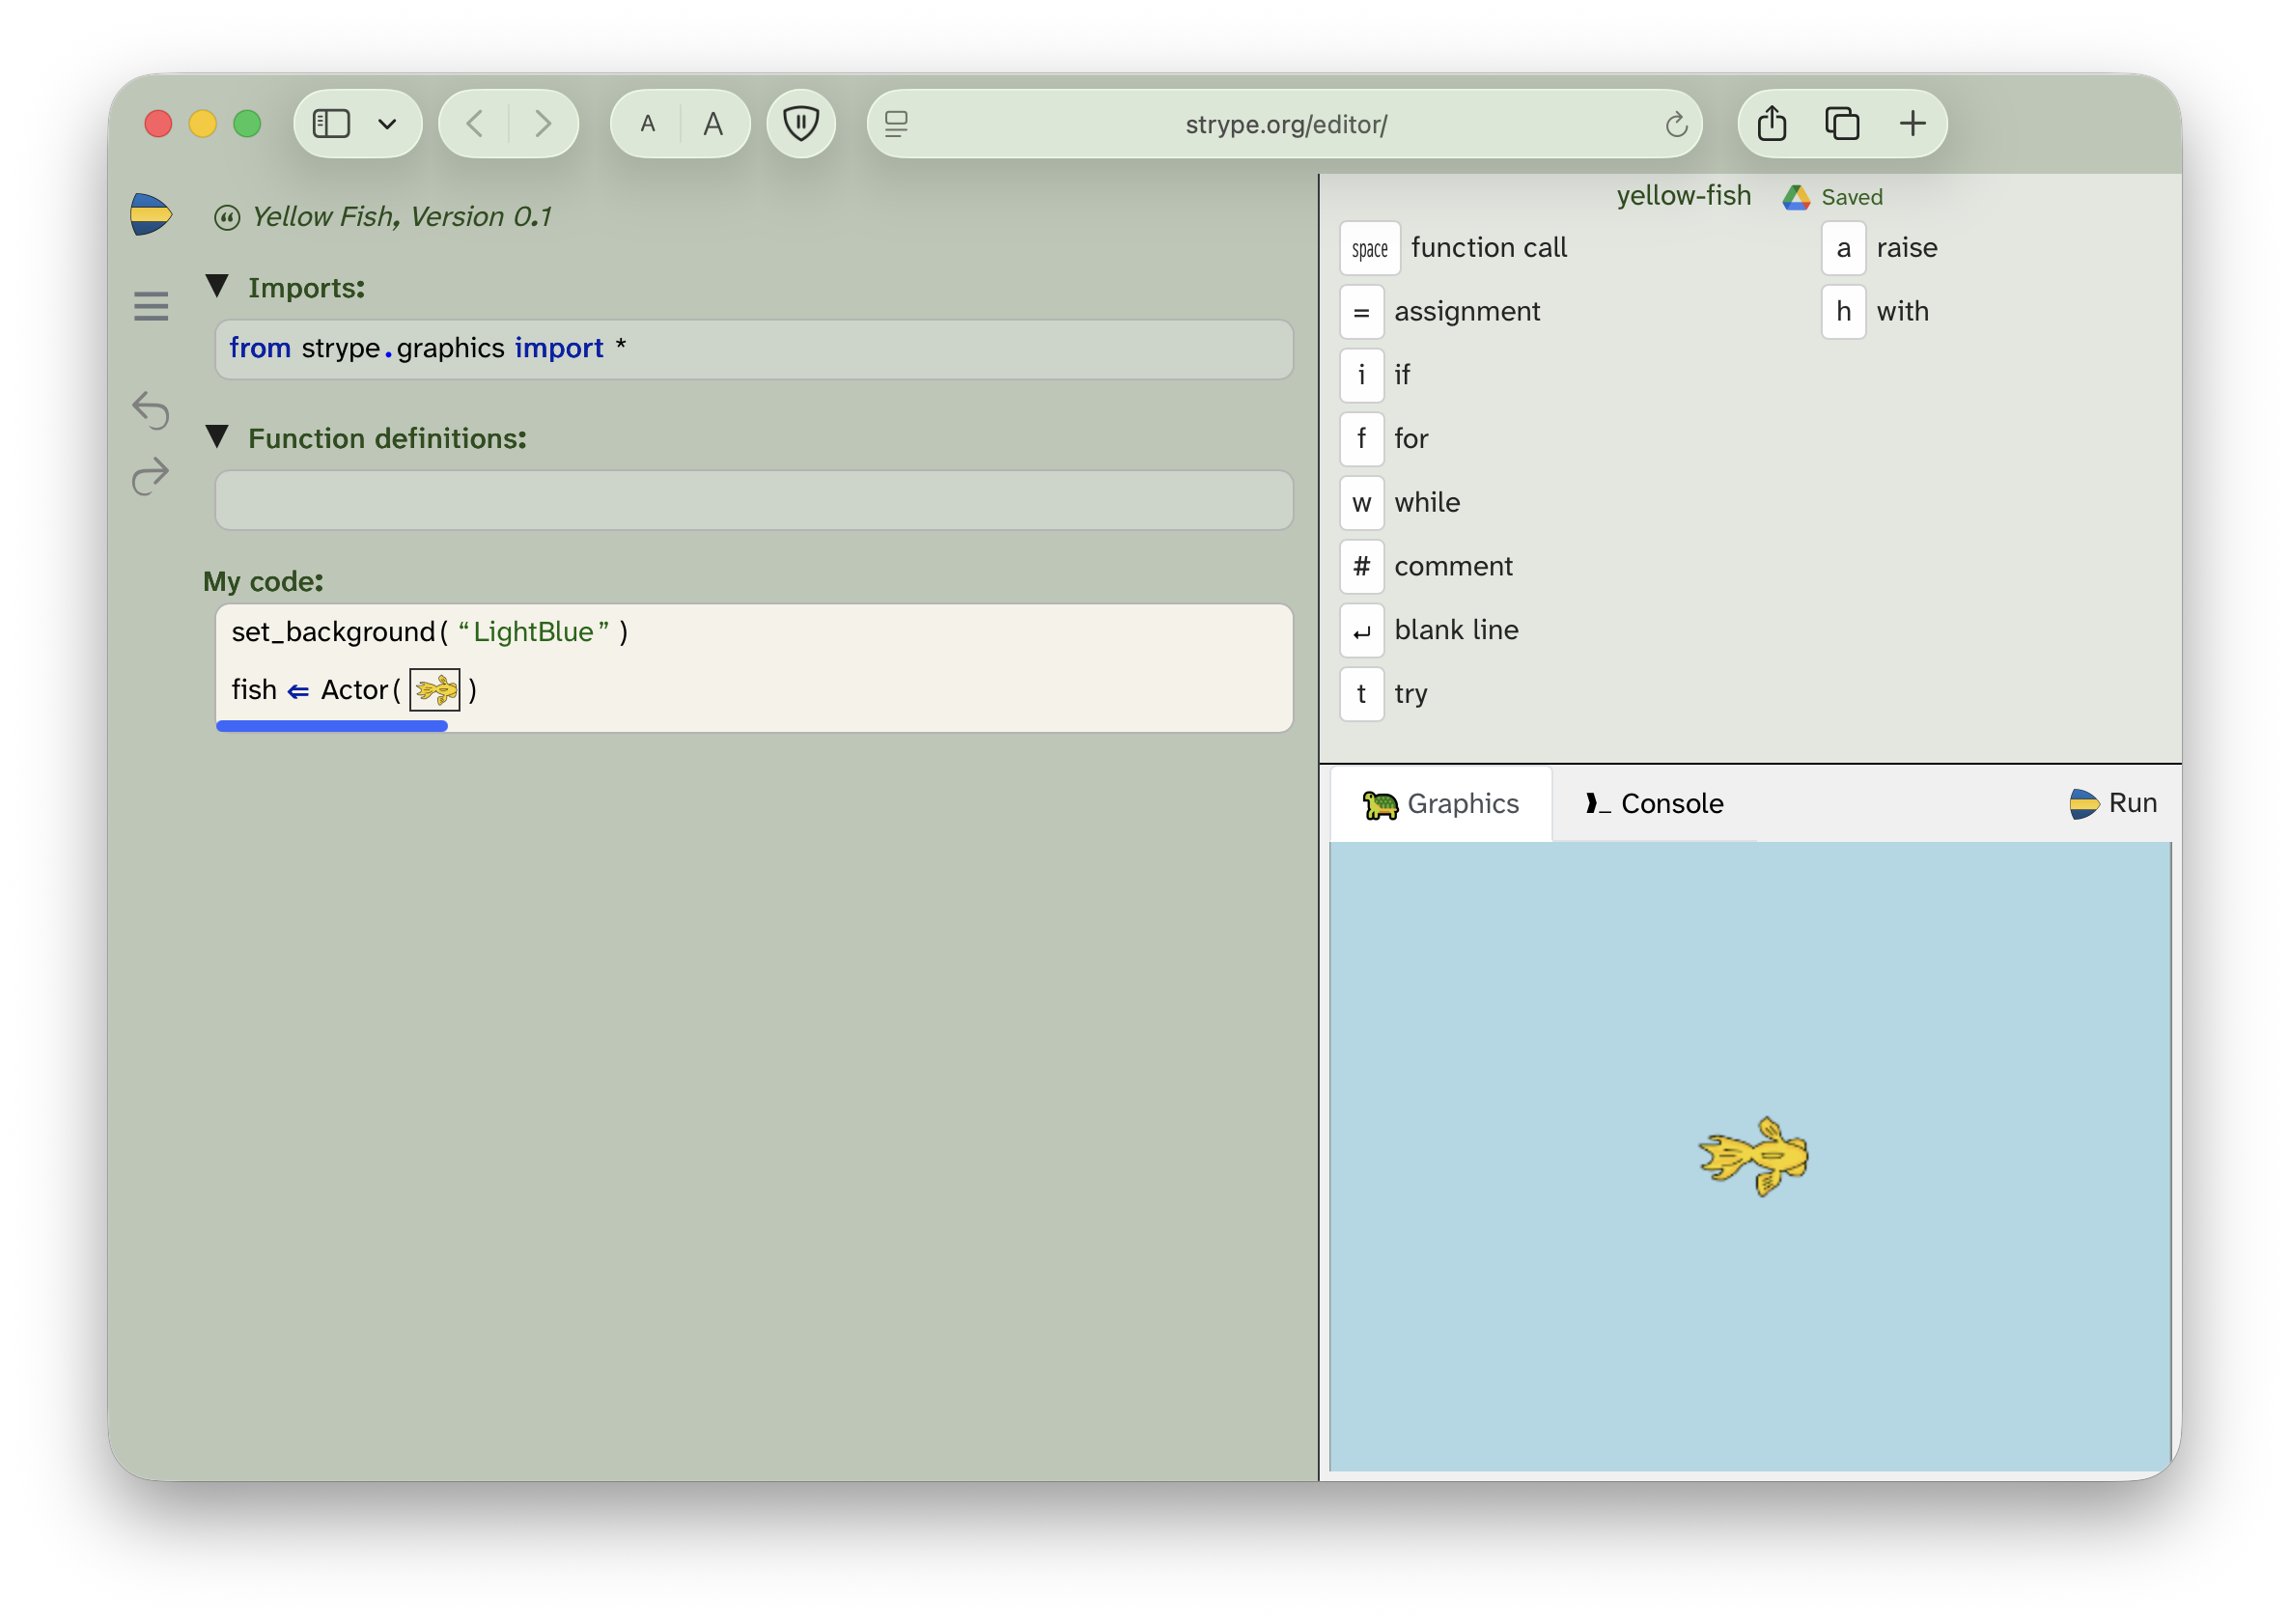
Open the yellow-fish project from the Chapter 1 book projects. Execute the program. You should see a result similar to the one shown in Figure 1.3.
 Opening book projects: If you are reading this on screen, you should be able to click on the project name to load the project in Strype. If you are reading this on paper, open Strype, then use the "Book…" menu (in the slide-out menu bar on the left) to find and open the book projects.
1.2.1. Importing the graphics library
This program makes use of the Strype graphics library. We can see this near the top of the program, in the section labelled "Imports".
Python is an extendable language, which has some functionality built in, and makes use of "libraries" to add more functions as we need them. In this book, you will learn to use both standard Python functions, as well as commonly used libraries. What is more, you will learn how you can find out what functionality is available in a library, so that you can teach yourself to use it later.
Producing graphical output is an area that is not built in to the standard Python language, so we need to use a library to enable this functionality. This has been done already in the project by adding the following line in the "Imports" section:

The * symbol at the end of this line is a shortcut for "everything". So this line in effect tells the system to import everything from the Strype graphics library. "Importing" means to make it available for us to use in our program, so the effect is that we can now use all of the functionality of the graphics library in our program.
We will start by experimenting with some of the functionality that the library provides.
1.2.2. Setting the background
Let’s have a look at the first line of code in our program:

This kind of statement is called a "function call". A function call executes a function that is defined somewhere else (in this case: in our graphics library) and that performs some kind of action. Later on, we will need to work out how we can find out about all the functions that are available in the library, but for now we will just experiment with a few of them.
A function call is a Python statement that executes a function that is defined elsewhere. It consists of the name of the function and a parameter list in parentheses (another word for round brackets, like the ones around this text).
In this case, "set_background" is the name of the function we are calling, and it is followed by a pair of parentheses. Between the parentheses is what is called a "parameter". A parameter provides some additional information to tell the function more precisely what to do. Here, we are calling the function set_background, whose job it is to set the background of the graphics world, and we are providing the parameter "LightBlue" to let it know what colour we would like it to use.
A parameter provides additional detail information to a function. Parameters are written in parentheses, with multiple parameters separated by commas.
Let us experiment a bit with this function call to see how we can influence its behaviour.
Exercise 1.3 Change the parameter of the set_background function call to "DarkRed". Make sure you keep the quotes around the name. Execute the program to see the effect.
Exercise 1.4 The colour names you can use as a parameter are the standard colour names used in HTML for writing webpages. You can find a list of available colour names in Appendix F: Available colours. Try out some other colours. Choose a colour that you like.
Types of brackets: Python uses various different kinds of brackets in different places. The ones we have seen for functions above are called either "round brackets" or "parentheses": ( )
Other bracket types Python uses are "square brackets", which look like this: [ ], and "curly brackets", which are sometimes also called "braces": { }
1.2.3. Creating actor objects
The next line of code looks like this:

There are several things happening in this one line of code, so we will investigate this in some detail.
In the Strype graphics system, you can add graphical elements to the graphics world by creating "Actor" objects. Actor objects (we may also call them just "actors") are created by inserting a function call frame into your code, and then writing the word "Actor" in place of the function name . Try this out now.
Exercise 1.5 Insert a function call frame at the end of your code. To do this, move the frame cursor to the end of the code and then press the space key (or click on the function call option in the frame palette). In place of the function name, write "Actor".
Once you have completed the exercise above, you will see the call to create an actor:
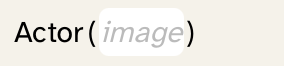
The frame also tells you that a parameter is expected here. It shows the grey word "image" on a white background. This tells us that creating an actor requires an image as a parameter. If you were to execute your program now (try it!), you will see that an error is reported in this frame when we try to run the program without providing an image. So let’s fix this, and add an image.
1.2.4. Working with images
You can add images to your program, by copying them from outside of Strype (for example, from the web, or from a file in your file system) and pasting them into Strype (Figure 1.4).
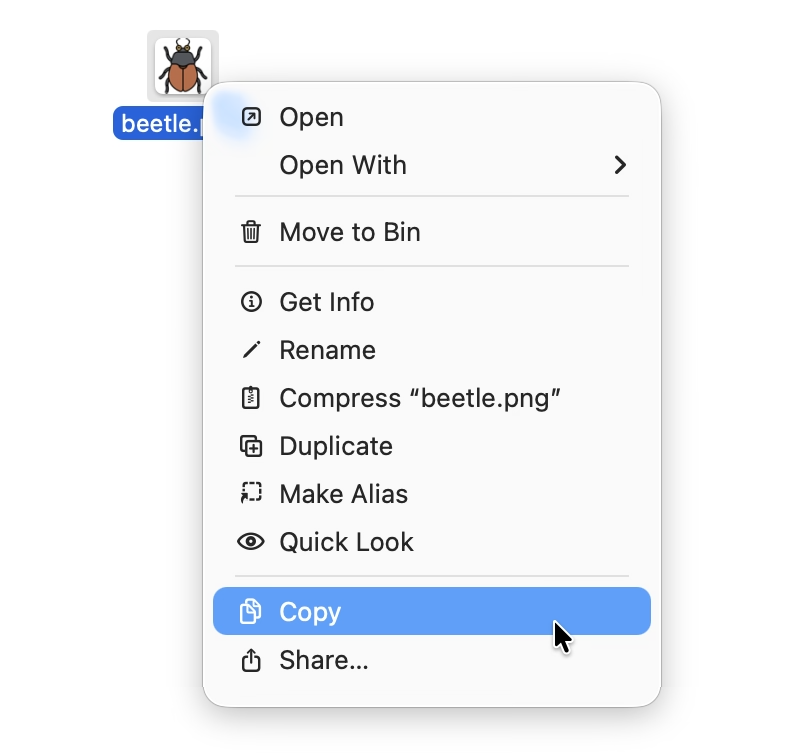
Exercise 1.6 Add your own image to the actor object now. You can, for example, do a web search for "beetle icon", find an appropriate image, and copy it. (The image does not need to be an animal. It could be a car, or a spaceship, or anything else that moves.) To copy the image, you can either copy it straight out of your web browser, or save it to your disk first and then copy it from there. Figure 1.4 shows the context menu of a local file with the "Copy" operation selected. This menu will look different on different operating systems, but you should be able to find the copy operation and use it. After copying the image, paste it into the Actor parameter.
Once you have pasted in your own image as the actor image, try running the program again. You should now see the new actor on screen. If you have left the line of code that creates the fish actor in place, you may also see the yellow fish. Both actors will, however, be drawn in the centre of the screen, so if your new actor is larger than the fish, its image may entirely cover the fish image.
It is quite possible that your new image does not look exactly as you would like it to. For this situation, Strype offers some simple image editing functions to adjust the image to make it more appropriate for our task. When you hover the mouse pointer over an image in the Strype code, you will see a preview of the image with an option to open a simple image edit function (Figure 1.5). Here, you can adjust the image for your project. If you need more sophisticated image editing functions, you can of course always use a separate image editing program before using the image.
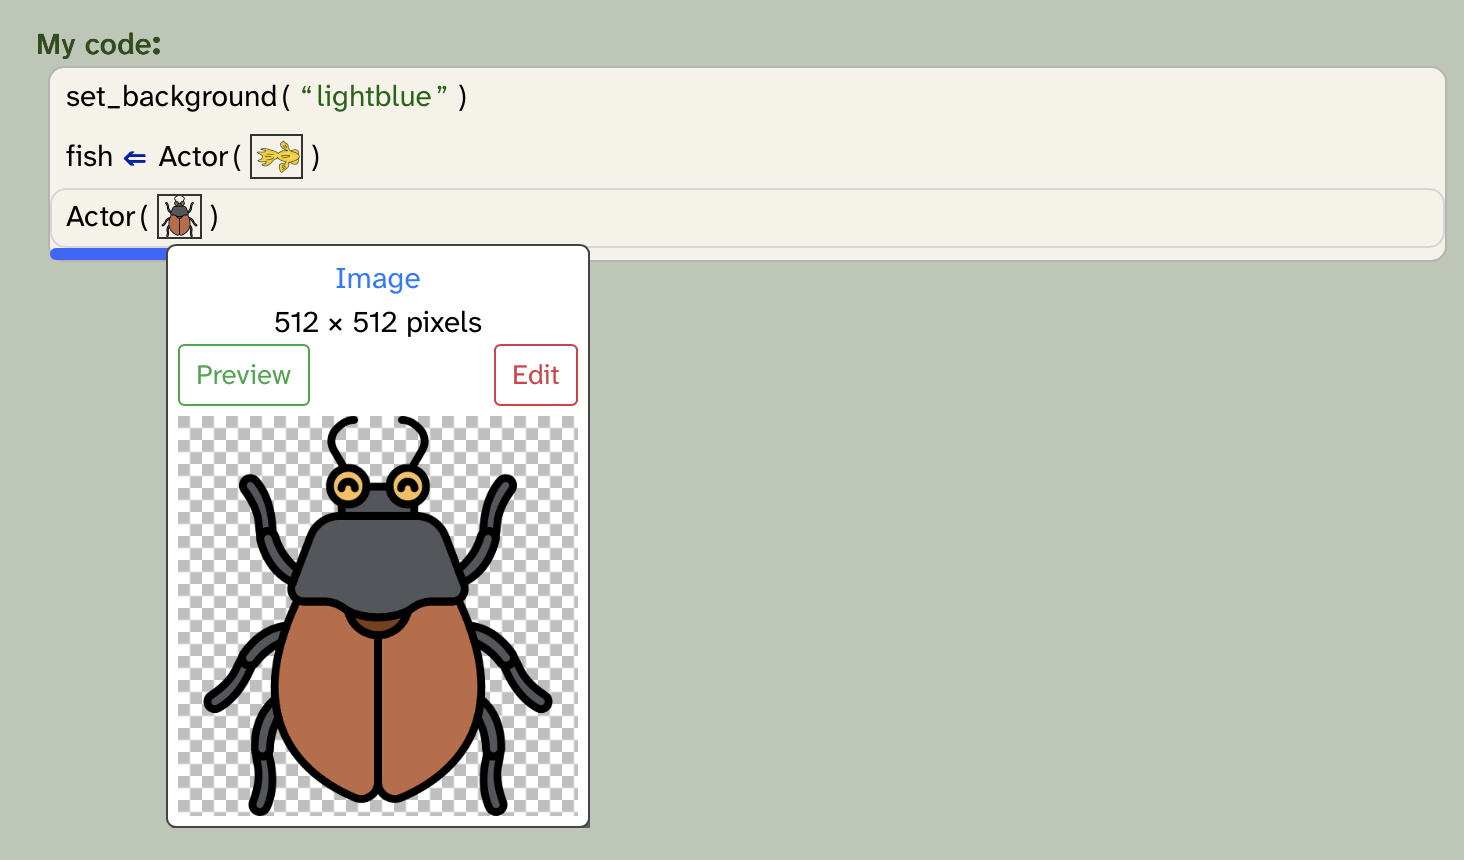
You almost always want actor images that have a transparent background, so that you can correctly see your world’s background behind the actor. You should use images of type PNG or WEBP to do this. JPEG images do not support transparent backgrounds.
1.2.5. The world coordinate system
When we placed our second actor into the world, we saw that they are both drawn on top of each other in the centre of the graphics world. We can change this by assigning initial coordinates to a new actor:

The two additional parameters to the actor specify x and y coordinates for the positioning of the actor. You have probably encountered such coordinates in mathematics; x is the horizontal position and y is the vertical position. Here, the actor is placed at x-coordinate 200 and y-coordinate 100. The coordinate system of the graphics world reaches from -399 to 400 in the horizontal (x) dimension, and -299 to 300 in the vertical (y) dimension. It is shown in Figure 1.6).
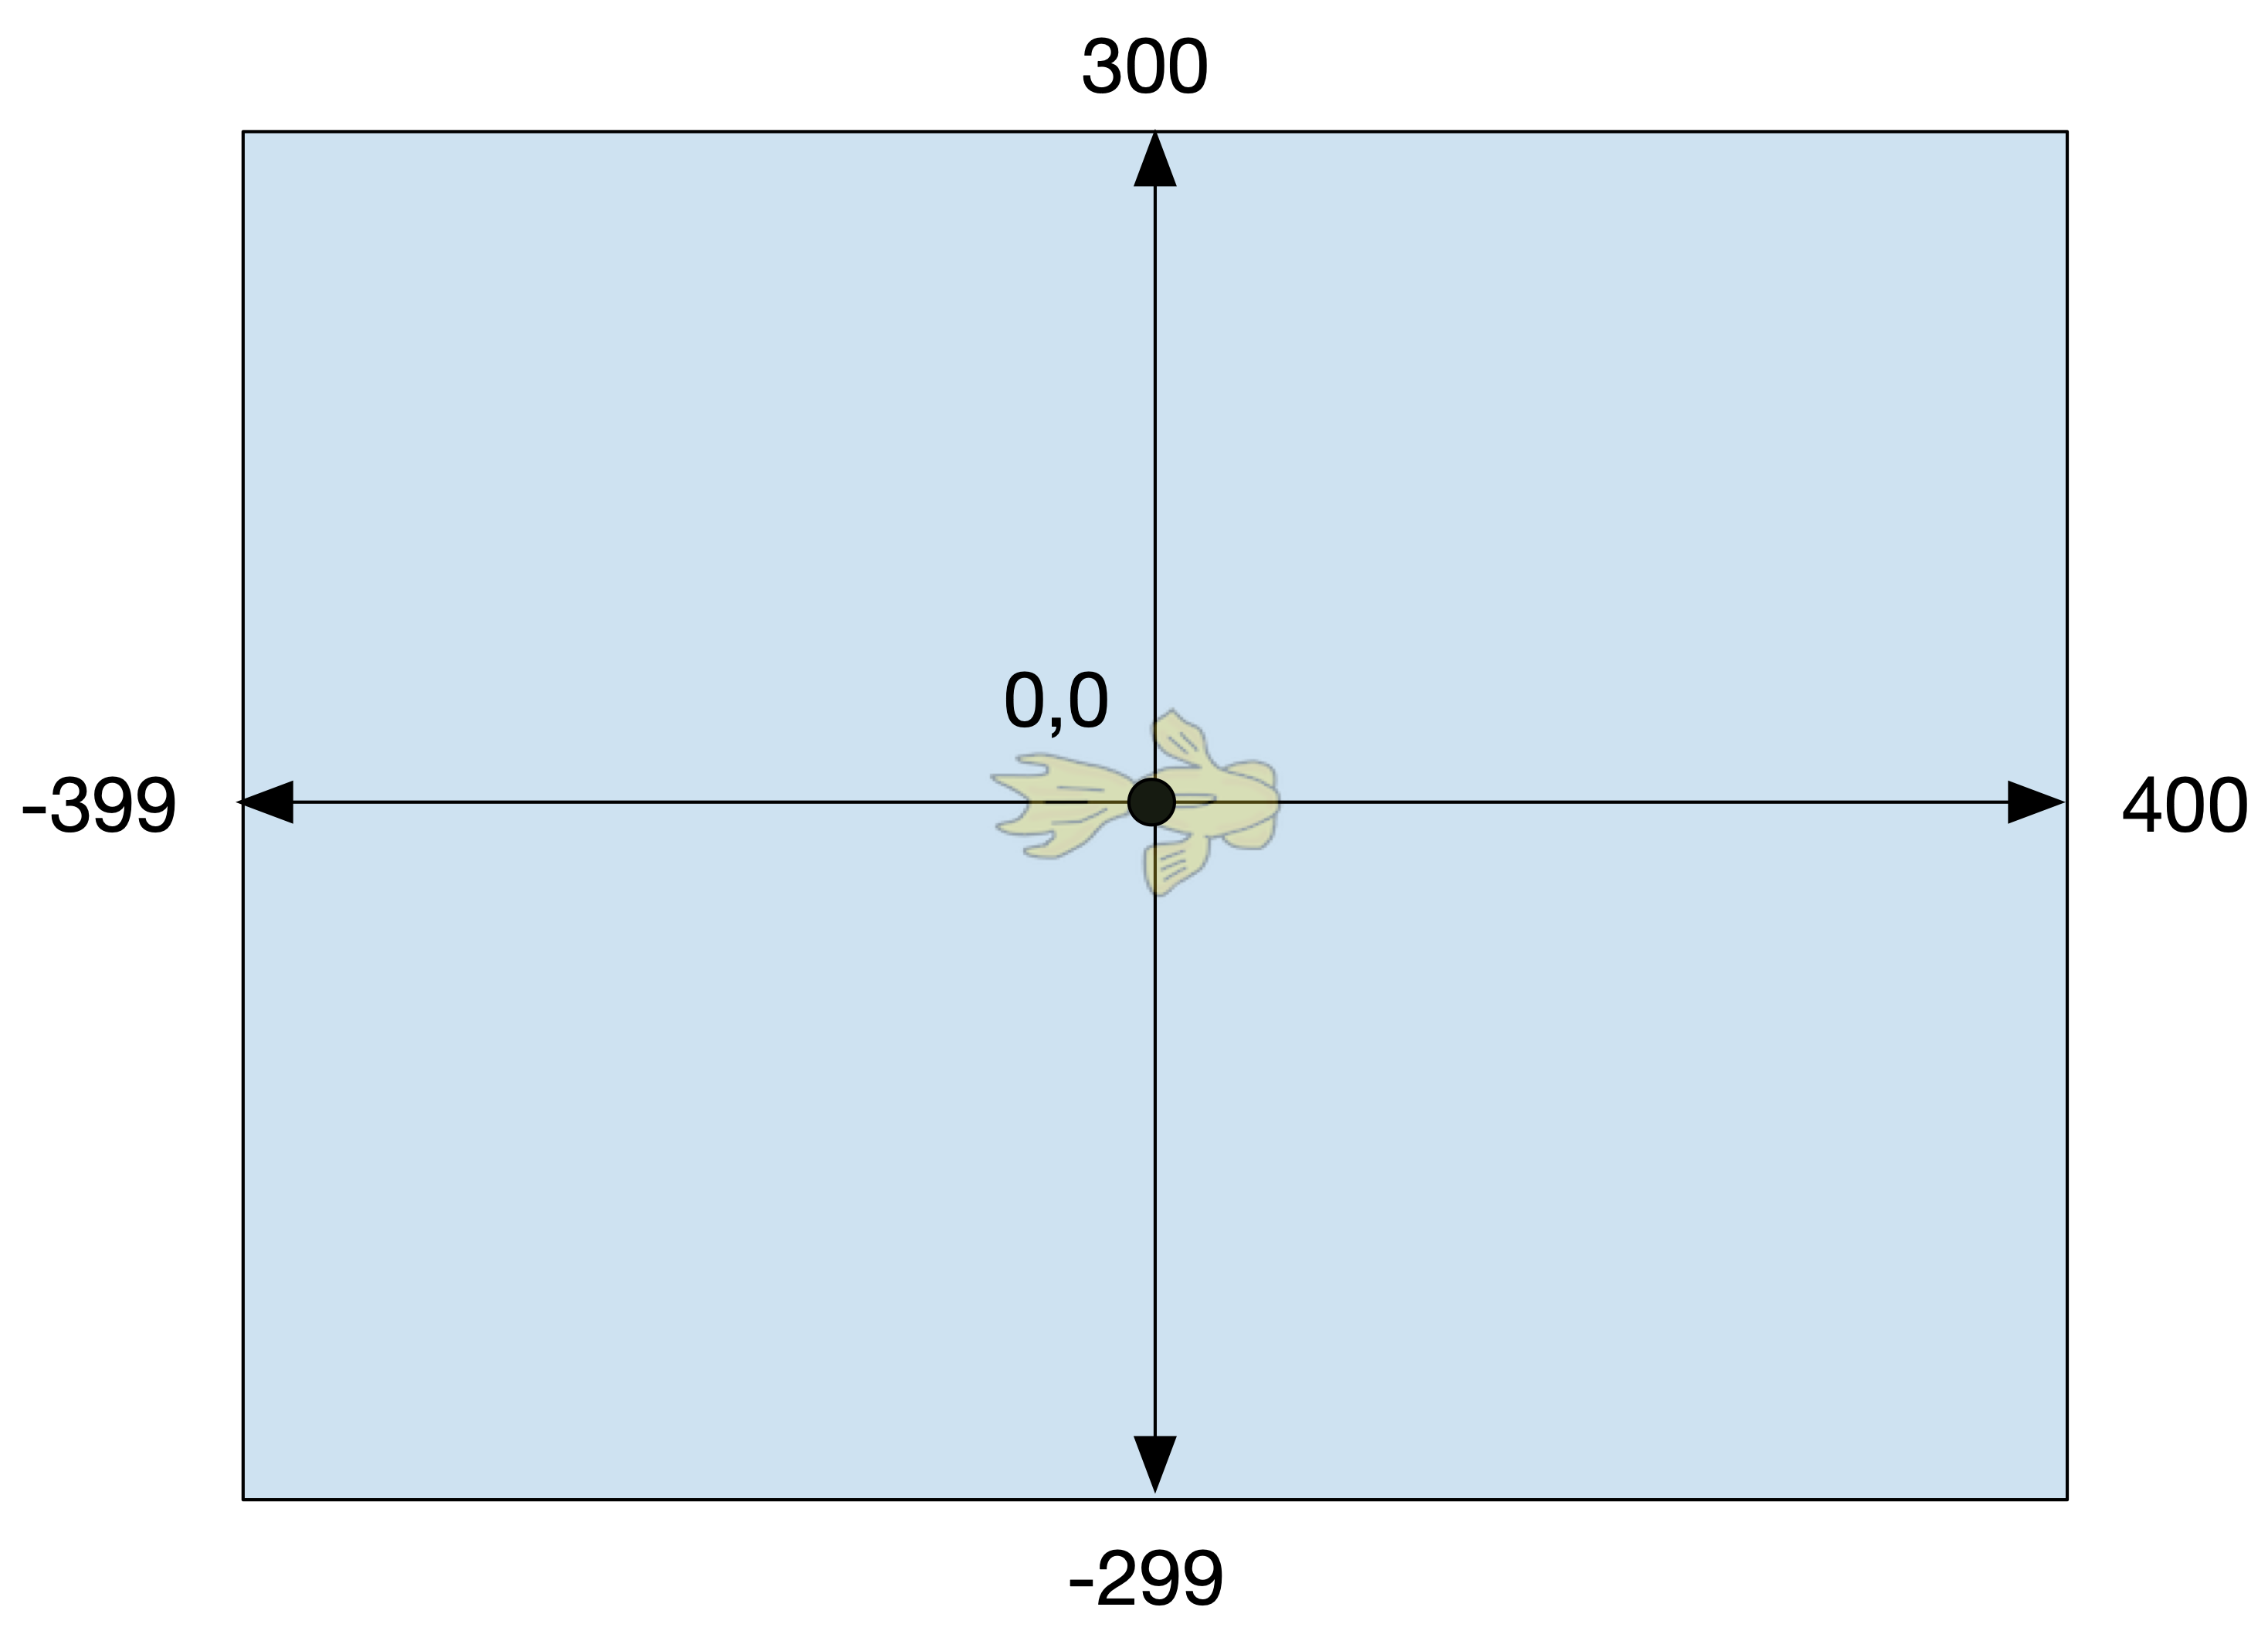
World coordinates: You may wonder why the negative edge of the world is at -399 for the x-coordinate, and not at -400 (with a similar difference for the y-coordinate). Would it not seem more consistent to make it -400 to 400? The reason is that the size of the world is 800 x 600 pixels, which is a commonly used aspect ratio. With coordinates ranging from -400 and -300, the size would actually be 801 x 601, because zero is also included. The coordinates are as they are because of the fixed 800 x 600 world size.
Exercise 1.7 Place your own new actor into the world somewhere near the top left corner, using the coordinates as shown above.
We have now reached a point where we can create actors, give them images and place them into the world at a specific location. However, currently our actors do not actually do anything. And that makes our project uninteresting. So let us now work on some code to make the actors move and react, so that we can turn this project into a simple game.
1.3. Actor movement
When we compare the two lines we currently have in our program to create actors, we can see that they look different:

The different is not only the additional coordinates that we have specified with our second actor, but also the arrow symbol and name (fish) that we have used in the first line. This is called an assignment, and we will investigate this next.
The purpose of this is to keep a reference to our actor object, so that we can continue to work with it afterwards. When we create an actor in a line on its own (as in our second line above), the actor object is created, it is automatically placed into the world, and that is all that happens. After this statement, we do not have access to the actor anymore, and we cannot directly work with it further.
This is why we often use an assignment to assign the actor to a variable, which allows us to continue working with this actor. Let us investigate what this means.
1.3.1. Variables and assignment
We can enter an assignment frame into our code by typing the '=' key. When we enter the frame, it looks like this:

The effect of an assignment frame is that it creates a variable and stores a value into it. A variable is a bit of storage that allows us to store some information, and to access and use it again later. Variables have names – this is how we refer to them – and store a value.
A variable is a bit of storage space that allows us to store a value and retrieve and use it again later. Variables have names, which are used to refer to them.
We can see that the assignment frame has two slots which we must fill in. The slot on the left is labelled "identifier". This is a technical term that means a "name for this variable", so here we can provide the name. We can make up this name, and we usually choose a word that describes what we will store in this variable.
The right hand side of the assignment has a slot labelled "value". Here, we can specify what we want to store in the variable.
Some examples of assignments to variables are:
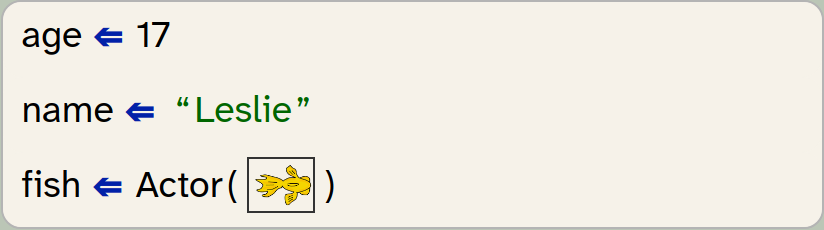
We can see from these examples that we can use variables to store different kinds of thing. We can store numbers, or we can store text (words, or whole sentences), or we can store actor objects. We will see later that we can also store all sorts of other things – we will get to that in due course.
An assignment stores a value into a variable.
We can then use the value stored in that variable just by using the variable’s name. For example

will print out the contents of the 'age' variable (which will be 17 after the assignment which we made above). Compare that with the statement

This statement would print out the word "age". Note the difference: the quotation marks around the word "age". If we print "age" with quotation marks, we are printing the word "age". If we print age (without quotation marks), we are referring to our variable named age, so we are printing out the value stored in this variable: 17.
Now that we have seen the first basics of variables, let’s get back to our yellow-fish project.
1.3.2. Making the actor move
We can now properly interpret the two lines of code we have seen before:
The first line creates an actor with a fish image and assigns it to a variable named fish, while the second line creates an actor and does nothing further with it.
We want to do further actions with our actor, so we need to assign it to a variable. But we do not need two actors at the moment, so we can delete one of the actors again. For this book, we will continue to use the fish actor, but you are welcome to use your own actor for the remainder of this project while you read on.
Exercise 1.8 Change your code again so that only one actor is created and assigned to a variable. The actor should use your own selected image. Rename the variable so that it correctly describes the type of actor that you have chosen. (For example, if your image shows a beetle, you might like to name the variable beetle, if it is a car, name it car. Whenever we use our fish variable in the remainder of this chapter, you should then use your own variable.)
Now that we have our actor, and we have stored it in a variable, we can make it move:

Try this out with the following exercise.
Exercise 1.9 Add the line of code which makes the actor move (shown above) to your own code, after the actor has been created. You can do this by adding a function call frame, typing fish.move as the function name, and adding the parameter. Run your program. What do you observe?
Exercise 1.10 Change the parameter from 8 to 300. Run your program again. What do you observe?
After the first exercise, you will probably notice that the fish does not appear to move. This is because the parameter is in pixels. Eight pixels is a very small distance on screen, so when you ran your program, the fish was shown and then – very quickly – moved eight pixels to the right. But this distance is so small, and the movement so quick, that it is hard to notice it at all.
In the second exercise, the distance we have used is larger, so we can see that the fish is now at a different place. But again, the movement is so quick that we do not really see the fish move. If we want to turn this project into a game, we need our fish to move more slowly.
Before we go on to do this, a little more terminology: A function that is called on an object, such as the move function above, is called a method. Objects have a fixed set of methods, and we shall see over time what kinds of methods our actors have, and what we can do with them.
Methods are called by specifying the object, a dot, and the method name and parameters.
A function that is called on an object is called a method. Methods are called by specifying the object we want to call, a dot, and the method name and parameters.
1.3.3. Controlled movement
We have seen in the previous exercises that calling the move method moves the actor very quickly. If we want to have slow, visible movement, we need to move the actor repeatedly, in small steps. We can do this by placing the move method call into a loop:
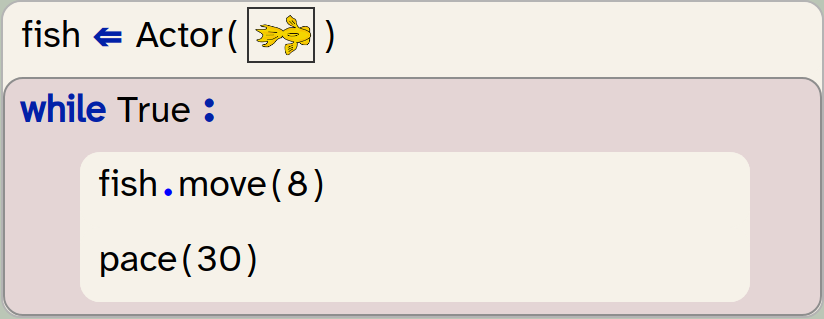
Exercise 1.11 Add a while loop to your program to create the code shown above. Also add the call to the 'pace' function as shown above. Run your program. What does it do now?
If you have a statement in your code, and you want to place it into a loop, you have two options: You can either insert the loop frame into your code and then drag your statement into the loop body with the mouse. Or you can select your initial statement (use shift-arrow-down) and then insert the while loop – this will surround the statement with the loop.
Let us look at this code a bit more closely. The while statement which we have just inserted is a loop statement: it repeats the statements inside it over and over again. Since the fish.move method call is inside the loop, it will be executed over and over, many times. Thus, we move the fish eight pixels to the right, and then more it eight pixels again, and so on.
If we did this without the pace function in our loop, this would still be so quick that we would not see the fish move slowly. (Computers are fast – try it out!) The pace function, however, has the effect of slowing down the loop. To be precise: the parameter of the pace function specifies how quickly the loop should run. A parameter of 30 means that the loop will run 30 times per second. This is a good speed to actually see the movement of the fish as a smooth movement across the screen.
Note that because we now have a program that runs forever, when we want to edit it again, we need to manually stop the execution. You will see that the Run button becomes a Stop button; click the button while it says Stop in order to stop the execution and return to editing the program.
Exercise 1.12 Experiment with different parameter values for the pace function. Also change the parameter to the move function to different values. You will see that you can use either one to change the speed of movement of the fish on screen. What is the difference between changing one or the other value?
The loop we have used here is called a while loop, because it starts with the keywork while. It has the ability to repeat a set of statements several times.
In the slot after the word while, we can specify how long we want to loop to run for. Using the word True here has the effect that the loop will run forever (or at least until we stop the program). We will see a bit later how we can use more sophisticated loop conditions to write loops that run a specified number of times.
Running our loop forever has the effect that the fish keeps moving until it hits the edge of the world. In Strype, actors cannot leave the world, so the fish gets stuck at the edge – every further attempt to move in that direction has no effect, but the program will keep running until we stop it.
Exercise 1.13 Actor objects also have a method called turn, which also takes one parameter. The parameter is a number, and specifies the angle to turn in degrees. Try out this method: replace the fish.move method call with a call to fish.turn, and run your program. What do you observe?
Exercise 1.14 Experiment with different parameter values for the turn method. What value gives you a nice, slow turning motion?
Exercise 1.15 Can you make the fish turn the other way?
Exercise 1.16 Try inserting the call to the move method back into the loop, so that you have a call to the move method and a call to the turn method, following each other. What does the fish do now? Try to predict this before trying it out.
Exercise 1.17 What would you have to change to make the fish swim in a larger circle? Try it.
The program that we have written so far is available in the book projects as yellow-fish-v2. If you have written your own program while reading this, keep using your own program. If you want to compare your program with ours, you can look at this version, or use this one as a starting point for the next exercises.
1.4. Keyboard control
The next obvious step towards our goal to turn this into a game is to give us control: We would like to control the fish with our keyboard, so that it can become our player character. That’s what we will do next.
Our plan is to use the left and right arrow keys to control the fish: If the left arrow key is pressed, we want the fish to turn left, and if the right arrow key is pressed, it should turn right.
Luckily, Python has a statement to express exactly this: an if-statement.
An if-statement is an instruction that allows us to execute a set of statements only if a certain condition is true.
Modify your program so that the loop looks like this:
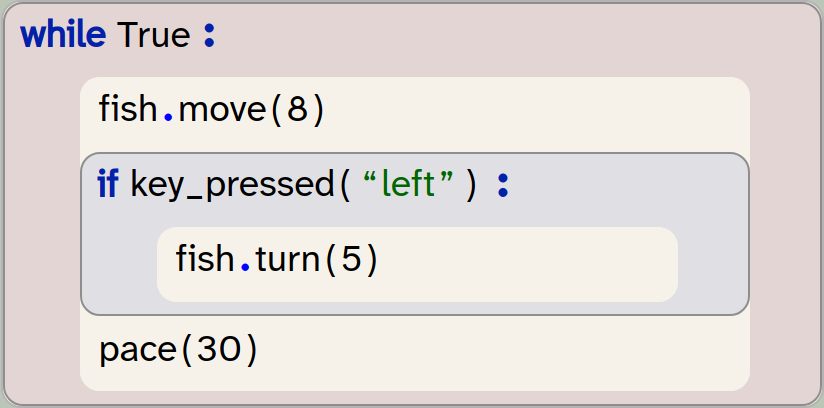
In this code, we have added an if-statement into the loop, and using this if-statement, we make the fish turn only if the left arrow key is pressed down.
When you insert a frame for an if-statement into your code, it looks like this:
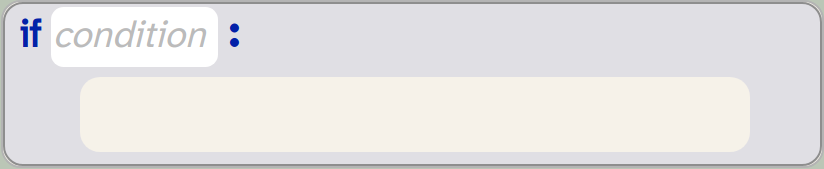
We can see that this frame has two slots: a text slot for the condition and a frame slot for the statements that should be executed if this condition is true. This frame slot is also called the body of the if-statement.
An if-statement has two slots: the condition and the body.
In our loop, we use a function call as the condition: key_pressed. This function takes as its parameter the name of the key we want to check, and returns true if this key is currently pressed down. If it is true, then it executes its body to make the fish turn.
If the condition is false, then the body is not executed, and the fish does not turn.
Exercise 1.18 Insert this code in your own program. Test it. This should work – if you see any errors, fix them.
All keys on the keyboard have names that we can use with the key_pressed function. The name of the character keys is just their character (so the a-key is called "a", and so on) and other key names include "left", "right", "up" and "down" for the arrow keys, and "enter", "tab" and "backspace" for some of the others.
Using this, we can now add a second if-statement to make the fish turn right when the right arrow key is pressed.
Exercise 1.19 Add a second if-statement to your code, immediately following the first one. Use this statement to make the fish turn right when the right arrow key is being pressed. Test your program.
You can find this version of the program in the book projects as yellow-fish-v3.
1.5. Summary
In this chapter, we have jumped into the start of our first Python program: a simple animated game. So far, we only have the beginning of the game implemented: a moving graphical character that we can control with our keyboard.
We will continue developing this game further in Chapter 3, and if you are really keen to continue with this project, you could jump ahead and continue reading there.
In this book, however, we will first take a moment and look more closely at the language constructs we have encountered so far. We have seen quite a few: function calls, parameters, variables, assignments, objects, methods, if-statements and while statements.
That is a long list!
We have had a first contact with each of these constructs, and we can roughly understand what they do, but there is more to learn about each of them. So we will now – in Chapter 2 – have a closer look at each of these constructs to deepen our understanding, before we get back to completing our yellow-fish game.

-
Sometimes we will tell you "run" a program, or to "execute" a program. These mean the same thing — you do this by clicking the "Run" button.
-
A function call is a Python statement that executes a function that is defined elsewhere. It consists of the name of the function and a parameter list in parentheses (another word for round brackets, like the ones around this text).
-
A parameter provides additional detail information to a function. Parameters are written in parentheses, with multiple parameters separated by commas.
-
A variable is a bit of storage space that allows us to store a value and retrieve and use it again later. Variables have names, which are used to refer to them.
-
An assignment stores a value into a variable.
-
A function that is called on an object is called a method. Methods are called by specifying the object we want to call, a dot, and the method name and parameters.
-
An if-statement is an instruction that allows us to execute a set of statements only if a certain condition is true.
-
An if-statement has two slots: the condition and the body.

At the end of most chapters, we will suggest additional projects which you may like to try out at this stage. These projects will not be discussed in detail, and it is up to you to study them, decide what you would like to do with them, and take them forward. They are designed to give you some ideas what you can do with the constructs you know now. They can generally be approached with the knowledge you have at this stage in the book (and sometimes require looking something up on your own). You should take these projects as suggestions and ideas what you might do – in either a new project, or to add to an existing project of yours – not as rigid specifications.
Pong
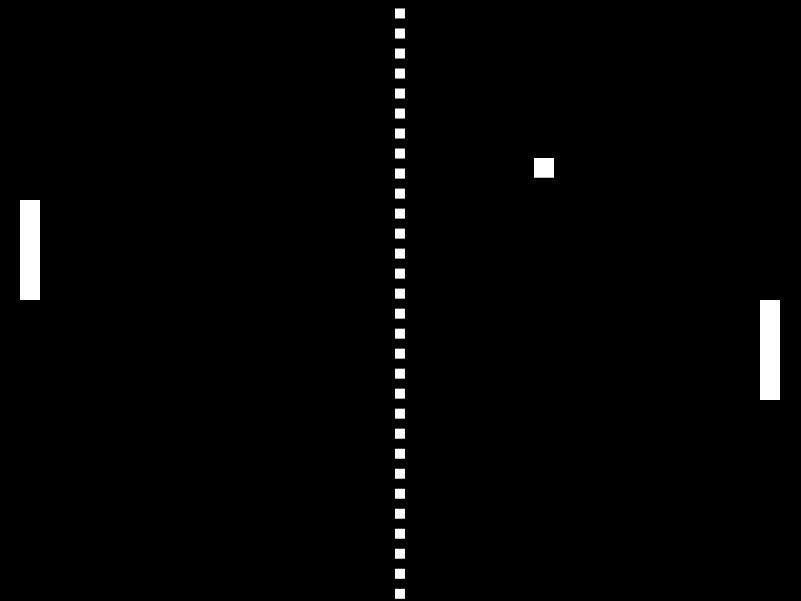 Pong is a very old-school, classic arcade game. If you have not seen it before, you can find out about it by doing a web search for "pong game".
You can find a starter project in the book projects under the name pong-classic. This shows you how to do two-dimensional movement (up/down only), by directly setting the x/y-coordinates of an Actor, instead of using the move method. You can take it from here.