Chapter 3. Creating a game
In Chapter 1, we started experimenting with the graphics functions built into Strype, with the aim of turning our yellow-fish into a simple interactive game. In this chapter, we will continue this project and finish our first version of the game.
If you have completed all the tasks in Chapter 1, you can continue with your project from that chapter. If you would like a fresh start, you can use the yellow-fish-v3 project from Chapter 1 of the book projects as your starting point.
3.1. The plan
To make this game even a little bit interesting, we need to have a task, a goal, and some danger. For our yellow fish, we have already seen how we can make the fish the player character by letting the player control the movement of the fish. The task will be to eat: We will introduce some shrimp to our game, which the fish can eat. The goal of the game then is to eat all the shrimp on screen.
To make this a bit more interesting, we will also add a shark: the shark likes to eat fish, so we need to stay away from it, otherwise we will be eaten by the shark. The aim of the game then is to manage to eat all shrimp without being first eaten by the shark.
3.2. Adding food
Our first task is to add some food to the game: a shrimp in our case. We can start by adding one single shrimp. This should now be quite easy: We can add a line of code to add the shrimp immediately after the line that adds the fish, with a very similar structure. We just use a different name for the variable, different coordinates and a different image:

Of course, if you have changed your player character and image in this project to a different actor, you can choose a different kind of actor for the food as well. If your player is, for example, a turtle, then the food could be a lettuce. Or if your player character is a spaceship, then the second character could be an astronaut. (In that case, it is not "food", and the player is not "eating" the second character, but rather picking them up from space.) You get the idea: whatever your game scenario is, choose an appropriate image for your second character. Whenever we write "shrimp" in the remainder of this chapter, use your own character instead.
In case you would like to stick with our fish/shrimp theme, you can find a shrimp image in the Chapter 3 section of the book projects in Strype (use the "Book…" option in Strype’s fold-out menu, go to Chapter 3, and copy the image from there).
Exercise 3.1 Add a shrimp to your project. Place it at a different location from the fish. Test to make sure that the fish and shrimp both appear on screen.
Exercise 3.2 Add a second shrimp at another location. Then add a third one.
3.3. Repetition - the for-loop
Let us say we would like to have 15 shrimp in our game. We could now go ahead and duplicate the line that creates the shrimp another 14 times, each time changing the world coordinates to different values. This would work, but it would be tedious.
Computers are good at doing things repeatedly, but that does not mean that we should need to write the same statement repeatedly. We can just tell the computer to execute a statement 15 times. (This will become even more important later on when we will execute statements not 15 times, but thousands of times. In that case, it is really not practical to write all the statements out one by one.)
 A loop is a statement that can execute a statement (or a set of statements) repeatedly, potentially many times. The loop body contains the statements which we wish to repeat, and the loop header determines how often it should run.
The type of Python statement to do something repeatedly is called a loop. Python has several different kinds of loop statement, and the one we will use here is called a for-loop. It looks like this:
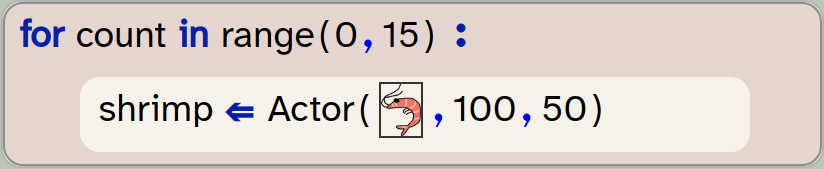
Exercise 3.3 Remove all but one of the statements that create the shrimp. Place the remaining one in a for-loop as shown here. Run your program. What do you observe?
Exercise 3.4 How many shrimp are created by this loop? How many shrimp can you see on screen? Can you explain what you see?
The for-loop executes the statements within it repeatedly. (There can be more than one statement in the body.) How often it executes depends on the header of the loop. The loop we see above counts from 0 to 15, and for each count executes the loop body (the statement with in the loop) once.
Let us discuss this in a bit more detail. The empty for-loop frame looks like this:
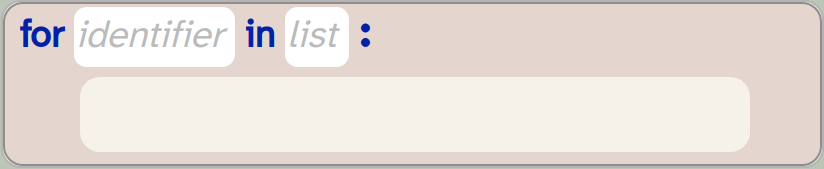
In the place of the expected identifier, we can write the name of a variable we want to use for counting. We can make up the name for the variable ourselves, and a variable with that name will be created. In our example above, we have used count as the variable name, but we could have named the variable anything we like. (In programming, the variable name i is also often used as a loop counter.)
In the 'list' slot, a list of numbers is expected. Here, we use the range function: this function creates a list of numbers from a lower bound to an upper bound. In our case we have used 0 and 15, so we will get a list of numbers from 0 to 15. One important detail to be aware of is that the range includes the lower bound, but excludes the upper bound. So strictly speaking, the numbers we get are 0, 1, 2, …, 14. This suits us well, because it means that we are getting 15 different numbers (0 to 14), and the loop will run 15 times.
When the loop executes, it first assigns the first number (0) to the loop variable count and then executes the loop body once. Then it assigns the second number (1) to count and executes the body again. Then again for the third number, and so forth.
Once it has done this for the last number, the loop body will have been executed 15 times. For each run of the loop body, the count variable has a different value, and we can use this value to our advantage to solve our next problem.
A for-loop is a type of loop statement that uses a counter variable (called the loop counter) and a list. It executes the loop body once for each item in the list.
3.4. Using the loop counter
In the last exercise above, you will have noticed a problem: The code created 15 shrimp, but they were all placed at the same location. Because all shrimp were drawn exactly on top of each other, it made it look as if there was only one.
We can fix this by placing each shrimp at a different location. How do we do that if all 15 shrimp are created using the same statement?
The answer is not to used fixed values for the x- and y-coordinates, but to use variables instead.
As our first try, let us use the loop counter variable as the coordinates for both the x- and y-position:
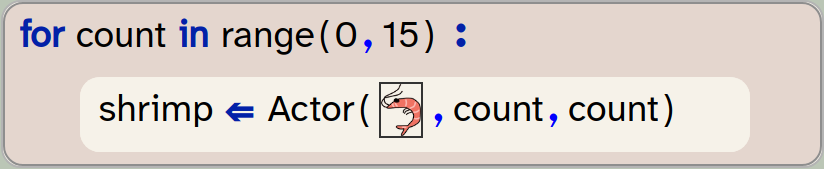
Using this code, the x/y coordinates will be 0,0 for the first shrimp, 1,1 for the second, and so on. This way, the shrimp are not all drawn at the same location.
Exercise 3.5 Implement the loop as shown above, using the count variable. Run your program. What do you observe? Explain what you see.
Exercise 3.6 To space the shrimp out more, multiply the count variables by 20 when you use them for the coordinates. That is: write count * 20 as the actual parameter for the x- and y-coordinates.
Exercise 3.7 Experiment with values other than 20 for the multiplication.
Exercise 3.8 What effect does it have if you use different multipliers for x and y?
Exercise 3.9 Make the row of shrimp start from the left edge of the screen.
Exercise 3.10 Arrange the shrimp in a straight line from the top left corner of the screen to the bottom right.
Exercise 3.11 Python allows us to call the range function with only one parameter, for example range (15). In this case, the parameter is the upper bound, and the lower bound is automatically set to zero. Change your program to use the one-parameter version of this function call.
In the exercises above, we have seen that we can use the * symbol for multiplication. Python has built-in operators for many frequently used mathematical operations; you can see a list of all available operators in Appendix C: Python operators.
For the purposes of our game, being able to place the shrimp at different locations is good, but placing them in such a regular pattern seems odd in our context. So let us make the next improvement: Let’s place the shrimp at random locations.
3.5. Creating random behaviour
Often, we want an element of randomness in our programs. In our case, we would like to place our shrimp at random locations, but we may also want other characters to move randomly, or have interesting things happen at random times. Randomness makes our game less predictable, and thus more fun to play.
In computer programs, all random behaviour is based on random numbers. Python can create random numbers, and we can then write code to translate this into any kind of random behaviour we need. We will see an example here for the random placement of the shrimp, and another example later in this chapter, when we want to make our shark move randomly.
3.5.1. Generating random numbers
Python provides a function called randint to generate and return random integers (whole numbers). We can call this function to receive a random number and assign it to a variable. For example, we can write an assignment statement like this:

The function call to randint returns a random number, and we assign this number to a variable called x.
The function takes two parameters, which are the lower bound and the upper bound of the random numbers we wish to receive. Both bounds are included in the possible range, so our example will produce numbers between 5 and 19, inclusive.
Python provides functions to generate random numbers. The randint function provides a random integer from a given range.
Exercise 3.12 Add the assignment statement with the randint function call to your own code, inside the for-loop. Run your program. What do you observe?
The exercise above shows us that we are not quite done yet: The code produces an error that tells us that randint is not defined. This is Python’s way of telling us that it does not know the randint method.
The reason for this is that the randint method is defined in a library. Python provides so many functions for different purposes that it might get confusing to make all of them available all the time. Instead, they are arranged into libraries, which we can import when we need them. Each library contains a set of functions for a specific purpose. Python provides a set of libraries by default with the language – these are referred to as the standard libraries. They are always available in every Python system. Other libraries can be added with explicit statements.
To make our randint function work, we have to first import it from a library.
3.5.2. Importing from a library
When we import from a library, we have the option of importing all the definitions in that library, or we can import specific functions.
We have seen an example of the first option in Chapter 1, when we looked at the import of the Strype graphics library. We saw the following import statement in the Imports section of our program:

In this case, we used the asterisk (*) to specify what we wish to import, which is a symbol meaning "everything". Thus, we imported the entire Strype graphics library.
We can now add the following statement to our Imports section:

This statement shows us that Python has a standard library called random (which contains various functions dealing with random numbers), and from there we can import a function called randint. In this import statement, we import just a single function from the library.
As a general rule of thumb, we should import separate named functions whenever we need just one or two functions from a library, and we import everything when we need access to a large number of definitions from the same library.
Exercise 3.13 Add the import statement for randint to the Imports section of your program as shown above. Run your program. This should now work. If it does not, then you made an error that you need to fix. You will not see any effect of the random number yet, but you should not see an error either.
3.5.3. Random placement
It is now time to use our random numbers for random placement of our shrimp.
Exercise 3.14 Add a second assignment of a random number to a variable. This time, call the variable y. Add this line directly below the assignment to x. Make sure both lines are inside your for-loop.
Exercise 3.15 Use your variables x and y as the actual parameters for the x- and y-coordinates in the creation of your Actor.
Exercise 3.16 Experiment with different values for the upper and lower bounds of your random numbers. Remember that the x-coordinates of the Strype world range from -399 to 400, and the y-coordinates from -299 to 300 (see Figure 1.6). What would be reasonable bounds for your random numbers?
Exercise 3.17 Start and stop your program multiple times to convince yourself that the shrimp are placed in different random locations each time.
If you have successfully completed the exercises, you now have a version of your program that has a keyboard controlled player character and several actors of a second type at random locations. If you would like to compare your version to ours, you can find a version of the program in this state in the book projects as yellow-fish-v4.
In our version, we have made one additional change: instead of defining the variables x and y and assigning random numbers to them, we have written the call to the random number function directly into the parameter list of the Actor creation:

This is an alternative way to achieve the same thing: we can write a function call that returns a value directly into a parameter list, and the result of the function will be used as the actual parameter.
Which version of the program you prefer is a matter of personal preference – both are good ways to achieve the same goal.
3.6. Collision detection
The next task we wish to implement is the eating of the shrimp: When the fish swims across the shrimp, the shrimp should be removed from the world.
What we need here is technically called collision detection: We want to know when one actor (the fish) touches another actor (a shrimp).
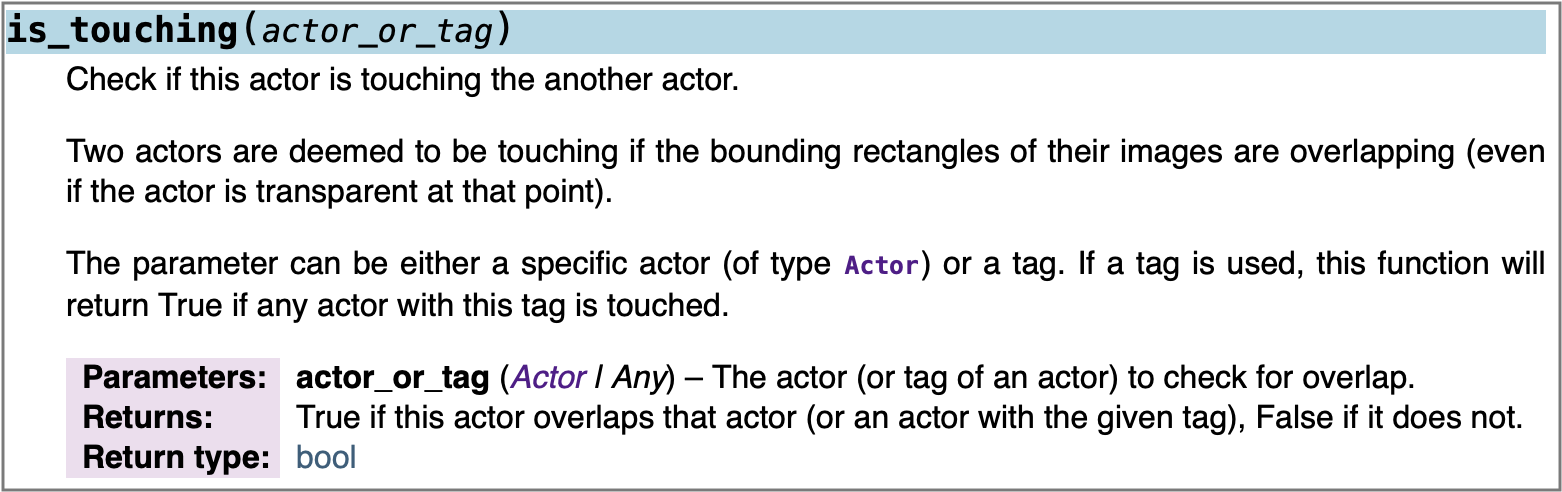
is_touching methodThe Strype graphics library provides a method to help with this: the is_touching() method from the Actor class. Figure 3.1 shows the documentation of this method (you can also find this in the library documentation in Strype).
We have previously discussed how to read the header of the method: We know to use the method name to invoke this method, and to provide a matching number of parameters. Let’s first take a closer look at the parameter of this method.
We can see that we can provide either an actor (using a variable that holds an actor) or a "tag" as a parameter. A tag is a label that we can provide for actor objects to identify them later. In our case, we wish to check for collision not just with a single actor, but with any of the shrimps. To achieve this, we will tag all shrimp objects as "shrimp" and then check for that tag.
Figure 3.2 shows the header of the Actor constructor, and we can see there that it has an optional fourth parameter: the tag we have just mentioned.

We can use this to attach a tag to our shrimp objects to identify them later:

The tag could be of any type, but it is most common to use a simple string to mark a set of actors so that we can easily recognise them later. In the method call to check whether we are touching a shrimp actor, we can then write:

and this call will return true only if we are touching an actor that was tagged with the string "shrimp". This would ensure, for example, that we are not eating other fish, should we decide later to introduce other fish into our game. Note also that this is a method – called on an object – not a stand-alone function, so we call it on the fish object. This makes sense, since it is the fish which wants to check whether it is touching another actor.
We should now also pay closer attention to the return value of the method. We already know that the documentation typically includes information about the general function of the method, and about its parameters. Here, we can see that the documentation also includes information telling us what the method returns to us.
Functions and methods may return a value to the caller of the function. This is called the return value. Like all data in Python, the return value has a type. This is called the return type of the function.
We have already seen earlier that some methods and functions return a result to the caller of the function. It is time to see how we can find out about this from the documentation.
Figure 3.1 shows two bits of information about the return value, in its two last lines. It first tells us what it returns, and then it tells us the type of the return value. The first line tells us that the method will return the value True if this actor touches a specified other actor, and False if it does not. The type in this case is a data type we have not discussed before: bool.
The boolean type (in Python abbeviated to bool) is a type that can only hold two possible values: True or False.
In Chapter 2, we have already seen the types str, int and float. To this list, we should now add our boolean type:
| type name | full name | used for | examples |
|---|---|---|---|
bool |
boolean |
true/false values |
|
When a method returns a value, we typically do something with that value. One option is to store it in a variable:

For method calls returning boolean values, we have already seen before that we can also use them directly in if-statements. Figure 3.3 illustrates this: The condition in an if-statement needs an expression that returns a boolean value (true or false), and our method call returns just such a value.
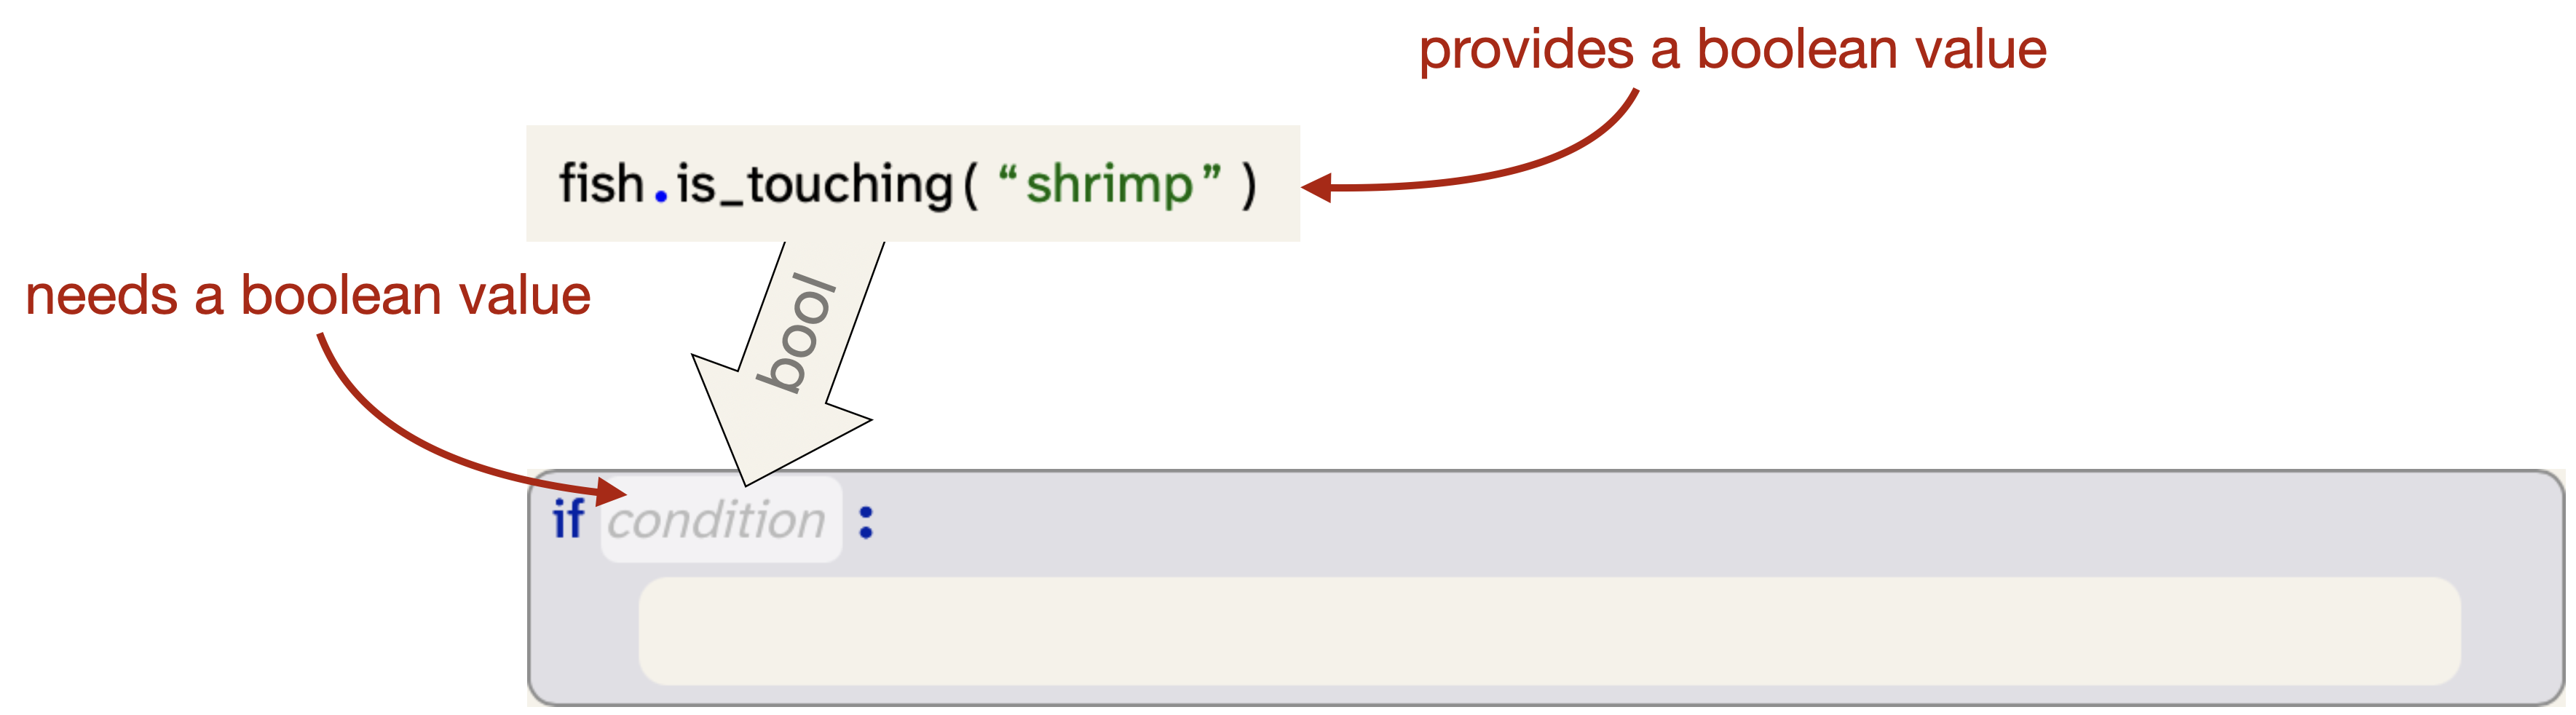
If you have done the exercises in Chapter 2, you have, in fact, made use of this before when you worked with the Fat Cat project. There, too, we used return values from method calls as conditions in our if-statements.
Exercise 3.18 Look through the documentation for the Actor class. What other methods can you find that return boolean values?
Exercise 3.19 What methods can you find in the Actor class that return int values?
Exercise 3.20 In your program, add the "shrimp" tag to your shrimp actors. You do this by adding an additional parameter to the creation of the shrimp, as shown above.
Exercise 3.21 Add an if-statement to your program to check whether the fish is touching a shrimp, as discussed. In the body of this if-statement, call the method fish.remove_touching("shrimp") to remove the shrimp if we have run into it. Where should this if-statement go?
Exercise 3.22 Test your program. The fish should now remove the shrimp when it swims over it. If this is not happening in your program, go back and check your code. Have you added the right tag to the shrimp? Have you used the same tag in your is_touching check?
Exercise 3.23 In the exercise above, we have used the remove_touching() method. What does this method do? What does it do when the actor is not currently touching another actor? What does it do when it is touching two other actors at the same time?
Exercise 3.24 If the fish touches two shrimp at exactly the same time, will they both be eaten? Explain your answer.
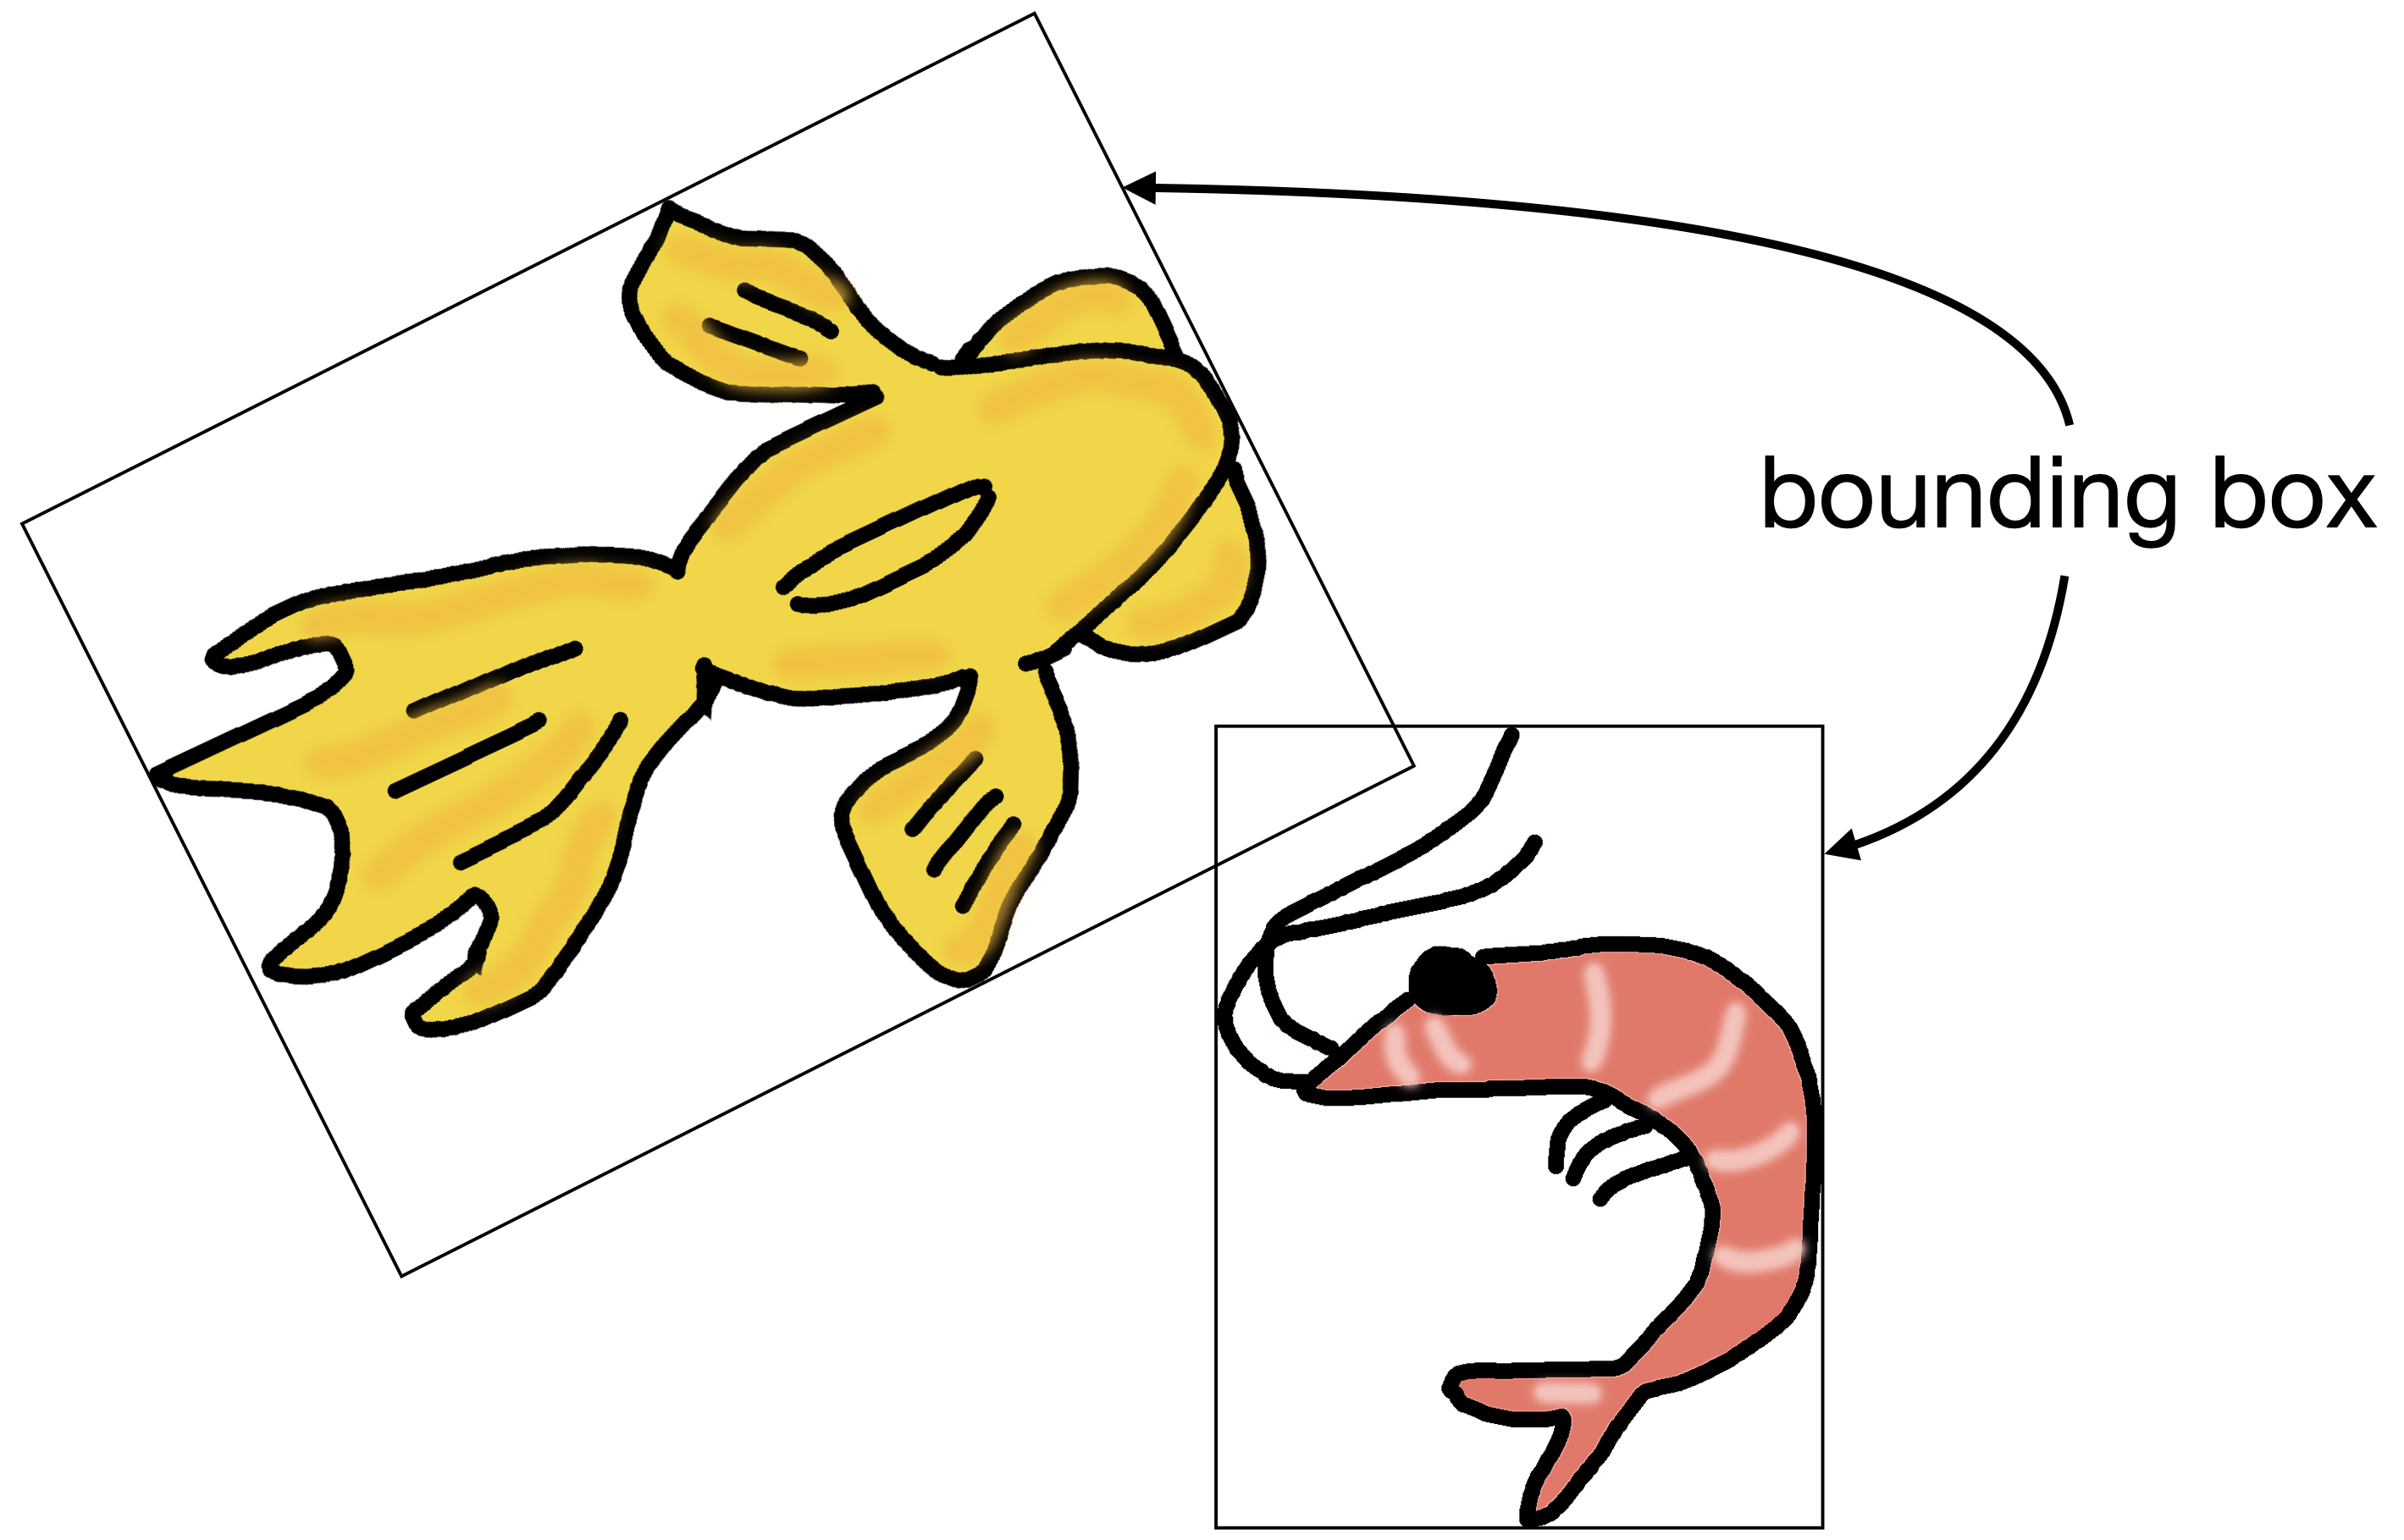
If you have watched closely when playing with your project, you may have noticed that often the shrimp disappear just before the fish seems to touch them. This has to do with how graphics are managed in many computer graphics systems (including Strype).
In Strype, even though images appear to have free form, all graphics drawn to the screen are, in fact, rectangular. Figure 3.4 illustrates this: it shows the bounding box of each image. The bounding box is the actual boundary of the graphic being painted. The image appears to be of arbitrary shape by using transparent pixels: the parts of the image where we do not want to show anything are transparent, making them essentially invisible. For the computer, they are, however, still part of the image, even though we cannot see them.
For the purposes of collision detection, two actors are "touching" when their images overlap. Since the invisible pixels are part of the image, this means that they are effectively touching when their bounding boxes overlap. The effect is that they are often technically "touching" even though the visible images do not touch each other.
 When you make your own images for use with actors, make sure to crop any unnecessary transparent area around the visible part of the image. If an image has transparent padding, it increases the size of the (invisible) bounding box and makes collision detection less precise.
3.7. Adding a predator
Now, let us make the game more interesting by adding a predator that hunts the fish: a shark. An image for this is in the Chapter 3 section of the book projects, but as always, you are free to use your own actor type and image for this. For example, if your player actor is a spaceship, then the "predator" might be an asteroid which you have to avoid hitting.
The beginning of this is easy: at the beginning of the game, where we create the fish and shrimp, we now add a line to create a shark:

Next, we add code into our main loop (after all the code dealing with our fish) to make the shark move:

It might be a good idea to make the shark move a bit faster than the fish to increase the challenge.
Exercise 3.25 Make the additions shown here to your own program: Add the shark and make it move.
Of course, at the moment the shark moves only in a straight line, and it gets stuck at the right edge of the screen. To fix this, we want to make the shark turn when it reaches the edge of the screen. The Actor class has a method to check for this: the is_at_edge() method returns True if the actor is at the edge of the world.
Exercise 3.26 Look up the is_at_edge() method in the documentation. What is its return type? What does it mean, precisely, to be "at the edge" of the world?
Exercise 3.27 In your program, after the method call that makes the shark move, add an if-statement. Use the shark.is_at_edge() method for the condition of the if-statement, and make the shark turn 15 degrees if it is at the edge.
Exercise 3.28 Is 15 degrees enough to turn away from the edge? Will the shark manage to turn enough to continue? Why not turn 180 degrees? Experiment with different degree values for the turn and see what the effect looks like. Explain what you see.
Next, we should make the shark eat the fish when they meet. So let us add some collision detection checking whether the shark touches the fish. This is now not too difficult, because it closely mirrors the code for the fish eating the shrimp:
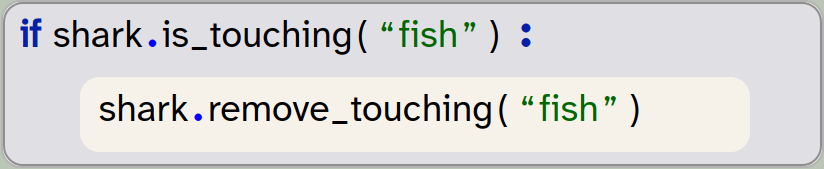
We need to remember, of course, to tag the fish with the "fish" tag when we create it, so that it will be identified.
Exercise 3.29 Add code to your main loop to make the shark eat the fish. Test your program to make sure this works.
We now have the beginnings of a simple game: We have a keyboard-controlled character that has a task and has to avoid being caught. (This version of the program is in the book projects as yellow-fish-v5.)
If you have programmed along with yout own images and characters, your story might, of course, be different: you might have a game where you control a spaceship that picks up astronauts, or you might be controlling a white blood cell that removes bacteria and tries to avoid a virus. You can see that very similar game playing code can be used to present different stories.
There are many ways in which we can now improve this game and make it more interesting, and we will suggest some in the next chapter.
3.8. Summary
In this chapter, we have made good progress in developing our yellow fish game. In fact, we are getting close to having a playable game now. We have used some more Actor objects, and we have seen how we can use a for-loop to create several actors without writing separate statements for each one. We have also investigated collision detection of actors, using the is_touching() method.
And finally, we have seen that we can import functions from the random module to generate random numbers. These numbers allow us to implement random behaviour in our programs.

-
A loop is a statement that can execute a statement (or a set of statements) repeatedly, potentially many times. The loop body contains the statements which we wish to repeat, and the loop header determines how often it should run.
-
A for-loop is a type of loop statement that uses a counter variable (called the loop counter) and a list. It executes the loop body once for each item in the list.
-
Python provides functions to generate random numbers. The randint function provides a random integer from a given range.
-
Functions and methods may return a value to the caller of the function. This is called the return value. Like all data in Python, the return value has a type. This is called the return type of the function.
Space
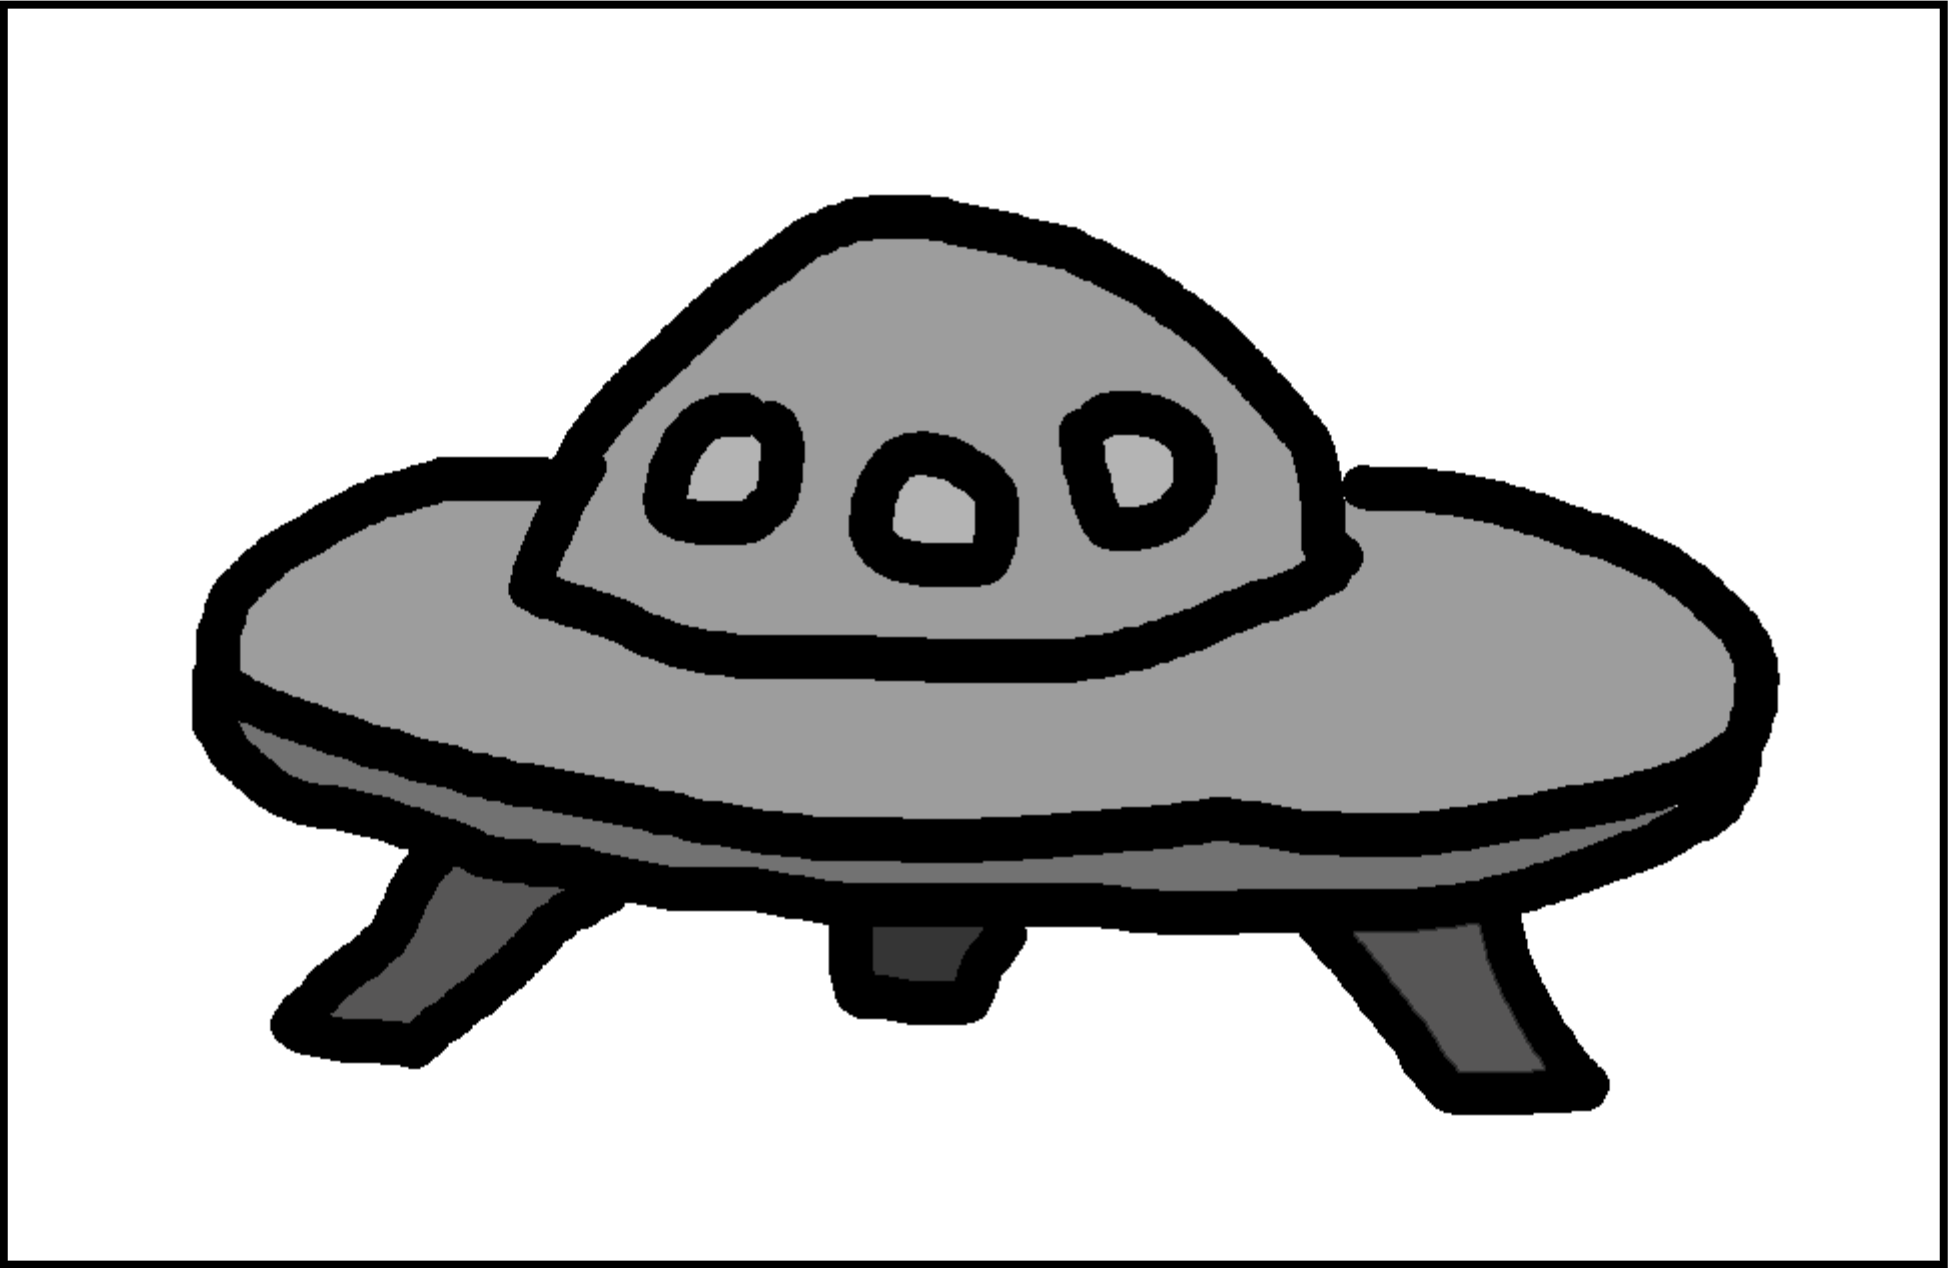 The space project is a very simple example of fixed, four-directional movement. In the yellow-fish example, we were able to turn and move in any direction we chose. Here, we see an example where the game character (a space ship, in this case) can move up, down, left and right, but does so without turning. (It is en extension of the two-dimensional movement from the pong game in chapter 1.) Maybe this is useful for your own game idea.