Chapter 11. Putting it all together
Throughout this book, we have introduced a large number of new concepts. In Chapter 1, we started from the very beginning, reading and writing our first lines of Python code. We advanced quite rapidly through a long list of constructs. These included assignments, variables, conditionals, loops, functions, and more.
In the later chapters, we have introduced and experimented with the collection classes – lists, dictionaries, etc – which are equally important to know for a good programmer.
In this chapter, we will work with a new project – a game – that lets us use all of these constructs again and put them all together. We will introduce a few new techniques, but not many. You know most of the important constructs and concepts now, but there are still interesting new ways to combine them to create more interesting outcomes. One particular thing we will do here is to combine various collections in more interesting ways.
We are also progressing in another way: In this chapter, we will provide less explanation of the details than we have done before. You are now expected to fill in larger parts yourself. We will discuss the core ideas and structure of this game in some detail, but then leave many of the tasks that make this game interesting for you to complete, invent and implement.
11.1. Haunted Mansion
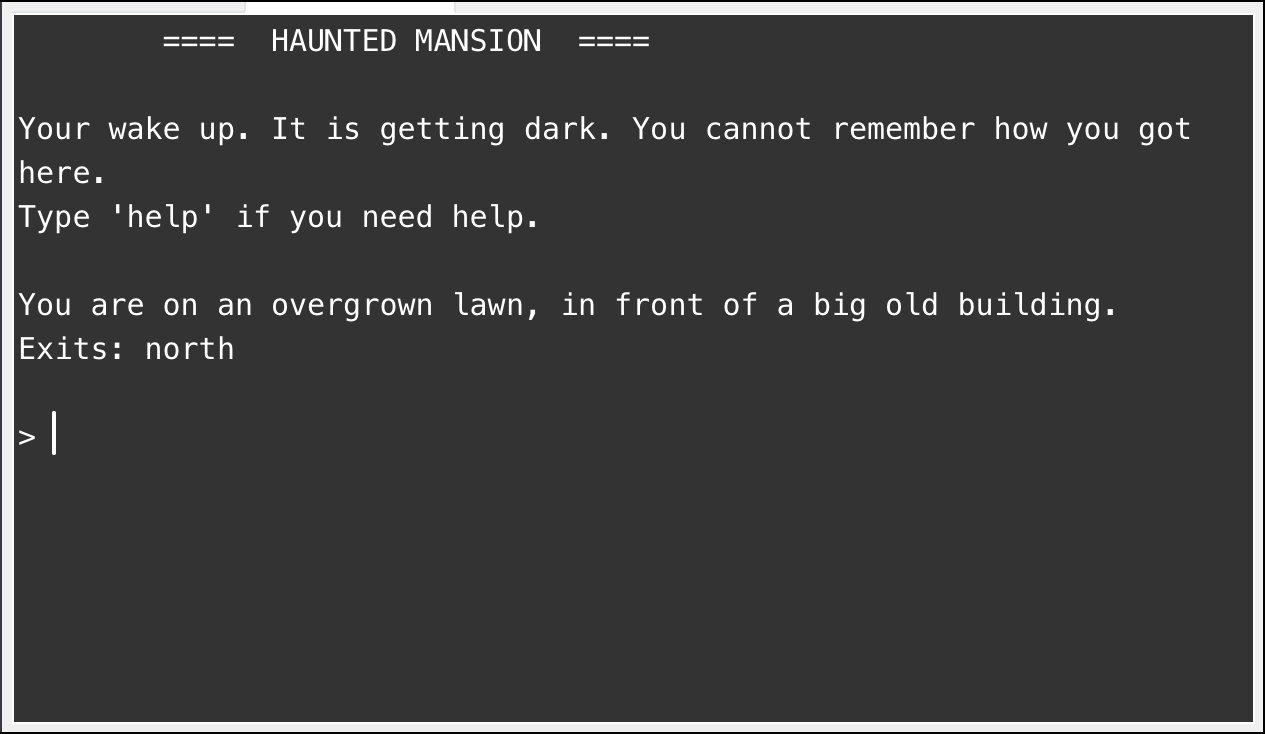
The game we will work on in this chapter is a text-based adventure game named Haunted Mansion (Figure 11.1). Games like these have a long tradition in computing. Using purely text-based output looks quite old-school, but you will see how you can build really fun games with this idea. And we will look at adding graphics and sound towards the end of this chapter.
 Our Haunted Mansion game is modeled on the original "Adventure" game that was developed in the early 1970s by Will Crowther and expanded by Don Woods. The original game is also sometimes known as the Colossal Cave Adventure. It was am amzingly interesting and sophisticated game for its time, and involved various tasks of finding your way through a cave system, collecting treasure, using secret words and various other mysteries, all in an effort to score the maximum number of points. You can read more about it at sites such as https://rickadams.org/adventure, or try doing a web search for “Colossal Cave Adventure.”
11.1.1. Exploring the game
To start this project, we will use a partially developed version of this game. You can find it in the Chapter 11 folder as haunted-mansion. Once you open this project, you can see that there is already a good amount of code there, so our first task will be to analyse and understand the existing code. This is a valuable skill: When you work with programming, it will happen much more often that you make extensions and improvement to an existing software system than starting your own new project from scratch. Code reading is almost always at the start of a new project.
So let us get stuck in and find out what this project can do so far.
Exercise 11.1 Open and explore the haunted-mansion project. Play the game to find out what it does, and then describe what you found. Include the following:
-
Describe the story that it presents to you.
-
What are the valid command words in the game?
-
What happens when you use a command word that the game does not understand?
-
How many rooms are there in the game?
Draw a map of all the rooms in the game, indicating how they connect to each other.
The exercise above has shown you that the game, at this stage, does not do very much, and is certainly not interesting to play. It will be our task in this project to change that.
Before we jump in and make improvements, however, let us try to understand how the code works that is already there. You can make a start on this by working through the next set of exercises.
Exercise 11.2 How many functions are defined in this program? Make a list of all the functions and for each, describe (in one or two sentences) what it does.
Exercise 11.3 What are the parameters of the process_command function? What expectations are there for these parameters?
Exercise 11.4 What does the process_command function return?
Exercise 11.5 What happens when you use the 'go' command without a second word? Where in the code is this handled?
Exercise 11.6 What happens when you use the 'help' command with a second word? Explain, with reference to the code, why this is.
11.1.2. Creating your own game idea
From this initial exploration, we can see that there is some useful code already in the project. It gives us a good starting point for a game of this type, but it does not implement a game as such. Nothing interesting is happening.
Throughout this chapter, we will work on improving this game and making it into something that is actually fun to play. However, as a first task, you should invent your own game idea. You do not need to make yours a game set in a haunted mansion, you can invent your own story, your own setting, and your own challenges.
This project works very well as a pair or group project. If you have a friend who also like to program, or if you are in a class with other students, it can be great fun to pair up in teams of two or three and work on this project together. Especially the next set of exercises, which are all about developing ideas, is more fun when done with others.
Exercise 11.7 Invent your own story line for your game. Think creatively! It does not need to be a haunted mansion, it can be any other location. Perhaps your own school, or a dungeon underground with trolls and other monsters, or a Harry-Potter-style scenery.
You can also think much more widely: The locations in the game are called "Rooms" in the program, but they do not need to be actual rooms. They can be any type of location. Maybe you are moving through your city, from place to place, or even from city to city (where each game location is s different city). You can go even bigger: you could make it a space game where each location is another planet. Or go small: maybe the player is travelling through a human’s body via their blood stream to find and eradicate a disease.
In short: don’t be constrained in your ideas by what is there at the moment. Invent a new and interesting scenario for your game.
Exercise 11.8 Invent a story line for the player. This should set the task of the game (what does the player try to achieve), and define an end to the game: How can we win?
Exercise 11.9 Invent as many interesting challenges as you can think of that the player might encounter during this game. Puzzles? Traps? Helpful characters you can meet? Mazes, teleporters? Anything that fits your theme and adds interest. Do not worry at this stage about how your ideas may be implemented. This exercise is about ideas and imagination, not about technology. As many ideas as you can, as crazy as you like.
Exercise 11.10 From the exercise above, select a number of ideas and try to turn them into a game story. Make an initial plan what your game may look like.
For the rest of this chapter, we will continue with our haunted mansion theme, but you should instead work on your own game version.
11.2. Analysing the code
From the exercises above, you will have gained an initial understanding of the structure of the code. There are, however, a number of details which will probably not yet be clear (that is normal), and it is worth investigating a bit deeper.
One way to become more familiar with existing code is to try to make small changes, and see whether your initial assumptions and guesses are correct. The existing code is actually quite well written: There are well chosen function names, functions all have comments, and the variable names give us good clues what they are used for. All this is a great help. Imagine the same code with no comments and bad naming – it would be a nightmare to untangle! (This shows you the importance of good naming and good documentation: when you need to read other people’s code, you appreciate when this is well done.)
Because of the clear naming, we can probably make some changes quite easily without understanding the whole structure. Let us try to make some changes of this kind.
Exercise 11.11 Change the names and description of the rooms. Internally, they can still be called Room at this stage, even if they are not technically rooms in your version. You can see that each room has two descriptions, a shorter and a longer one. (The longer one is provided currently only for the first room; it is missing for the other rooms.) The longer description is currently not used. It is here in preparation for a later extension, where we expect that we can inspect the location in more detail.
Run your program, and make sure you see your new location descriptions.
Exercise 11.12 Change the intro text for the game.
Exercise 11.13 Add a new command to the game: look. Make sure that the game recognises when the player types "look". Make a new function to handle the implemementation of the look command. When this command is used, initially just print out "You do not see anything." (Later, we will make this command print out the long description of the current room. Also, you may have noticed that there are various items mentioned in the game code – a candle, a bottle, etc. – which we cannot yet see in the game. These should also be shown at some stage.)
These exercises should have shown you that some changes are quite straightforward. So far so good.
The next step is to make our own map: add some more rooms and connect them, so that you can move in and out of each location. Looking at our code, we can see that creating rooms is easy. There are statements at the beginning of the setup function that create each room, and it is not hard to copy those and make more rooms. These statements, however, use a mechanism we have not seen before: a named tuple. We need to look at this more closely in a moment.
The other challenge is setting the exits. Linking the rooms together to move from one to the other looks a little more mysterious. It is worth investigating this part of the code more closely as well. Let us look at these two issues next.
11.2.1. Named tuples
To store the information for each room, we would like to store two strings: a short description (a single line) and a longer description, where we can provide a more extensive text.
We have previously seen that we can use a tuple to store two bits of related data together in one variable. We could now make a tuple with these two strings to store the room information:

This works well to store the data we need.
When we later want to use this data (let’s say, we want to print out the long description), then we can access the elements in the tuple using an index. For example

would print the long description. This works, but it is not nice. When we see the expression outside[1], it is not clear what gets printed. We would have to look up (or memorise) what is stored at index 1 to know what is going on. The code is correct, but not very readable.
To improve this situation, Python has an additional construct: named tuples. Named tuples are tuples like any other, but in addition to storing the data, we can give a name to each component, and to the tuple itself.
The original tuple stores only the data:

We can see that it automatically assigns an index, which allows us to access each component.
A named tuple stores the same data, but it allows us to attach a name to the tuple, and a name to each component:

If we do this, then we can use the name (instead of the index) to access a component:

We can immediately see that this code is more readable. Without needing to memorise the details of the tuple, the code tells us exactly what is printed out here.
To use a named tuple instead of a standard tuple for our rooms, we have to do three things. First, we have to add an import statement to make the named-tuple functionality available in our program:

Secondly, we create a description of our named tuple:

As we can see, this is an assignment. On the left hand side of the assignment is the type name of the named tuple we are creating. On the right hand side is a call to the namedtuple function (which creates the named tuple) with two parameters: The first parameter is a readable name for the tuple overall, and the second parameter is a list of strings with a name for each component. This creates the names which we can later use to access the components.
The third and last part is the creation of the tuple itself. It looks similar to the original creation of the tuple, but we now write the type name of the named tuple in front of the parentheses:

This turns our standard tuple into a named tuple. It does not store any more or less data, but it makes the resulting code much more readable.
 A named tuple is a tuple with attached names for each of the elements. It allows us to access the elements by name (instead of by index), making our code more readable.
11.2.2. Exits: A dictionary of dictionaries
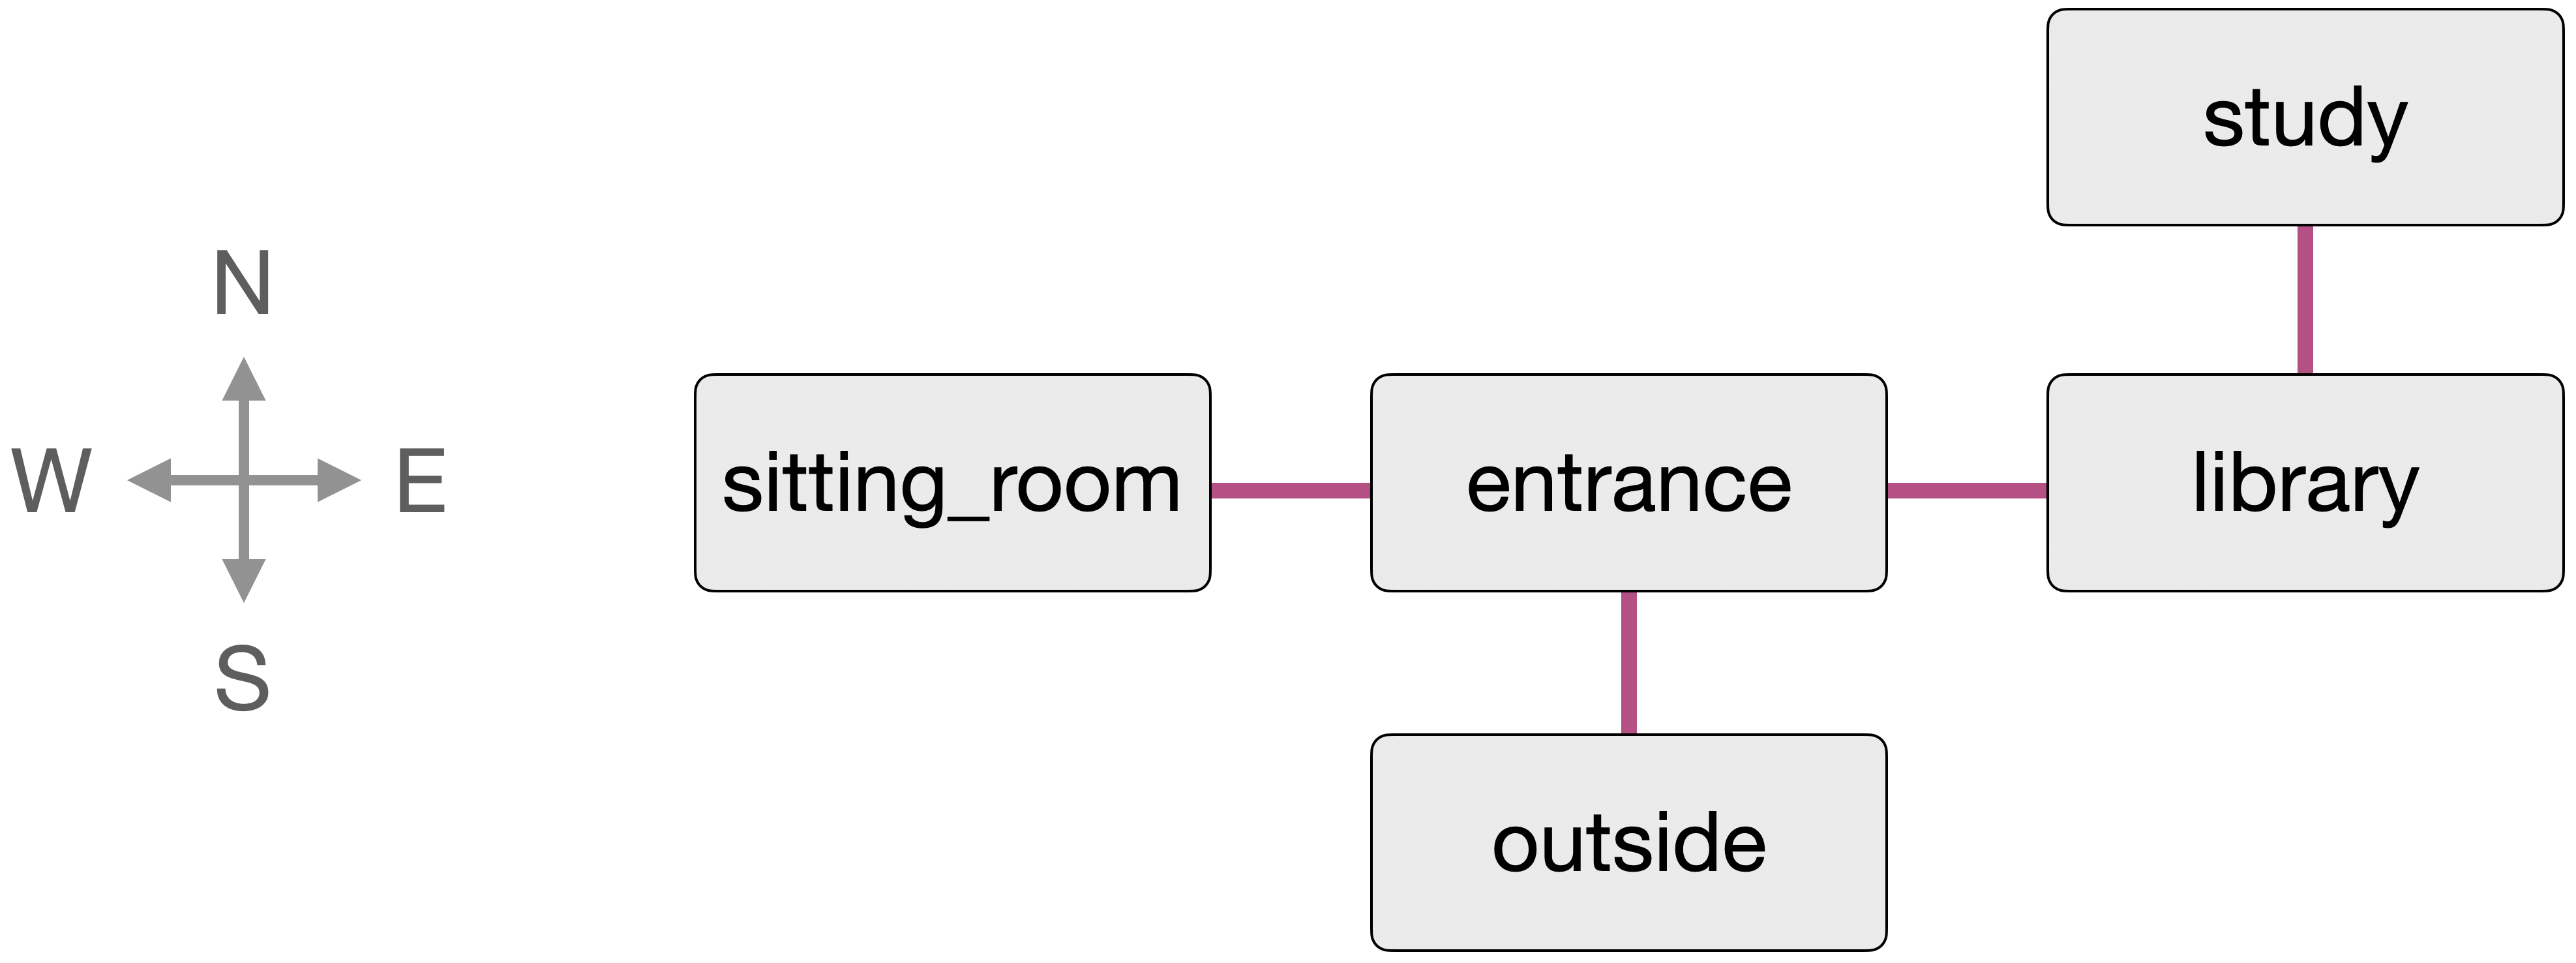
The other interesting aspect to investigate more closely in this example is how the exits are stored. Figure 11.2 shows the map we wish to represent for our game. So, how can we store this information?
In our setup function, we see these lines:

We should now be able to recognise that this is a dictionary: It is written with curly brackets, and the colons separate the keys from the values.
Exercise 11.14 What is the type of the keys of the exits dictionary? What is the type of the values?
Looking carefully at the exits dictionary, we can see that the first entry is outside : {"north" : entrance}. This is the key:value pair that makes up each entry in a dictionary. Let us look carefully at the types and values used here.
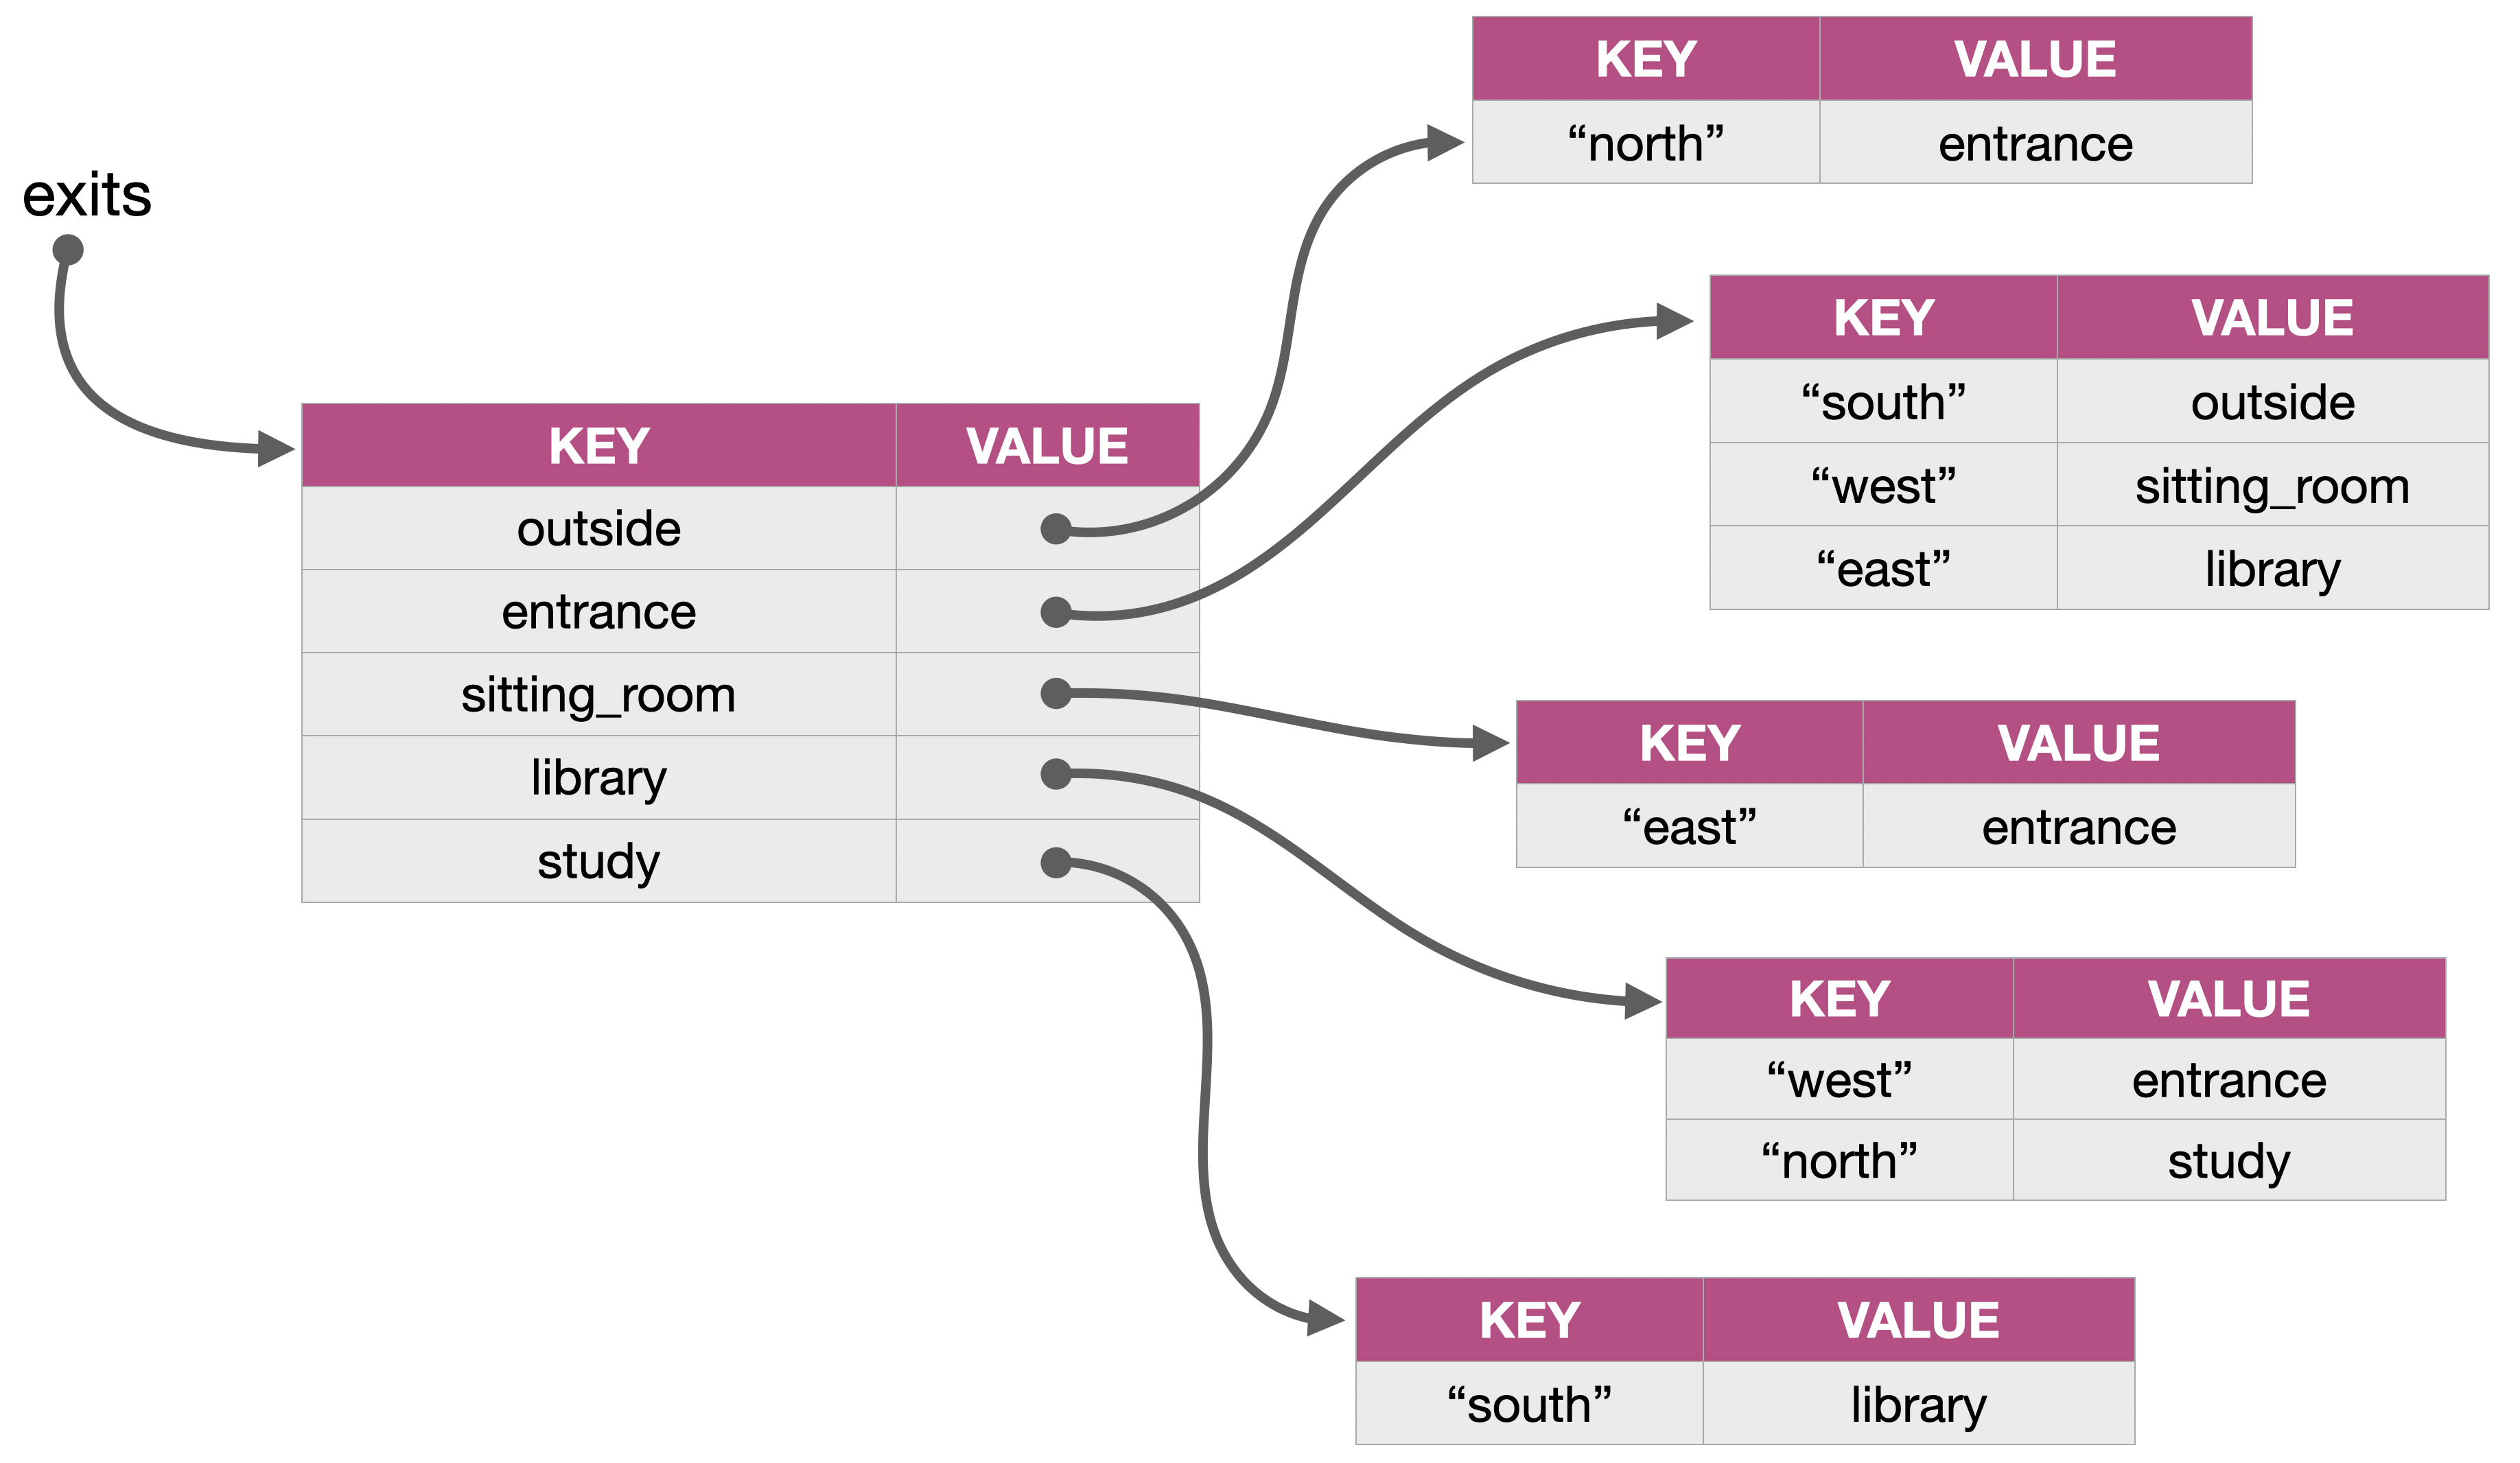
On the left of the colon is the key. It is outside, which is a variable holding a room. So the type of the key is Room. On the right side of the first colon is the expression { "north" : entrance }. This is itself another dictionary! So the value of the entries in our dictonary is another dictionary.
To fully understand this structure, it helps to draw diagram. Figure 11.3 shows the data structure we are constructing here to store the information. It is worth spending some time studying this, and comparing it to the map in Figure 11.2, until you understand how this stores all the information about the exits.
Some observations are worth noting here:
-
We are not using anything here we have not seen before. We already encountered dictionaries earlier in the book, so the concept itself is not new. But we are putting things together in more complex ways: where we before used integers or strings as keys and values, we now used a dictionary of dictionaries. Over time, you will see more of this: As you become more practiced at programming, you will not see as many new constructs anymore (after some time, you will know them all), but you will continue to put your constructs together in more interesting and powerful ways.
-
Using collections that hold other collections is not unusual. You will get used to this idea. We will see another example of this a bit later in this chapter.
-
If you look carefully, you will see that each direction of an exit is stored separately. For example, we store the information that north of the library is the study, and separately that south of the study is the library. We can use this to build special effects in our game. For example, if we had one of these entries, but not the other, then we can go one way, but not back. (A trap door? A hidden exit?) Or if we connect the rooms differently, so that the way back leads to a different room, then we can build really confusing labyrinths that it is hard to get out of…
Exercise 11.15 Make a map for your own game. Decide how your locations connect, and them implement this in your project. (We would recommend not to make it too big at this stage. Perhaps no more than a dozen locations for now.)
Exercise 11.16 The exit dictionaries are used when the player moves through the game. More specifically, they are accesses in the go_room function, which implements moving to a different room. Study this function carefully and explain how it works.
11.2.3. Items: A dictionary of lists
If you have read the code in this project carefully, you will have seen that it creates a number of items, which are placed into the rooms. When we walk through the rooms, however, the items are currently not shown. Let us fix this now.
Exercise 11.17 Items are defined using a named tuple, similar to the rooms. Find the place in the code where they are created, and answer these questions:
-
How many items are created in the program? What are they?
-
What information is stored about each item?
-
In which room is the candle?
Exercise 11.18 To store the information where items are located, the program uses the global variable items. This is again a dictionary, using the rooms as the key for the entries. But what is the type of the value of each entry? And what does it store?
Exercise 11.19 Draw a diagram of the data structure stored in the items variable.
Exercise 11.20 Create another item and place it outside.
We have seen here that items are created and correctly placed in the rooms. What is missing is telling the player about htese items as they walk around. Let us do that now.
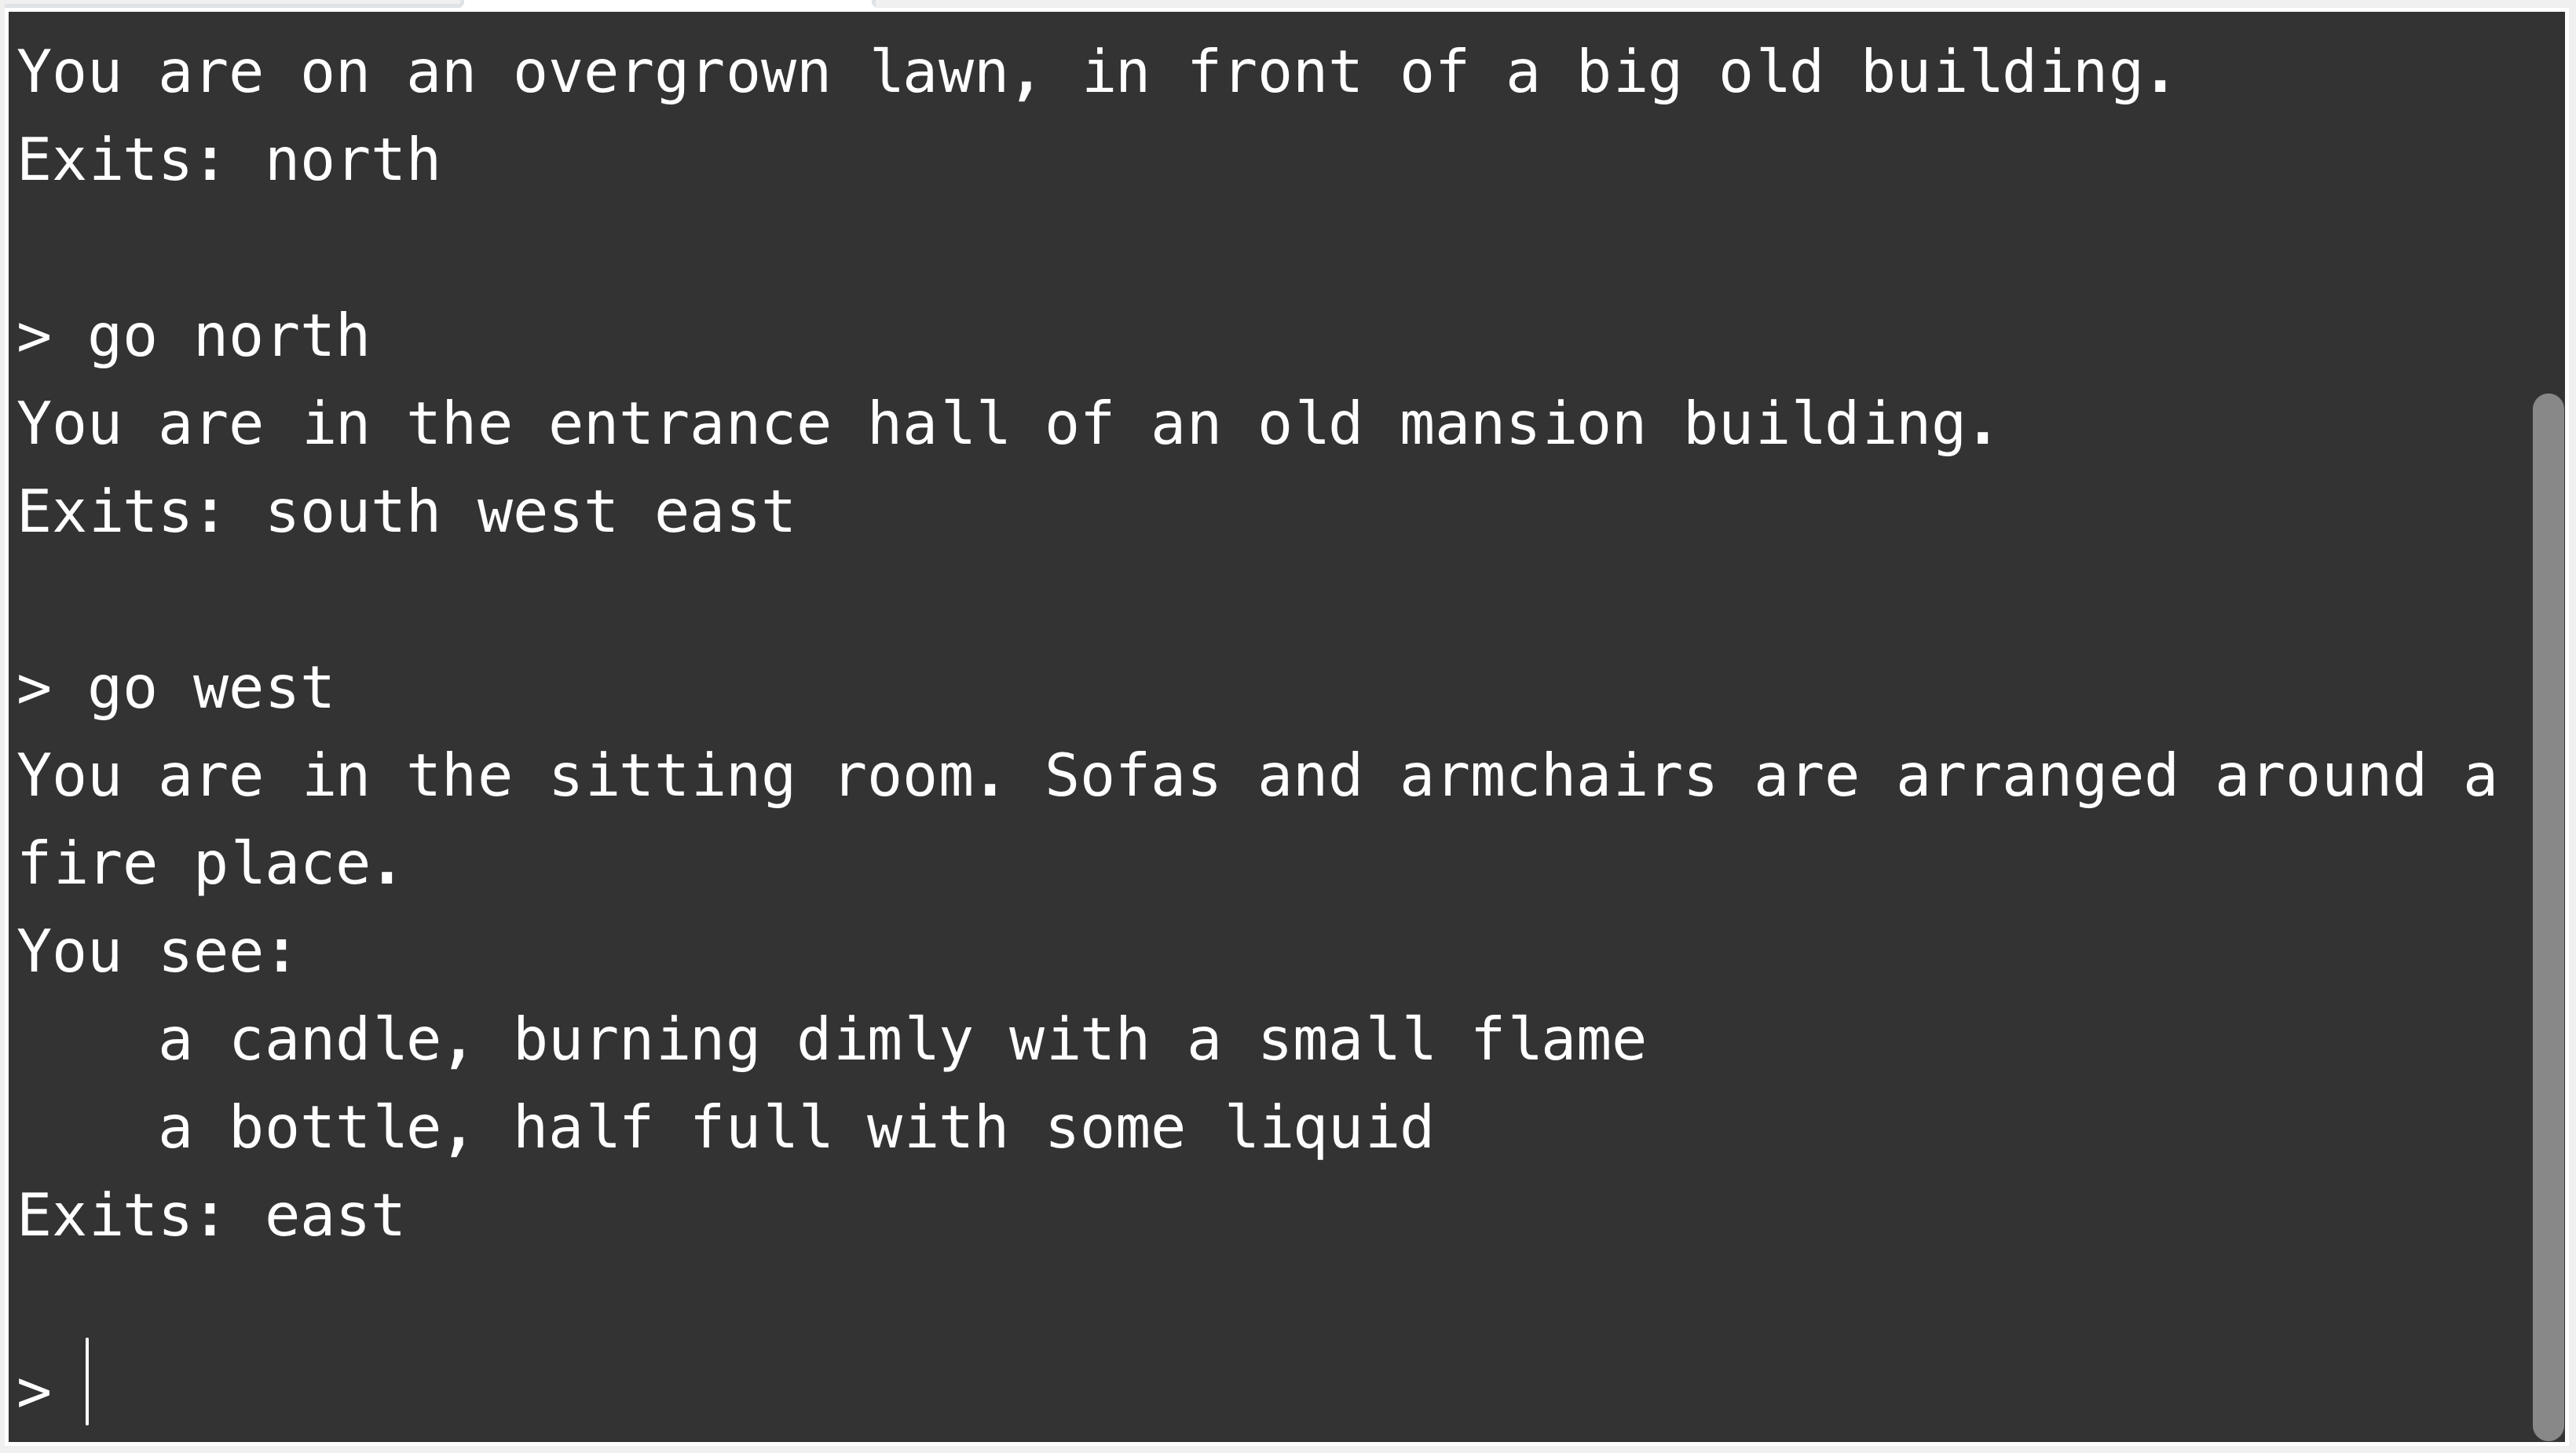
Exercise 11.21 Make sure that all items in a room are displayed on screen when a player enters a room. You can do this in the show_room_description function. This function already shows the room description and its exits. Add to this the display of the names of all the items in the room (see Figure 11.4).
Exercise 11.22 Implement a command "look" that may or may not take a second word. If no second word is provided, the it prints out the long description of the current room. If a second word is provided, and it is the name of an item (e.g. "look candle") then it prints out the description of this item.
These last exercises are getting quite tricky. Do not be discouraged if you find them difficult at first. It may help to discuss them with others if you have people nearby who you can work together with. If you can solve those tasks, and fully understand how they work, then you have reached a good level of understanding of data structures!
If you like to check your code against ours, you can find a version of the project with the 'look' command implemented in the book projects as haunted-mansion-v2.
11.3. Building your game
From here on, it is really up to you. We will not discuss much additional functionality in detail, but leave it to you to invent and implement more ideas to make your game more interesting and more fun to play. The constructs we have discussed so far enable you to achieve many varied things.
Here are some ideas what you might add to your game. But there are just this: ideas. You are free to add them to your own game, vary them, or do something different entirely.
-
Add a command called "take" to pick up an item. The player carries items around with them.
-
Add a command "inventory" to show what the player is currently carrying.
-
Add a command "drop" to drop an item in the current room.
-
Restrict the weight a player can carry. Every item has a weight, and the player can only carry items up to a certain total weight. Some items cannot be picked up at all.
-
Add an action that the player can do only if they have a specific item.
-
Add other characters to the game. Characters are in rooms. When the player encounters a character, they may say something.
-
Make a character react to the player. For example, when the player says something, the character responds. They might give you some valuable information.
-
Make a character help you only if you give them a specific item.
-
Add food to the game. With every move you get hungrier. If you get too hungy, you starve and lose the game. You must find food to eat. (Obviously, you need an "eat" command.)
-
Add a time limit for a specific task. Maybe the task only starts when you encounter something specific. From then on, it counts your moves, and if you do not complete the task in time, you lose.
-
Add a transporter room. When you enter it, it beams you to a random other place. (Or maybe a transporter gadget? Use it to transport somewhere else?)
-
Add a "use" command. It lets you use an item. Some items do something when you use them.
Of course, there are many other possibilities here. Invent some functionality of your own and implement it.
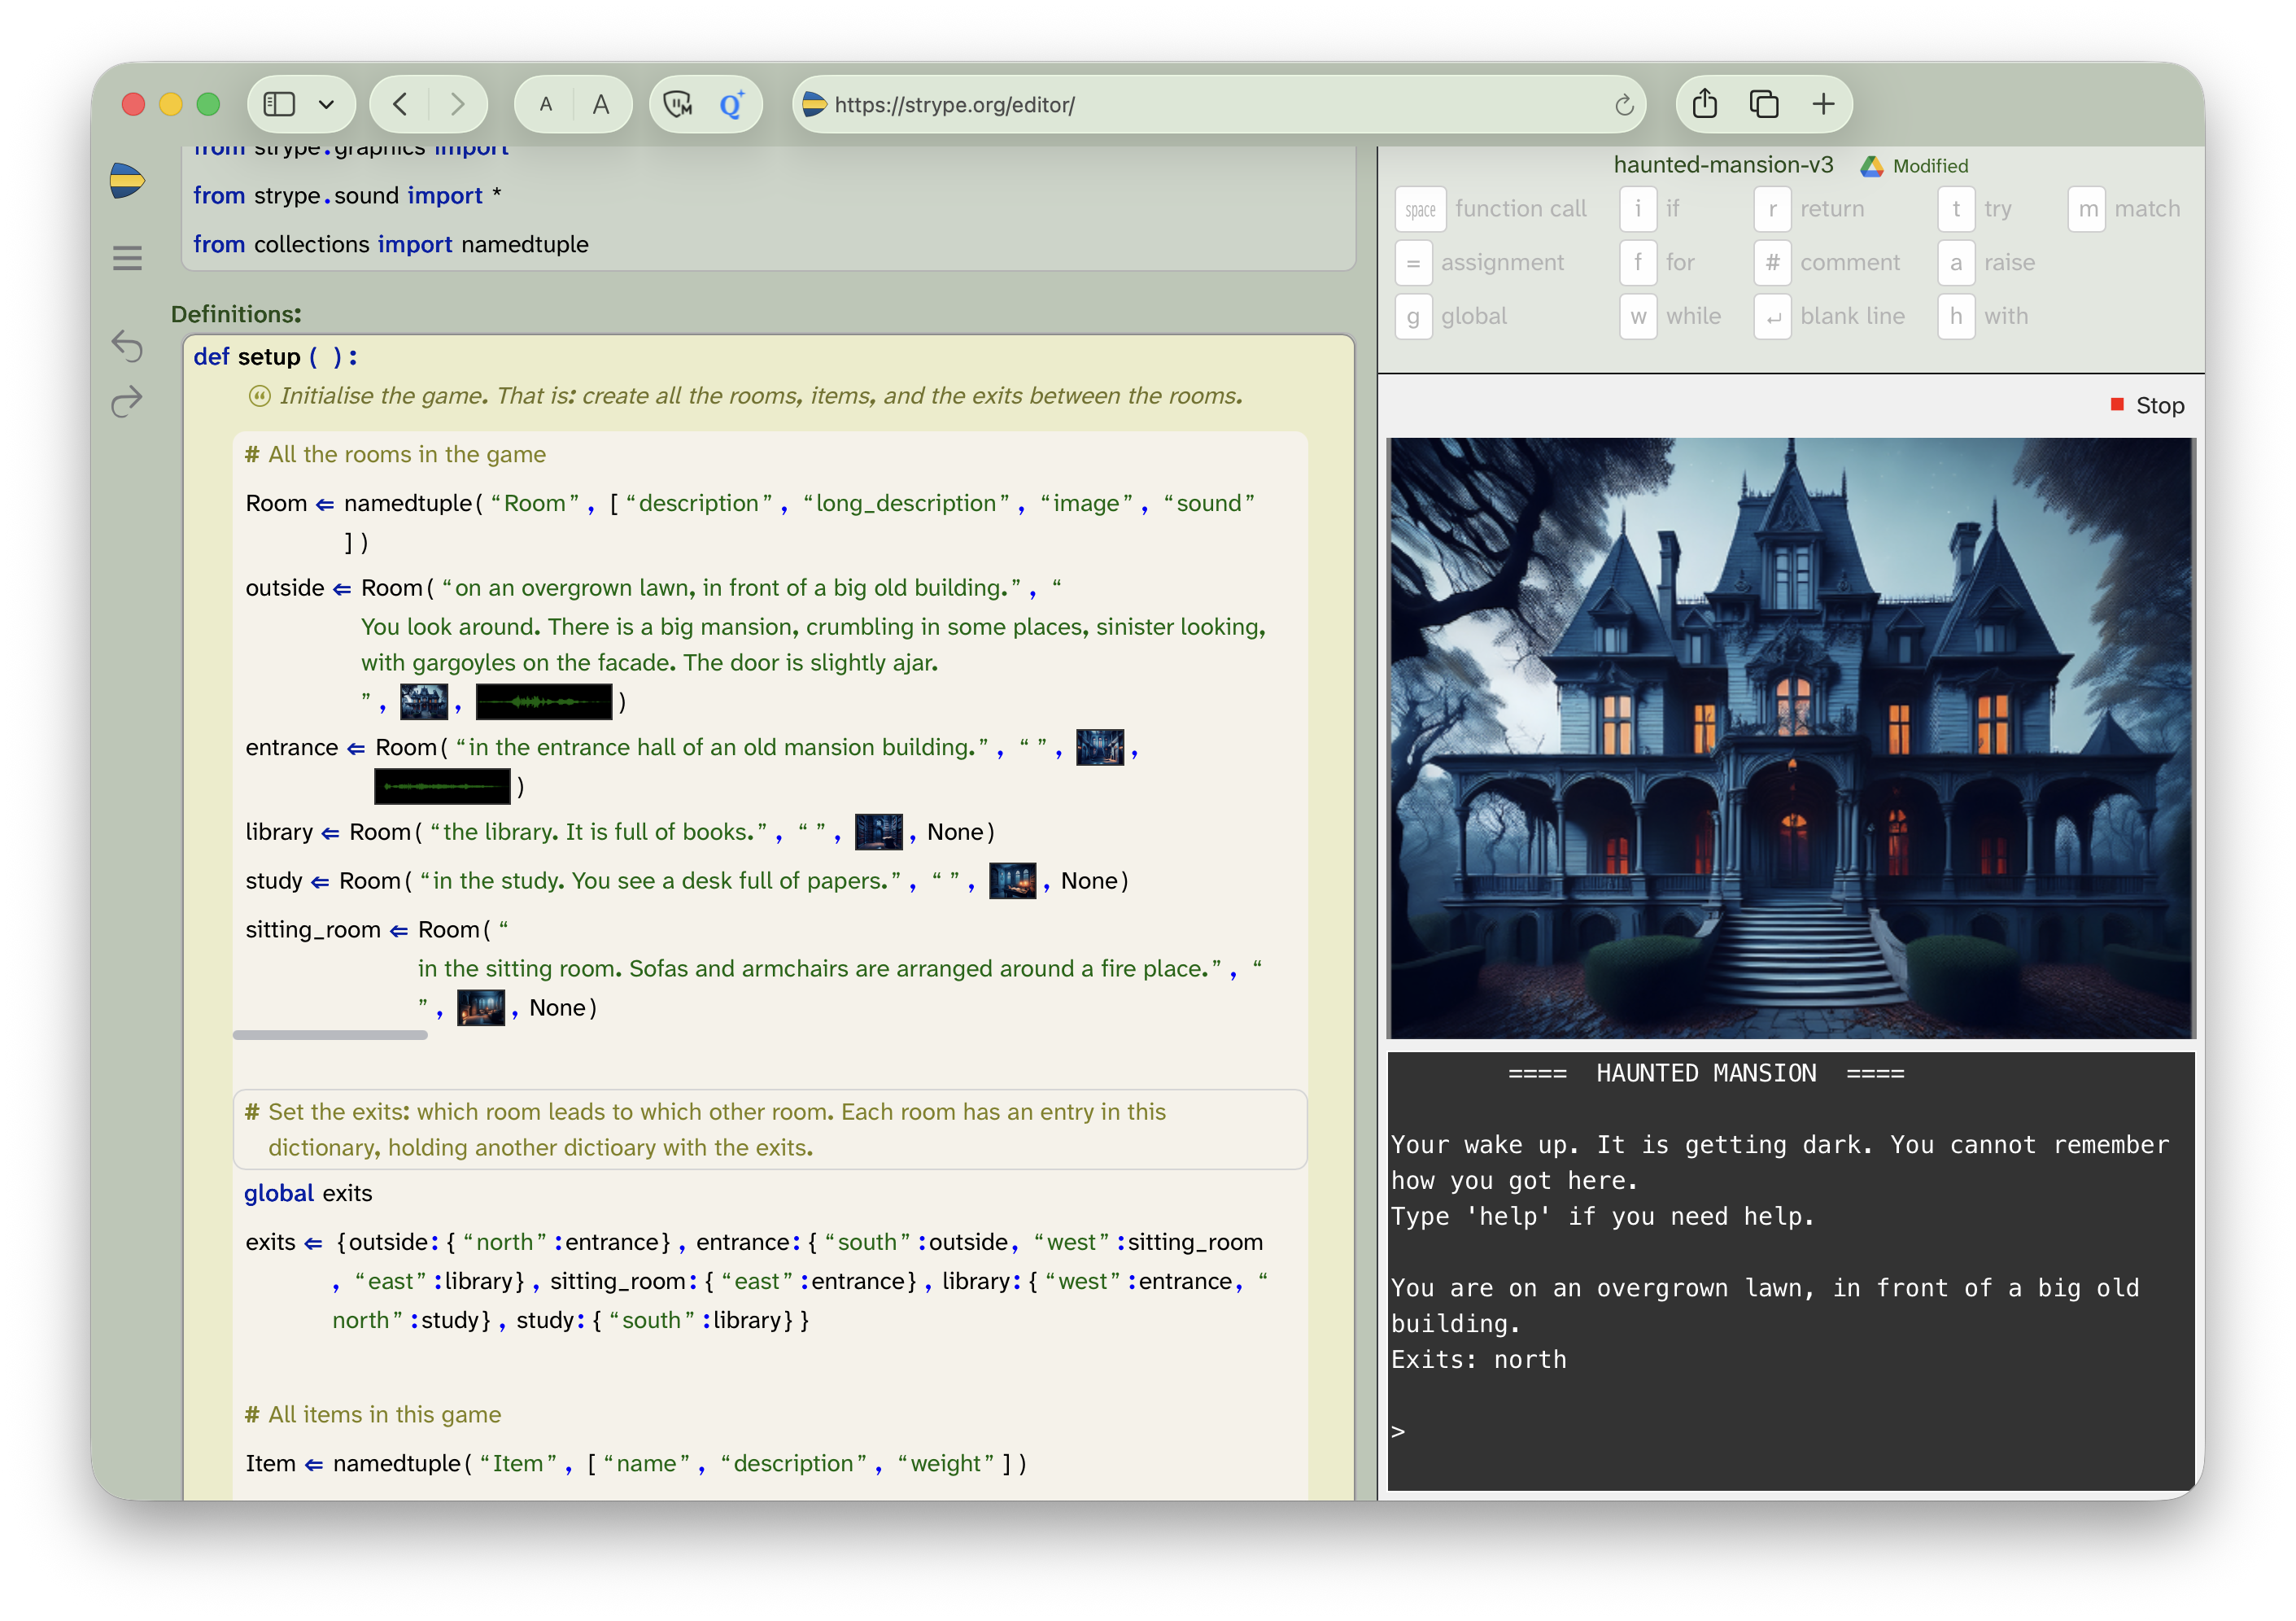
11.4. Adding graphics and sound
One last thing that we will suggest and briefly discuss here is addition of some images and sound to our game. The most straightforward way to do this is to leave the game with text-based input, but show an image – and possibly play a sound – when you enter a room (or when something else happens in the game).
The project version haunted-mansion-v3 shows a demonstration how this might be done. Open this project and run it to see what it looks like. To do something similar in your own game, you can do the following:
-
Set the Strype view so that you see both the text console and the graphics world at the same time (Figure 11.5).
-
In your named tuple for the room, add an image and a sound component to the room. Then add an image (and possibly a sound) to each room.
-
When you enter a room, show the room’s image as the world background. If the room has a sound, play it.
That is all that this version of the project does. You could, of course, also add images for items, or attach sounds to other events. It is all up to you. We leave you to finish the game on your own from here. You now know enough to be able to turn this into something exciting.
11.5. Summary
In this chapter, we have mostly applied what we have learned before, but we have done so with somewhat more complex data structures. We have introduced one new construct (the named tuple), but mostly we have just put together what we already knew in novel and more interesting ways.
We have seen that we can put collections into other collections, and that we can build useful data structures this way.
Programming will increasingly be like this from here onwards: You will encounter new constructs less often, and you will increasingly work by putting what you know together in more interesting ways. There are still some constructs to discover – we have not shown you all of Python yet – but not many; you now know all the important ones.
The next and last chapter just lists some more project ideas, without further discussion. We leave you with those half-baked projects and hope that they spark some ideas, that you choose to continue to write programs, and that it brings you joy.

-
A named tuple is a tuple with attached names for each of the elements. It allows us to access the elements by name (instead of by index), making our code more readable.

Adventure
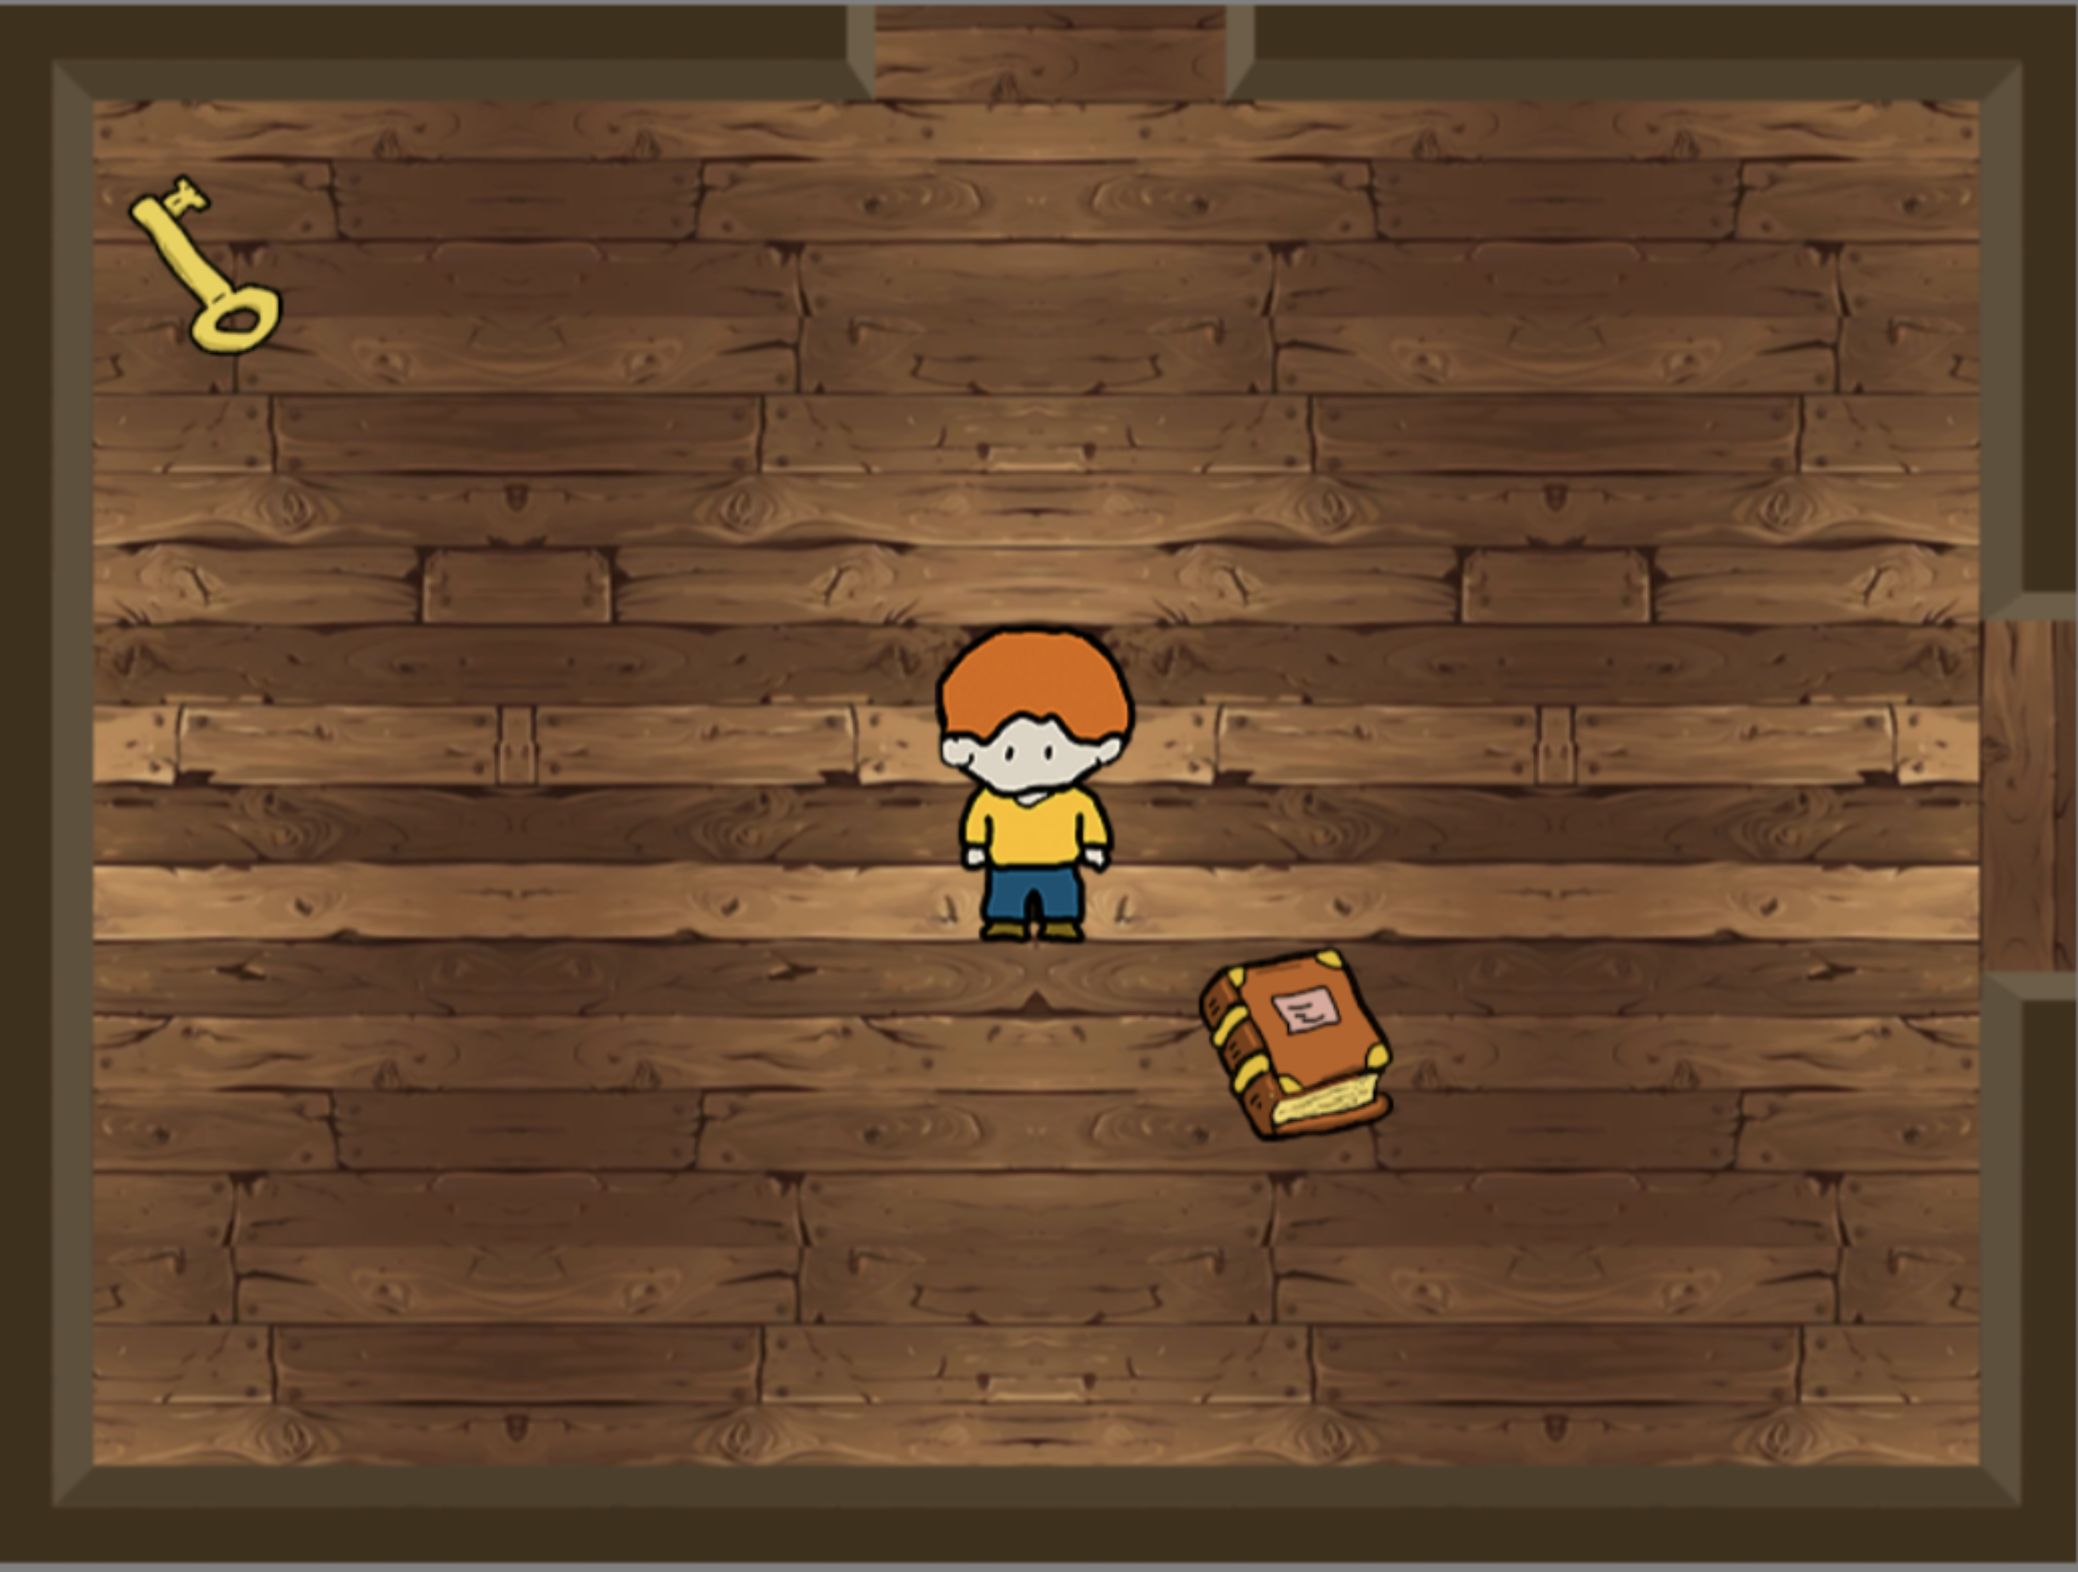 The game discussed in this chapter added some graphics at the end, but it remains, in essence, a text-based game. Commands are typed as text, and the whole interaction is text-based.
Turning this into a graphical adventure game, in the same spirit, but with a player-controlled graphical character that actually moves across the screen, is possible, but it is quite a bit more work. The project shown here, called adventure, shows you how it can be done.
This version is not necessarily much more difficult in principle, but if you try to extend it, you will see that making the graphics you need for it takes some time and skill. Doing so can be fun, though! So have a go if you like.