Chapter 4. Finishing our game
In this chapter, we will suggest and investigate some improvements to our game. How exactly you extend your own game depends, of course, on your game story, and on what behaviour makes sense in your context. But even if you choose slightly different extensions, the functionality we discuss here should help you improve your game.
But before we make further additions, let us take a step back and reflect on our code.
4.1. Defining your own functions
When we observe the development of our project through the steps we have taken so far, we notice that it gets longer and longer. This is natural: the more functionality we add, the more code we will have, and the longer our program text will be.
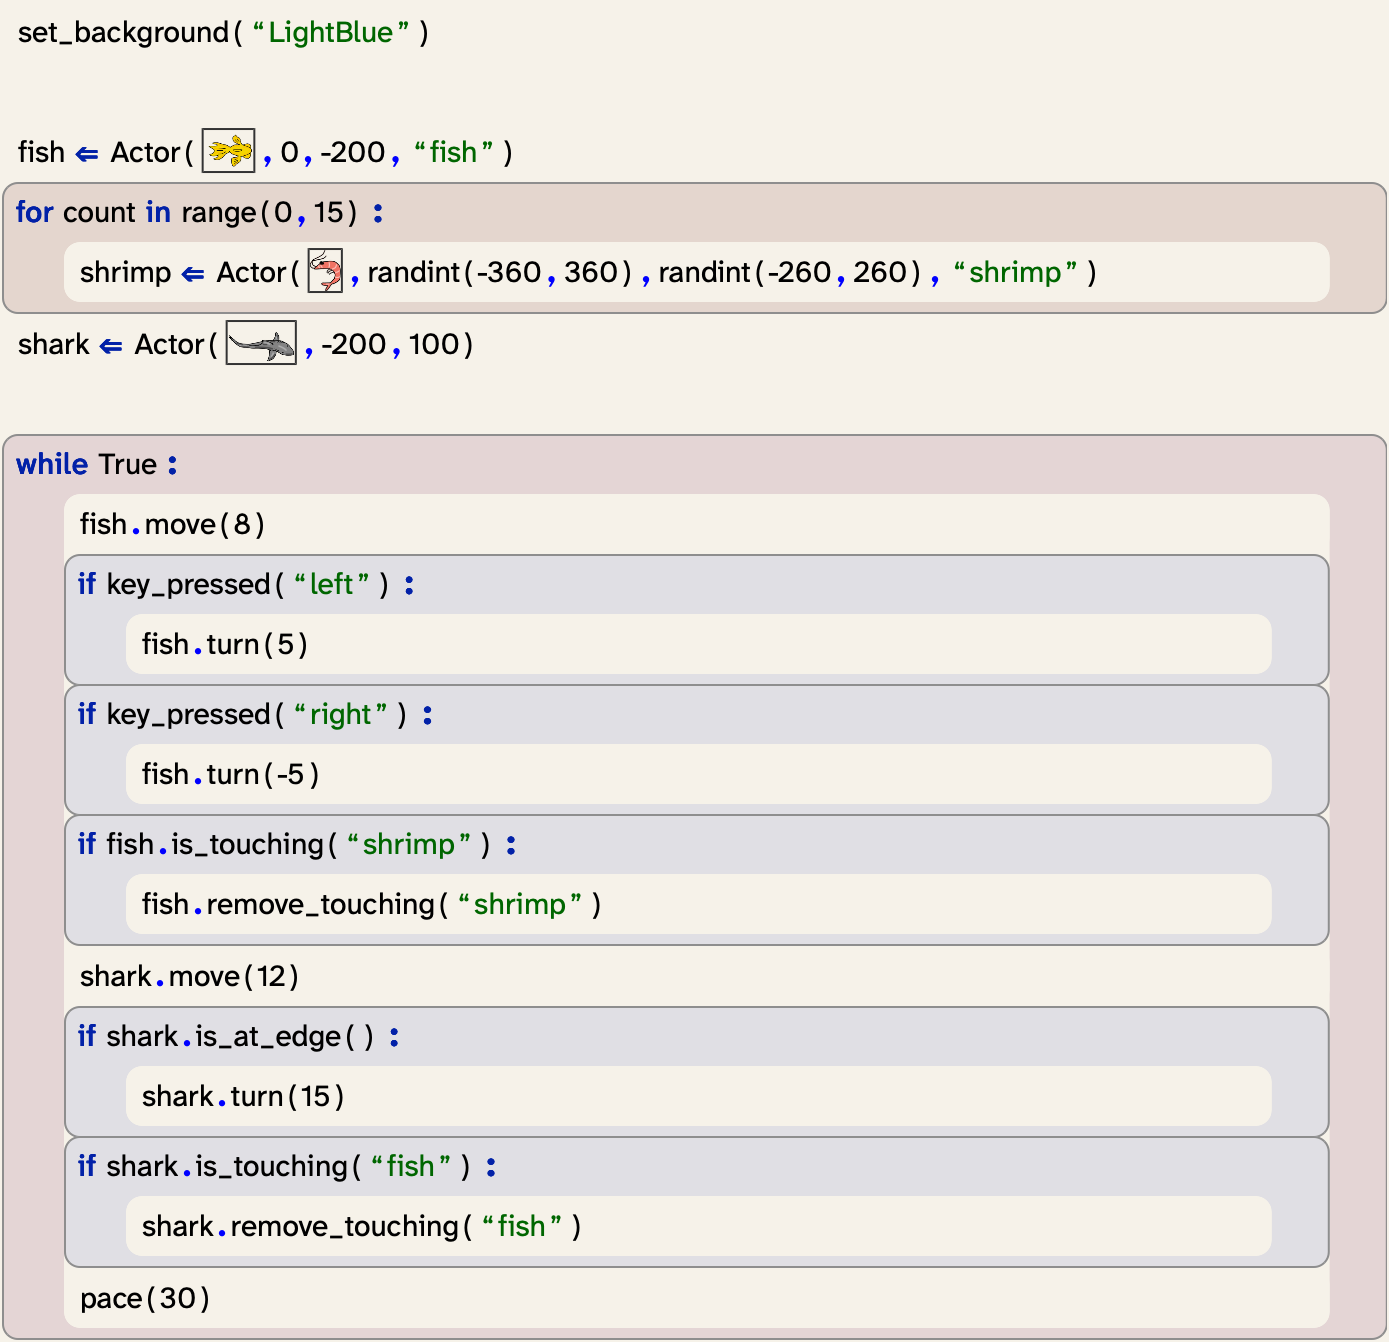
So far, this is not too bad. The program still spans only about a page (Figure 4.1), and with some effort and practice we can manage to read and understand it. Over time, however, this will get worse. Our program is still very simple, but as we add more improvements, its size will quickly grow. We will soon deal with programs that are not one page long, but dozens of pages. In professional systems, programs often span thousands or millions of lines of code.
4.1.1. Analysing program structure
To be able to manage longer programs, we need a way to structure our program text better. And while our program is still fairly short, it is never too early to start with this. Developing a good program structure is a habit we should get into from the start, because later on it will be essential. When we deal with the projects in the later chapters of this book, we would not be able to work with them without this practice.
So what does this mean exactly?
Currently, the program text does not really reflect the logical structure of the program very well. We have written the program as a single sequence of statements in the "My code" section of the editor. If another programmer now came to read our program for the first time, they would have few clues about which part of the code does what, and they will have to read the program line-by-line to find out. As our programs get longer, this will become more and more challenging.
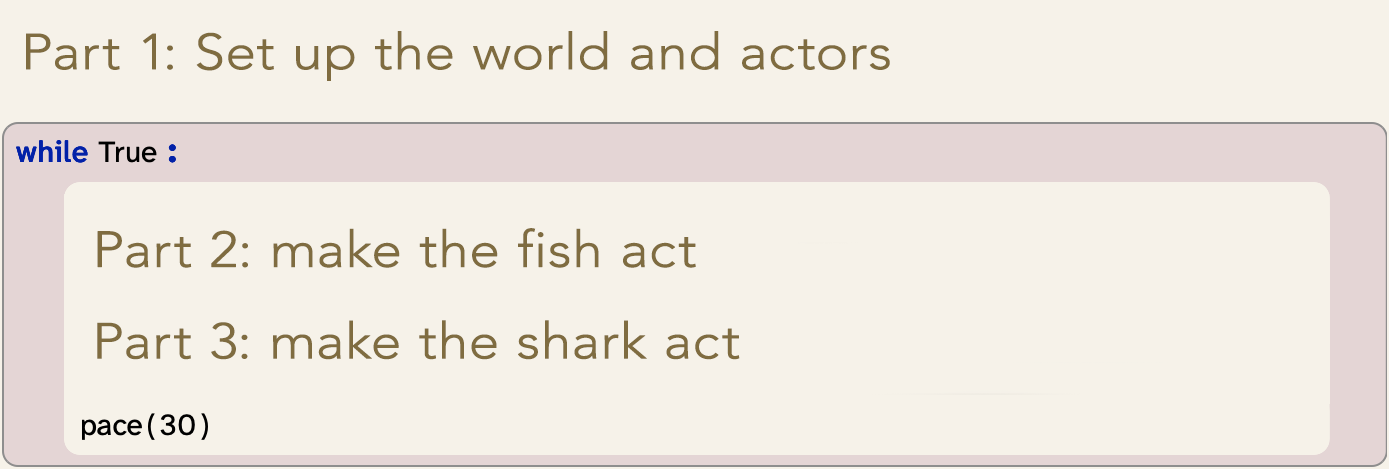
If we analyse our program carefully, we can see that it consists of three distinct logical parts (Figure 4.2):
-
First, we set up the world (set the background and create the actors)
-
Then (in the loop), we make the fish act (move, turn and eat)
-
And finally, we make the shark act (move, turn and eat)
We can improve our program by reflecting this logical structure in our program structure. To use this, we use functions.
4.1.2. Functions as logical blocks
We have encountered functions before in the context of using ready-made functionality: We have, for example, called the set_background function to set the world background colour, or the randint function to obtain a random number. In both of these cases, the functions came from a library.
In the fireworks project in Chapter 2, we have also seen that functions can be defined in our own project. We called, for example, the place_rocket and ignite functions to invoke functionality defined in the "Definitions" section of our program.
We can now create our own functions and move some of our code into them. This way, we can put all code that serves one single logical purpose into one place and give it a logical name. We start with this my making a function for the fish actions.
Exercise 4.1 Move the frame cursor into the "Definitions" section in your program and enter a frame for a function definition. Since the function we are about to create will be responsible for moving the fish, you can call it "move_fish". It does not need any parameters.
Exercise 4.2 Move all the code that is responsible for the fish actions from the main loop into the move_fish() function. This includes the code to make the fish turn and eat shrimp.
Exercise 4.3 In the place where the fish code had been (in the main loop), insert a call to the move_fish() function.
Exercise 4.4 Do the same for the shark: Create a move_shark function, and move all the shark code into it, and call the function from the main loop. Test your program: If all went well, it should work just as it did before.
Exercise 4.5 Create another function called "setup". Move all the code that sets up the world into this function. Then move the two frames that create the fish and the shark to the beginning of the "Definitions" section, before (outside) the first function. Again, test your program.
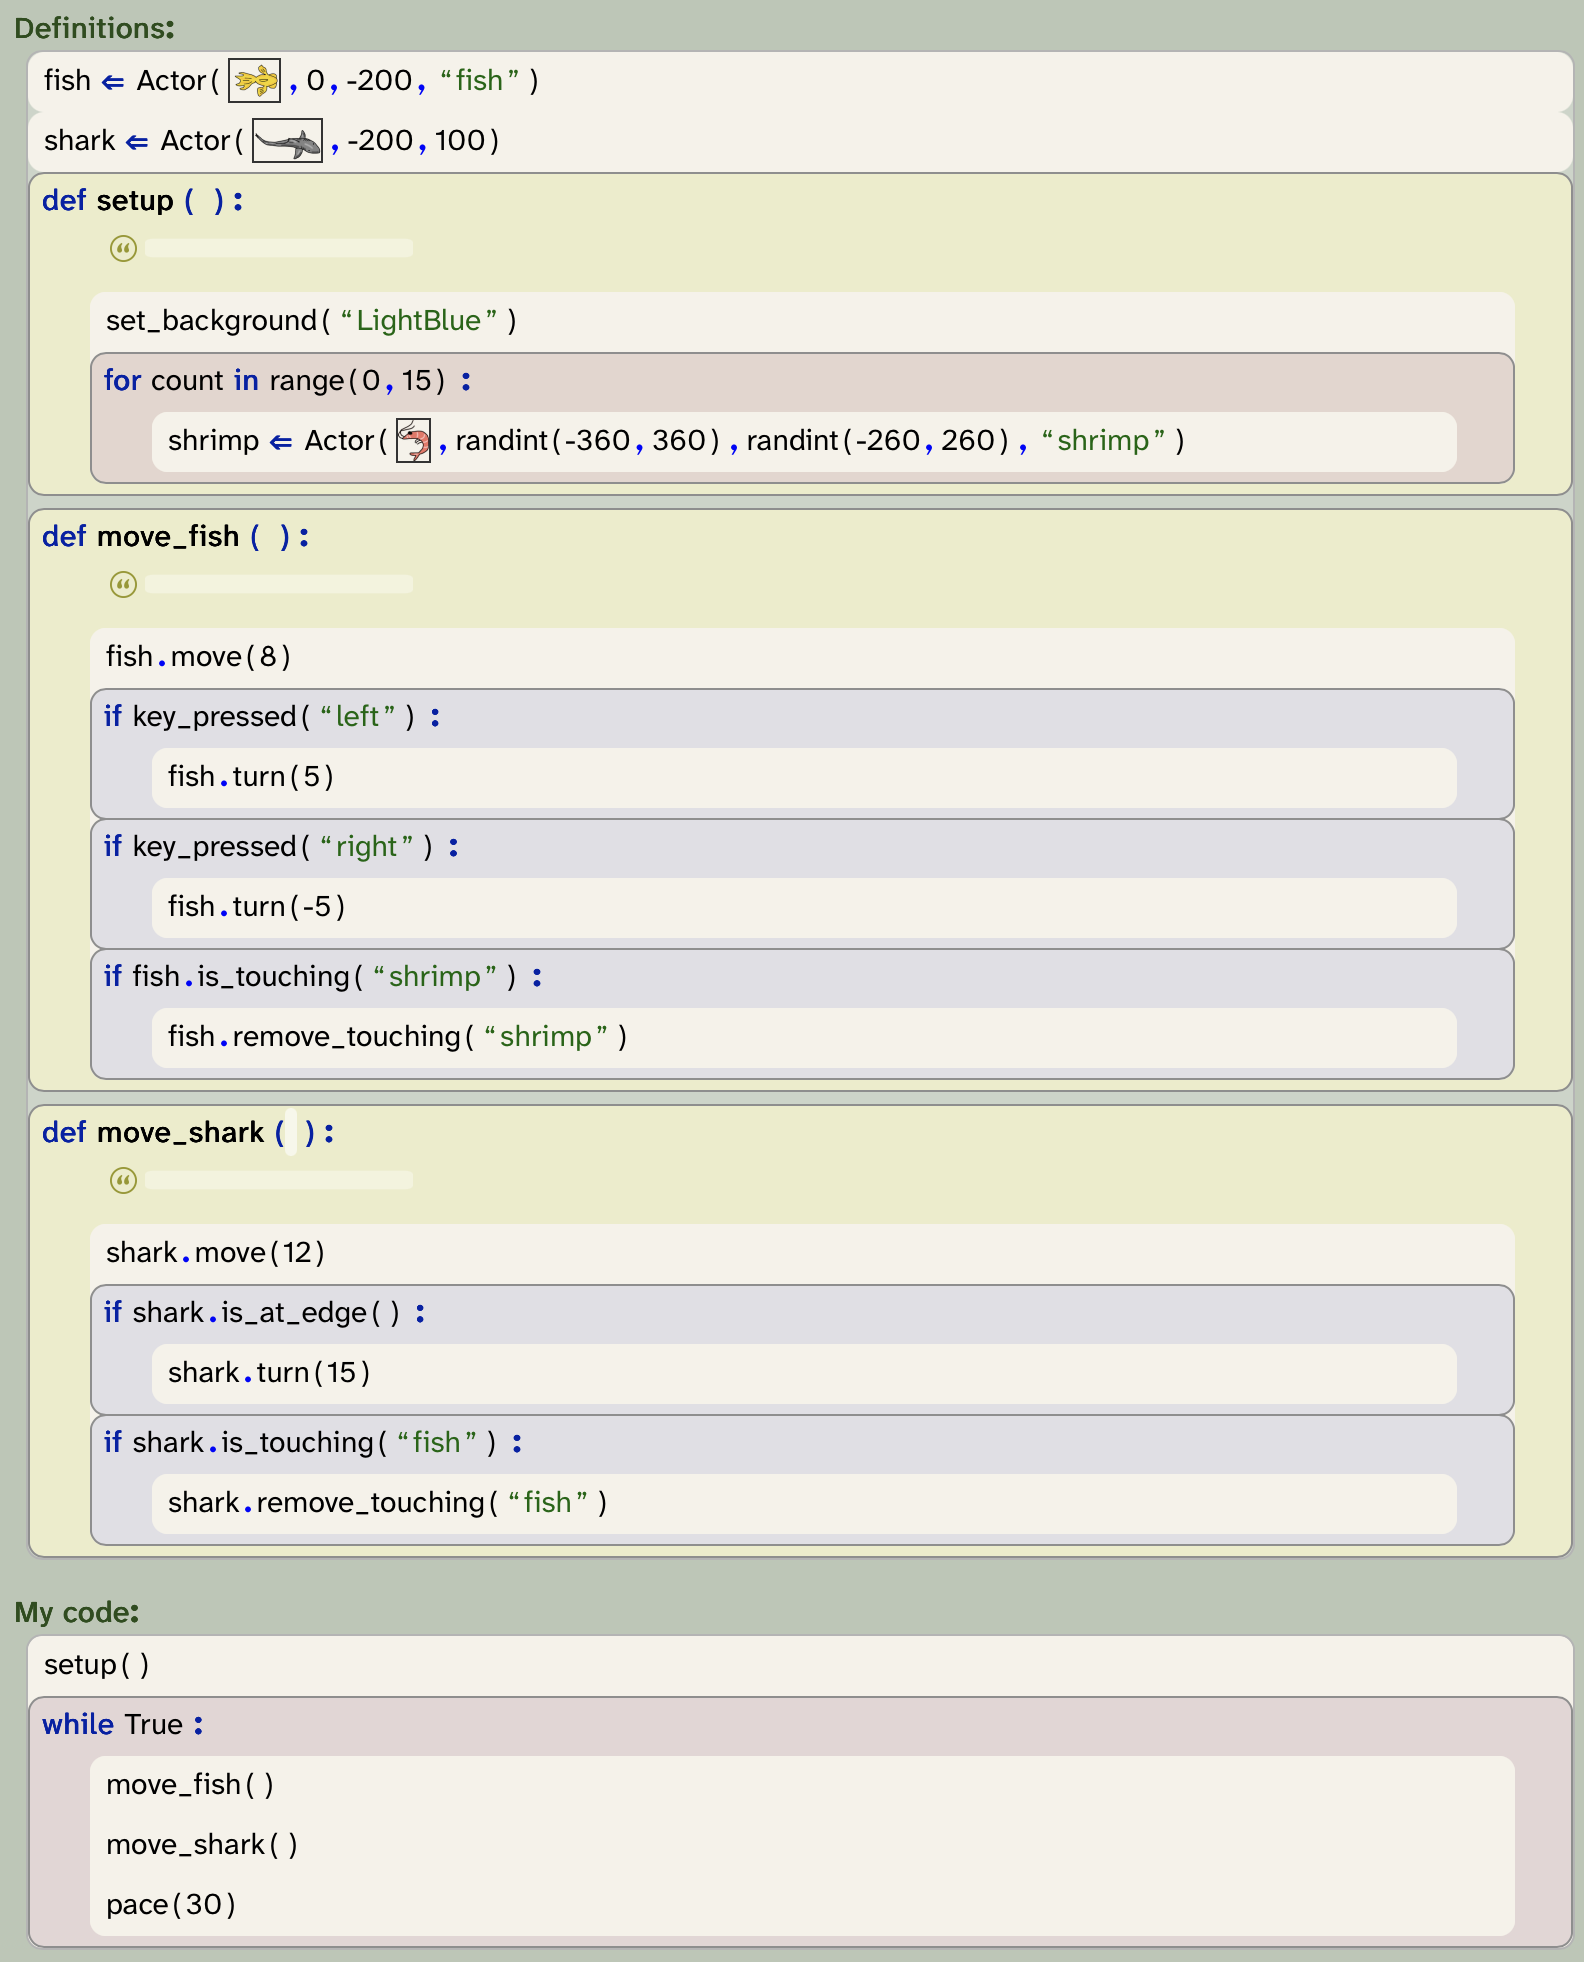
Figure 4.3 shows what our program now looks like. When the execution reaches the setup() function call, it jumps up to the setup function, executes its body, and then returns to the function call and continues execution there. The same happens for the move_fish() and move_shark() calls.
One further change that we made here is that we have moved the creation of the fish and shark variables out of the function, and added them straight to the definitions section. (The definitions section can contain definitions of variables and functions, but no other code.)
The reason for this is that variables defined inside a function are, by default, only usable within that same function. We need, however, the fish and shark variables in the other functions as well, so they need to be defined outside the function to be visible to all functions. We will discuss this aspect of variables in more detail later (in Chapter 7).
The new program does exactly the same thing it did before the reorganisation, but it has a nicer structure. So what exactly are the advantages of this new version?
 Sequences of code can be moved into functions, and the functions can be called at the place where we would like to execute that code. This makes our program more modular, and easier to read and maintain.
4.2. Readability and naming
The more we work with programs, the more we will need to read programs. Sometimes beginning programmers think programming is all about writing code. That is certainly important, but it is by far not everything: reading code will be just as important – if not more important – as writing code.
As your programs become more interesting and larger, you will take more and more time to work on them. You will work with code that you have written months earlier, and you have to read it again to remind yourself what it does.
If you continue programming, you will start working with other programmers. You will need to read code that others have written, and you will need to write code for others to read. When you progress even further, you may contribute to an open source project, or you may find some publicly available code on the internet that you’d like to use and extend. In each case, your work will start by reading large amounts of code that others have written before you can add your own.
In each of these cases, it is important that the code you are working with is readable. Being readable means that it is written in a way that helps a human reader to make sense of it and understand it. Not all code is easily readable, and there are big differences in how different programmers write code. Writing your code with readability in mind is one of the most important principles if you care about your program.
Readability is one of the most important aspects of a program. Programs can be written in many different ways, and this can affect greatly how easy or hard they are to understand. Always strive to make your programs as easy to read and understand as possible.
The most basic thing you can do to aid readability is to choose good names for your variables. From the beginning, we have named our variables so that they describe what they are used for. We used, for example "fish" for the variable holding the fish, and "shark" for the variable holding the shark.
This seems obvious in retrospect, but it is by no means automatic. We could have named our variables "a", "b" and "c" instead of "fish", shrimp" and "shark", and the program would have worked just the same. In fact, we have seen many programs where programmers did just this: they used one-letter variable names, just to save a bit of typing, and the program is full of variables called things such as "n", "p1", or "c".
A programmer can get away with using lazy names for variables as long as the program is really small, and no other programmer needs to read it. But as soon as we want to work with others, or work with our own program for a longer time, we should take variable naming seriously. If you name your variables in a way that they describe well what is stored in them, the whole program will be much easier to read and understand. You should get into the habit of always thinking carefully about naming your variables.
So what has this discussion to do with our use of functions?
The answer is that using functions gives us a chance to attach a name to a section of code to describe what it does. For example, we have taken all the lines of code that have to do with moving the fish, and put them into a function called "move_fish". The name of the function describes to the reader what happens in this function, and at the place in the code where it is actually needed, it now says "move_fish()" instead of listing a long sequence of statements. This is of great help to a reader of this program, as it gives them a very useful hint what the program does here, without cluttering the main loop.
The ability to attach a meaningful name to the block of code – in the form of a function name – is the first advantage of our restructure.
Take the naming of your variables and functions seriously. Always try to use a descriptive name that gives a good hint what the variable is used for, or what the function does.
Exercise 4.6 Look back through your program. Make a list of all identifiers that you have used in the program. Think about each of them: are they well-chosen? Do they describe their purpose well?
 A note about names: In Python, you are often expected to name things. For example, you can make up your own names for variables or for functions. Python has some rules about what these names must look like:
-
You can use letters, digits and the underscore ( _ ) for names, but no other special characters.
-
You cannot use spaces in a name.
-
The first character cannot be a digit. (It has to be a letter or the underscore.)
-
Names in Python are case-sensitive. This means that the names "number" and "Number" are different names.
The technical term for these names is "identifier". You may come across this term occasionally: When the system asks you for an "identifier", it is asking for a name in this format.
Exercise 4.7 Which of the following names are valid Python identifiers, and which are not? Why?
sum
sum01
1sum
sum_
sum 01
sum%1
_
33
__33__
sum+
 Good programming practice: Choose names carefully
Pay close attention to the names you give to variables and functions. Choose names that describe as well as you can what a variable is used for, or what a function does.
4.3. Abstraction
The second advantage of using functions in our program is abstraction. Abstraction is the technique of solving a sub-problem first, and then being able to ignore the details of the problem once it has been solved.
For example, if we now read our main loop, we can see that in each loop iteration it moves the fish, moves the shark, and maintains the pace of the loop. This is really easy to understand, and as long as we are happy with the behaviour of the fish movement, and we trust that it works as intended, we do not need to worry about the details of how it works any longer.
We have essentially treated the programming of the fish behaviour as a distinct sub-problem, which we solved by writing a function. When we need to invoke the fish behaviour, we can now call it just using its name, without needing to worry about the details of how it works. We treat "fish_movement" as if it were a single task, and we free our minds to concentrate on other things. We "abstract from" the details of the task, and treat it as a single, easy thing.
As our programs become longer and the tasks we wish to implement more complex, this becomes really important. Towards the end of this book, we will write programs solving problem that are too big to hold all details in your head at the same time. We will solve those problems by dividing them into sub-problems, which are smaller and can be solved more easily. These sub-problems are often solved in functions. And once we have written enough functions solving enough sub-problems, the solving of the overall problem becomes easy and straight forward.
Abstraction is thus a technique that wraps a potentially complex task into one unit and gives it a name. It hides the complexity, and makes it easy for us to use it without needing to think about the complicated details.
Even more importantly: it allows us to share the work between different people. For example, one programmer, somewhere, once implemented the randint function from the random library, or the is_touching method from the graphics library. But since we are using abstraction, we do not need to understand or worry about how these functions work internally. We just use them as a single instruction that does what we need. We aim to achieve the same with our own functions.
To use a function without the need to study its body, we just need to understand how to call it and what it does. The one additional thing that is needed is a good function comment that gives a reader enough information to understand what a function does without the need to read the body. So far, we have neglected the comment in our own functions. It is time to fix this.
Exercise 4.8 For each of the functions defined in your program, write a function comment. This is done in the area under the function header, marked with a small double-quote symbol. In the comment, describe what the function does.
The idea of abstraction is supported in Strype using the folding functionality of the function definition frame. Once the implementation of a function is finished, you can fold in the implementation to simplify the view of your program. Since you only need to know the header to call the function, this will be all you need to see for much of the time. Only when you later want to modify the function do you need to fold it out again.
Good programming practice: Always comment carefully
You should always add a comment to every function you create. The comment should state what the function does, what parameters it expects, and what it returns. Another programmer should be able to call your function without having to look at the implementation; the comment should tell them all they need to know.
Within the code, use comments to add information when a segment of code is not obvious.
4.4. Reuse
Yet another advantage of using functions for part of our code is reuse: Once we have created a function for a subtask, we can call this function multiple times in our program, without the need to write out the whole code again. We will see more examples of this in later projects.
4.5. Refactoring
The technical term for what we have done when we move part of our code into functions is refactoring. Refactoring is an activity of improving the structure of our code without adding any new functionality. Typically, after a step of refactoring, the program behaves in exactly the same way as before, but the internal structure is better. The structure matters, because it typically makes it easier to understand, extend or modify the program
Refactoring is the restructuring of a program to improve the internal quality of the code. Refactoring maintains the functionality of the program: it will do exactly the same after the refactoring as it did before. The improved structure makes it easier to do further work with the program.
The program as it looks after the improvements described here is available in the book projects as yellow-fish-v6.
So far, we have only made structural improvements to our game, but not added more functionality. In the remainder of this chapter, we discuss some ideas of functionality you could add to your game. These do not need to be done in this order, or indeed at all. You are very much invited to invent your own improvements and try to add those as well. You might like to treat the following sections as suggestions rather than as strict recipes you have to follow. If you want to compare your code to ours, you can look at yellow-fish-v7, which is the last of the yellow-fish projects in the examples folder and contains implementation of some of the functionality suggested here,
Good programming practice: Use small functions
You should always strive to break up your code into separate functions. Your "My code" section should never hold a long sequence of code. If it does, it is time to move some code into separate functions.
If functions get long, break them up as well. Each function should always be responsible for only one well-defined logical task. If it does more than that, create a new function.
4.6. Adding sound
Currently, our game is silent. One obvious addition is to add sound effects. This is fairly straight forward:
-
To use sound in our project, we need to use the
strype.soundlibrary. We can import the entire library, using the*symbol, as we have done with thestrype.graphicslibrary. Make sure this library is imported. -
We can either copy sound files from our file system into our program, or we can record sounds directly in Strype.
-
We can then use the
playmethod from theSoundclass to play the sound file.
Let us start by recording our own sound – this is the easiest option. Strype has a built-in sound recorder that lets you produce your own sound effects easily. Insert an assignment frame and place the cursor into the value slot on the right-hand side:

In the help area in the top right of the Strype window, you will see the hint that pressing Ctrl-Shift-U can be used to record a sound. Try this out.
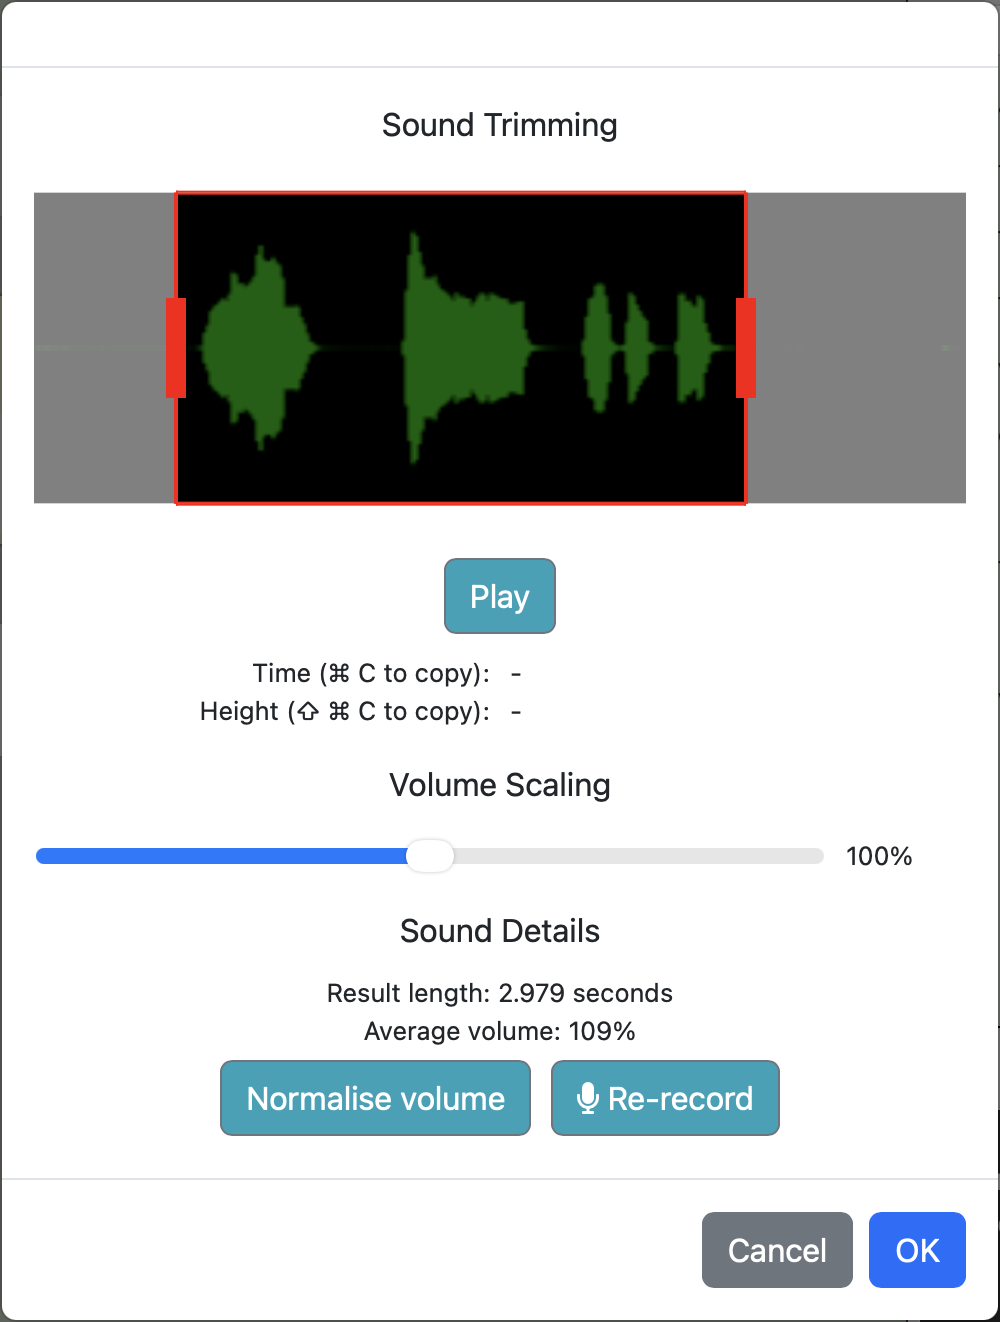
You will see first a sound recorder and, after recording your sound, a simple sound editor (Figure 4.4). In this editor, you can trim the sound (remove unwanted parts at the start and end) by using the red handles, and you can adjust the volume. Experiment with this.
Exercise 4.9 Find the place in your program where the fish eats a shrimp. Add an assignment frame there for a sound to be played at that point.
Exercise 4.10 Place the cursor into the value slot of this assignment and use Ctrl-Shift-U to record a sound. Change, trim, check, re-record the sound until you are happy with it.
Now that we have a sound recorded, we can play it:

Exercise 4.11 Enter the code shown above into your own program. Try it out.
Exercise 4.12 Also play a sound when the shark east the fish.
If a sound is only used once in a program, we can also play it without assigning it to a variable. For this, we create a function call frame, record the sound directly into that frame, and then call play on the sound literal:

Either way is fine.
Another option is to find and copy sound effects from the internet. Some sounds are provided with the Strype projects, and you can find libraries of free sound effects by doing a web search. To use those sounds, download them to your own computer and then copy/paste them into your program, just like you did with images.
If you would like to explore this, do the following exercises.
Exercise 4.13 Add ready-made sounds from the internet to your program. The Chapter03/sounds folder contains the sounds we have used for our own version of the game. You can find some more sounds in the Material section of the book website, or you can search for sound effects on other websites. Download one to your computer, copy it, and then paste it into your own program. Sound file formats that work include MP3 and WAV format files.
Exercise 4.14 Add another sound that is played when the player wins the game (when all shrimp are eaten).
4.7. Game over
At the moment, the game just runs on when the fish is caught. Implement a proper end to your game.
Exercise 4.15 Add a game-over message to your game. You could do that by creating an actor that has a "Game Over" image as its actor image, at the time when it should be shown.
Exercise 4.16 Stop the execution of the game when the game is over. (You can do this using the stop() function from the graphics library.)
Exercise 4.17 As an advanced exercise, you could also end the game when the player has eaten all the shrimp. This requires using the len() function to check the length of a list, which we have not discussed yet, so do this exercise only if you feel adventurous and are happy to look ahead and find out about this on your own. The idea is to put up a "You win" sign (and maybe play a sound) when all the shrimp are gone. You can check this by using a call to get_actors("shrimp") to get a list of all shrimps, and then checking whether the length of this list is zero.
One tip to consider if you are stopping the game: If you play a sound and then immediately stop the execution of your game, you will not hear the sound. This is because execution will be stopped immediately after the sound has been started (not ended). If you want to hear a sound at the end of the game, you should use a variant of the play method:

This version of the play method waits until the sound has finsihed playing before the execution continues with the next statement. (The original play method continues execution while the sound is playing.)
4.8. Random turns
Winning the game is still quite easy. This is partly because the shark swims in a very predictable way: when it is not at the edge of the world, it just swims straight. We can make it a bit more interesting if we make the shark swim more randomly.
We can use randomness here in two ways: we can make the shark turn at random times, and turn by a random amount. Let’s start with the second part of this: turning by a random amount. This is quite straight forward. We can use the shark’s turn method, and then use a call to the random function for the actual parameter of the degree to turn. For example

will make the shark turn a random angle, between -45 and 45 degrees.
Exercise 4.18 Add code to your program to make the shark turn a random amount at each step.
When you test this version, you will notice that it makes the shark appear too nervous. The constant turning makes it flick back and forth – it does not look good. So our next step is to make it turn less often. Let’s say, at every step we want a 10% chance of turning, and in 90% of the steps we just continue straight. How can we do this?
Exercise 4.19 How can you use a random number to express a 10% chance? Describe at least two different ways.
One way to express a 10% chance is to generate a random number between 0 and 99, and then look at the number. There is an exactly 10% chance that this number is less than 10.
In Python, we can use the < operator to test whether one number is less than another one. For example number < 20 returns True if the value in the variable number is less than 20. (Again, see Appendix C: Python operators for a full list of operators.)
This means that the expression randint(0, 99) < 10 will be True exactly 10% if the time. By using this expression as the condition in an if-statement, we can make the turn happen in 10% of the steps:
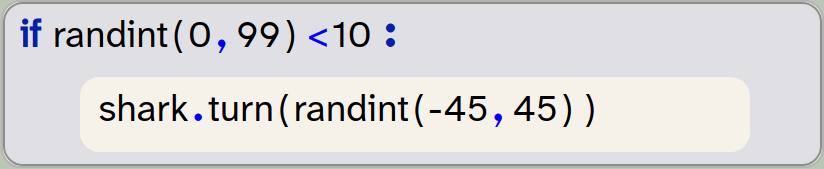
Exercise 4.20 Add this improvement to your code: make the shark turn with a 10% probability. Experiment with different values for the chance and the turn until you are happy with the movement.
4.9. Keeping score
Another possible addition is to keep a score. We could, for example, award 20 points for every shrimp eaten. Doing this involves creating a variable for the score, initialising it to zero, and then incrementing it by 20 every time a shrimp is eaten.
We have not yet discussed using variables in this way, and we will do so only in the next chapter. However, if you feel adventurous, or you know a bit of Python already, try this yourself with the following exercises. If you are uncertain, leave these exercises until after you have studied the next chapter
Exercise 4.21 Add a variable for the score. Initialise it to zero.
Exercise 4.22 Increment your score variable every time the fish eats a shrimp. (Note: you need to understand local and global variables for this, including the global keyword.)
Exercise 4.23 Show the score on screen by using the say_for method of the fish. Every time the score changes, get the fish to say the current score for one second.
4.10. Other extensions
Many more extensions to this game are possible. The following exercises suggest some ideas. We will not discuss these here, but leave it up to you to work these out. Some of them are advances exercises that require you to look ahead and find out some things for yourself.
Exercise 4.24 Make new shrimp appear, either every time a shrimp is eaten, or at random intervals.
Exercise 4.25 Change the fish movement so that it moves forward only when the up-arrow key is pressed.
Exercise 4.26 Make the game get more difficult over time by slowly increasing the shark’s speed.
Exercise 4.27 Turn the game into a two-player game by introducing a second fish.
We will leave this project behind for now, but try to have fun with it by making it your own with your own ideas.
4.11. Summary
In this chapter we have suggested some more functionality which you can add to your game. But most importantly, we have discussed how to structure your program as it gets longer. We have discussed modularisation, which is the structuring of your program into distinct logical units, and we have used functions to create those units. Each function is given a name, and we have discussed the important aspect of how you should name functions and variables.
And finally, we had a first look at adding sound output to your programs, to create more engaging games.

-
Sequences of code can be moved into functions, and the functions can be called at the place where we would like to execute that code. This makes our program more modular, and easier to read and maintain.
-
Readability is one of the most important aspects of a program. Programs can be written in many different ways, and this can affect greatly how easy or hard they are to understand. Always strive to make your programs as easy to read and understand as possible.
-
Take the naming of your variables and functions seriously. Always try to use a descriptive name that gives a good hint what the variable is used for, or what the function does.
-
Refactoring is the restructuring of a program to improve the internal quality of the code. Refactoring maintains the functionality of the program: it will do exactly the same after the refactoring as it did before. The improved structure makes it easier to do further work with the program.