Chapter 7. Doing more with lists
In the previous chapter, we had a first experience of working with lists. Lists are so central to programming in Python that we will spend a bit more time with them: we will look at other uses of lists in this chapter to get a deeper understanding of working with them.
We will do this with two different examples: First, we will see how we can use lists in our games, and then we will process sound files using list operations. Both of these examples will teach us something more about handling list, and data in general.
Let us start by getting back to our game from the early chapters of this book. When we implemented that game, we have seen that our graphics program deals with actors (objects of the Actor class) to show various elements on screen. Using lists of actors enables us to improve our game.
We will start by looking at a variation of our Yellow Fish game; it is named Space Rescue.
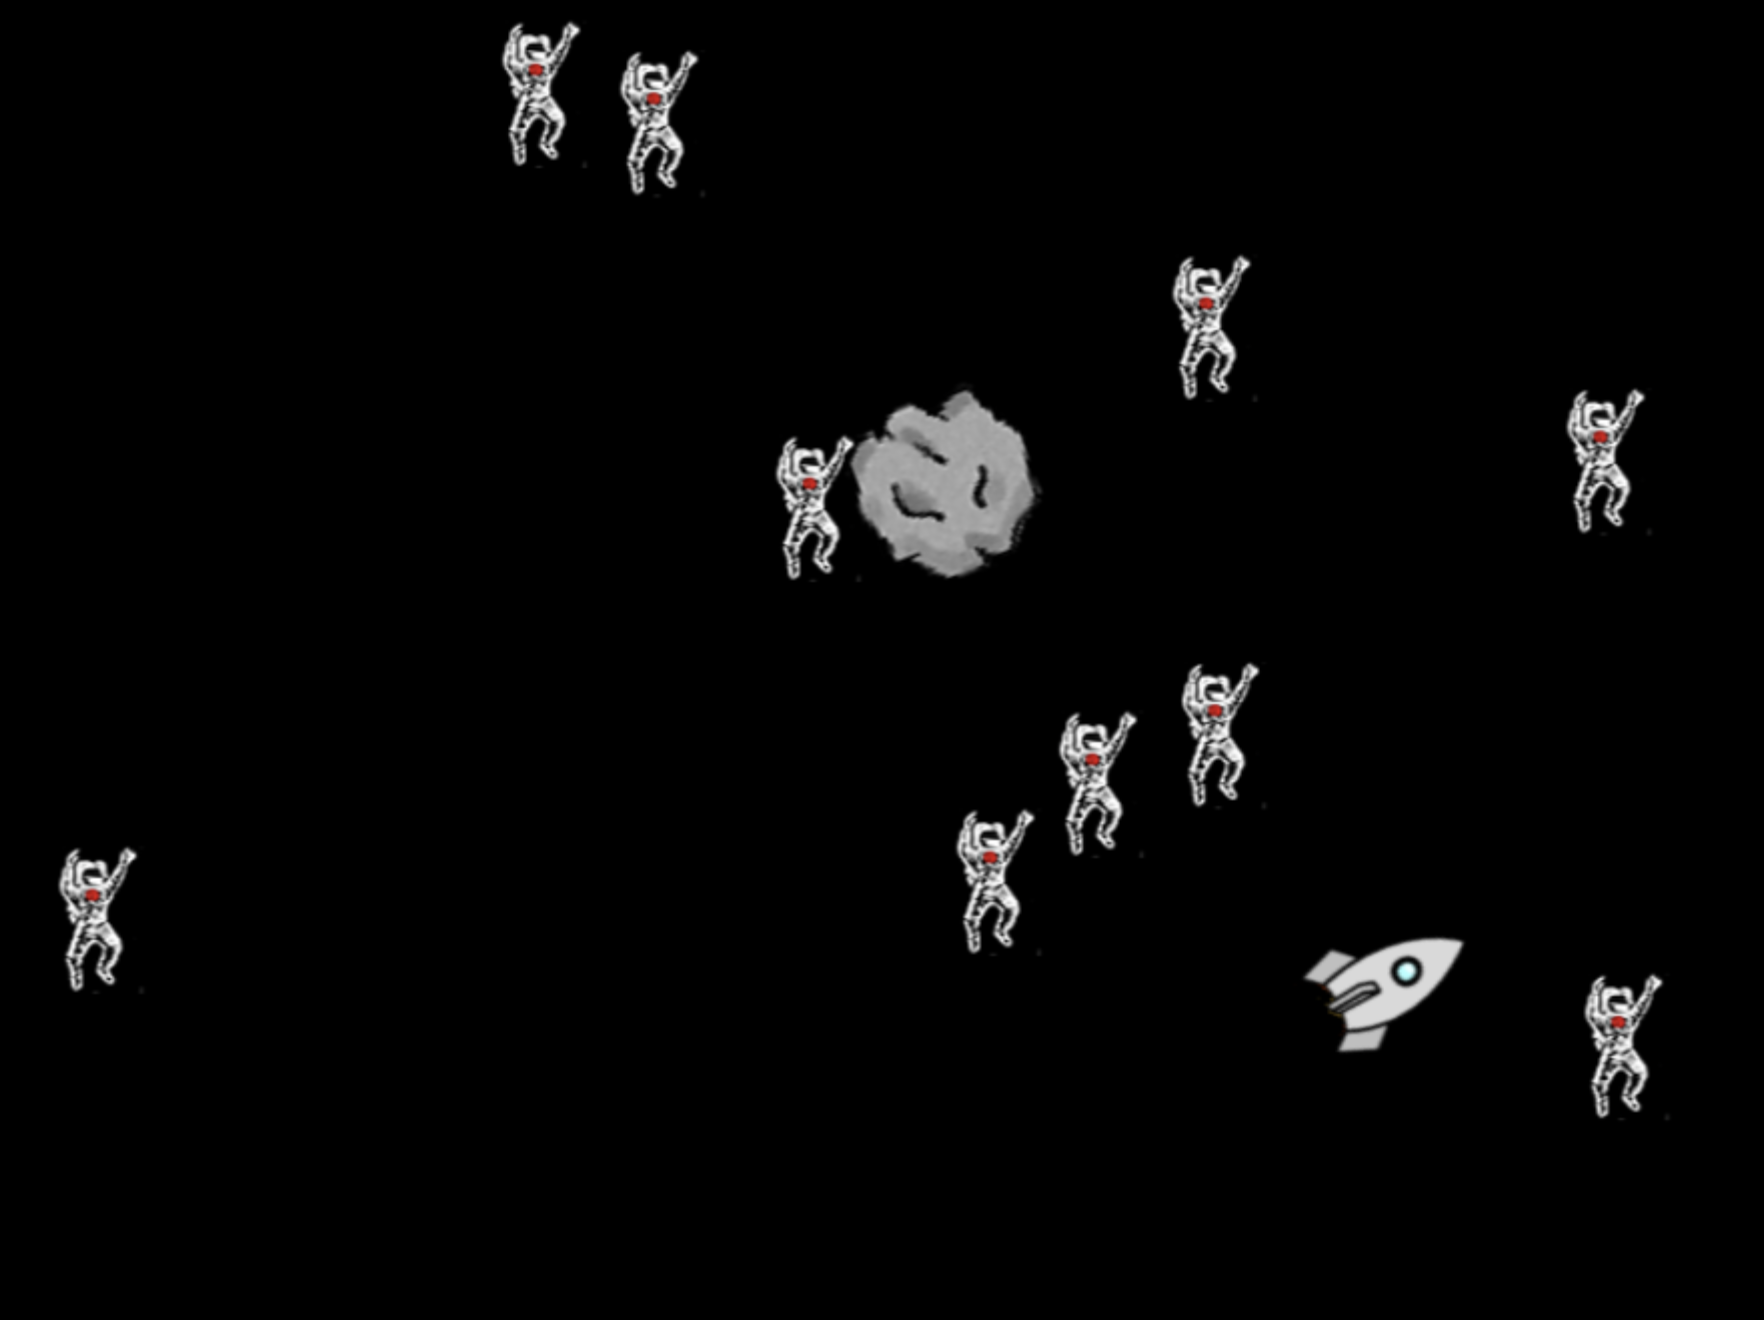
7.1. Lists of actors
The Space Rescue project (Figure 7.1) is essentially a copy of the Yellow Fish game with different graphics. Start by investigating it.
Exercise 7.1 Open the space-rescue game from Chapter 7 of the book projects. Run the program and investigate it. How is it similar to the yellow fish game? How is it different?
You will have seen when you tried out the program that it is essentially the same as yellow fish. We have changed the colour of the background, the graphics and some of the sounds, but the code is almost identical. The only two changes to the functionality are:
-
The asteroid (which previously was the shark), does not turn when it reaches the edge of the screen, but instead appears on the opposite edge.
-
We have added an end-of-game scene that lands the rocket on a planet when the player wins the game.
Exercise 7.2 Examine the source code of the new game version. Find the place where the new behaviour of the asteroid at the edge of the screen is implemented. Make sure that you understand this code. Explain how it works.
Exercise 7.3 Find the code that implements the end-of-game landing scene. What is the function called that implements this?
Exercise 7.4 Does this function use any constructs you are not familiar with?
7.1.1. Creating the astronauts
One small improvement to the game we can now make is to animate the astronauts. Currently, they do not move at all, which makes the scene very static. Since they are floating in space, we might start by making them slowly turn on the spot.
Exercise 7.5 Find the place in the program where the astronauts are created. What variable is the astronaut actor assigned to? Where else is that variable being used?
With the investigation in the previous exercise, you will have seen that the astronaut actor is being created and assigned to a variable, which is then never used. The variable is essentially discarded in our program. This is not a problem: The astronaut actors remain in the game, because they are held in the graphics world, and we can later get them back from there.
Let us prepare our task by initially rotating every astronaut to a different value, so that they are not all facing the same way.
Exercise 7.6 In the loop that creates the astronauts, use the set_rotation(rotation) method of the astronaut actor to assign a random rotation to the actor immediately after it is created. The rotation is specified in degrees, so the random value should be between 0 and 359. (360 would be the same as 0.)
7.1.2. Accessing the astronauts
We can now make all astronauts slowly turn by calling the turn method on each actor in every step of our main loop. To do this, we first need to get access to our astronauts again. Luckily, this is quite easy: the graphics world maintains a list of all actors in the world, and the strype.graphics library includes a function called get_actors() that can be used to get access to this list. We could, for example, get a list of all actors by simply writing

The function has an optional parameter to provide a tag. If a tag is provided, only actors tagged with this tag will be returned. If you check the line where we created the astronauts, you will see that we used the tag "astronaut" for each of our astronaut actors, so we can now use this in our function call:

This call will give us a list of all astronaut actors.
 The graphics system maintains a list of actors. We can obtain a list of all actors, or of selected actors, by using the
 get_actors() function.
Exercise 7.7 Find the get_actors() function in the library documentation. What is the default value of its parameter?
Exercise 7.8 Create a new function move_astronauts() (to mirror the move_rocket() and move_asteroid() functions). The function body can initially be empty. Make sure to call this function from your main loop.
Exercise 7.9 In this new function, use the get_actors() function to get a list of astronauts. Then write a for-loop that iterates over the astronauts list and makes each astronaut turn 1 degree. Test your program. Do the astronauts turn?
Exercise 7.10 Write an appropriate function comment for your new function.
Your astronauts should now be slowly turning while they are floating in space. One last thing that we will add is to make them all re-appear on the surface of the planet after the rocket has landed. One problem with this in our current version is that we do not keep hold of the astronauts after they have been collected, so we are not in a position to re-add them into the world. We will first change this by keeping a list of all astronauts, and then we can add them again later.
Exercise 7.11 Add a variable called astronauts and assign an empty list to it. The place to create this variable is at the beginning of the "Definitions" section (where the score variable is also initialised).
Exercise 7.12 In the loop that creates the astronauts, add each new astronaut to the astronauts list.
Now we are in a position where we have kept our own list of all astronauts (independent of whether they were already collected or not), and we can now put them back into the world at the end of the game.
Exercise 7.13 Add a for-loop to the landing function, after the rocket has landed, to add the astronauts from our list back into the world. To place an actor back into the world after it had been removed, you can use the re_add(x,y) method of the actor:

Choose your values for the randint function so that they are placed at random locations on the surface of the planet.
When you run your program, you will notice that the 10 astronauts all appear at once. This is because the for loop is so quick that we see them all appear at essentially the same time. To make this visually more interesting, we can slow down the execution of this for loop, using the pace function, to make the astronauts appear more slowly, one after the other.
Exercise 7.14 Set the pace of this new for-loop to 5, so that it executes slowly enough for you to see the astronauts appear one at a time.
Exercise 7.15 Add the playing of the click sound (the one that is used when an astronaut is picked up) into this loop. (You can do this by duplicating this line and then dragging it into place.)
A copy of the project with these changes implemented is in the book projects as space-rescue-v2.
 When you carefully inspect the creation of the astronauts and compare it to the creation of the shrimp in our earlier version, you might have noticed one further small difference: In the fish version, we wrote:

while in the space version we changed this to

The main change here is the assignment of the image outside the loop. If we use the image literal inside the loop, we are creating 15 separate shrimp images. They all show the same picture, but they are all separate image instances. If, on the other hand, we use the image literal outside of the loop, only one image is created. This same image is then used for all the different actors. This is much more efficient than using multiple images unnecessarily. Using many separate images can slow down the execution of your program, especially if the images are large.
With this series of exercises, we have seen how the graphics world uses lists to work with the actors and how we can use these lists to deal with more than one actor at a time. We can also use our own lists of actors if we want to keep them when they are no longer in the world. Again, lists are useful here to process a collection of items.
There are, however, two more things to discover in this project, which we should discuss before we move on.
7.2. Constants
One thing you may have noticed if you read the code carefully is that we have a variable that is written in capital letters:

This style looks different from the way we have named our variables previously, and in Python it has a special meaning: it means that this value is a constant.
A constant is very much like a variable – it holds a value that you can assign to it – but the difference is that this value is intended to never change. It will always be the same throughout the whole execution of the program.
Many programming languages have a special language construct to declare a constant. You can then assign a value once, and never change it after that. The system would report an error if you tried.
Python does not have such a construct. Instead, we use a convention. By convention, when variables are written in capitals, they are intended to be constants. This is a very common and very widely used convention: just about all Python programmers follow it. This means two things for you:
-
First, when you see a name in capital letters, you can usually assume that it is constant.
-
Secondly, you should follow those rules in the code that you write: Use capital letters for your own constants, and never change the value of a constant.
Python does not prevent you from changing the value – technically, constants are just variables – but you will confuse every Python programmer if you do.
There are several reasons why you might want to use a constant in your program. The first is that it can make your code more readable. Imagine you read this fragment of code:
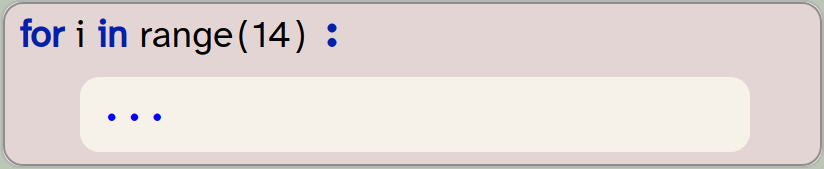
In this case, you do not immediately know what the number 14 means. Why 14?
If instead, it says
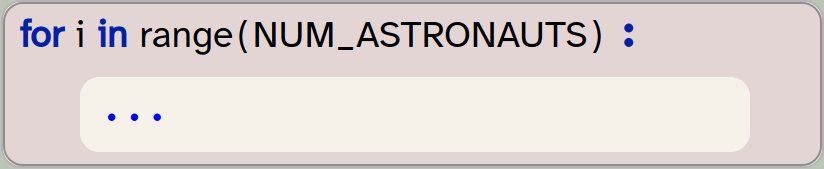
then it is much clearer. The value itself may still be 14, but you now know immediately that this loop is linked to the number of astronauts in the game. Constants can give names to your values, and make your code easier to read.
Secondly, you may have used the number of astronauts at multiple places in your program. Should you later change your mind and decide to show more astronauts, you now have to find all the places in the program where that number is used, and change it in each place. In larger programs, this can be challenging.
If, instead, you used a constant, you can change the value one single time, and it will automatically be used wherever it is needed.
Exercise 7.16 Is there another variable in this program that could or should be a constant? Discuss.
A variable written in capital letters is considered a constant. Values of constants should never be changed. Python does not enforce this, but it is bad practice to do so. Using constants can make your program more readable and easier to maintain.
 Good programming practice: Use named constants when possible
Use named constants to attach names to specific values. Try to avoid having arbitrary numbers in your code; instead, name them to describe what they are and use the named constant where the value is needed.
7.3. Global and local variables
The other new construct you may have noticed in the source code of the space-rescue program is the use of the term global:
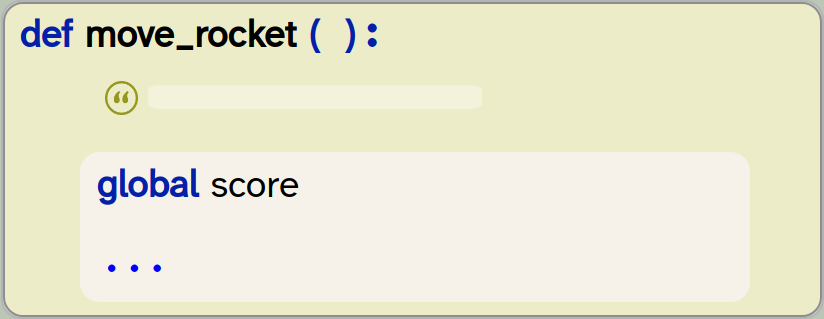
This construct has to do with the difference between global variables and local variables.
Python distinguishes global and local variables and keeps them separate. Local variables are those declared inside a function. If you introduce a variable inside a function body, it is automatically local, and it can only be used inside that function. In fact, it does not survive after the function ends: when the function exits, the local variable is deleted (and next time the function runs, and entirely new variable is created).
Global variables, on the other hand, exist for the whole time the program runs. They are the ones that are created outside of functions (in the "My code" section or directly in the "Definitions" section, outside of a function definition).
A global variable is a variable declared at the outer level of your program (outside of function or class definitions). Global variables hold their value throughout the entire run of a program.
A local variable is a variable that is declared inside a function. It is created every time the function executes, and is destroyed when the function ends.
Exercise 7.17 In the space-rescue program, find an example of a global variable. Find an example of a local variable.
To investigate the relationship if global and local variables a bit more, consider this code:
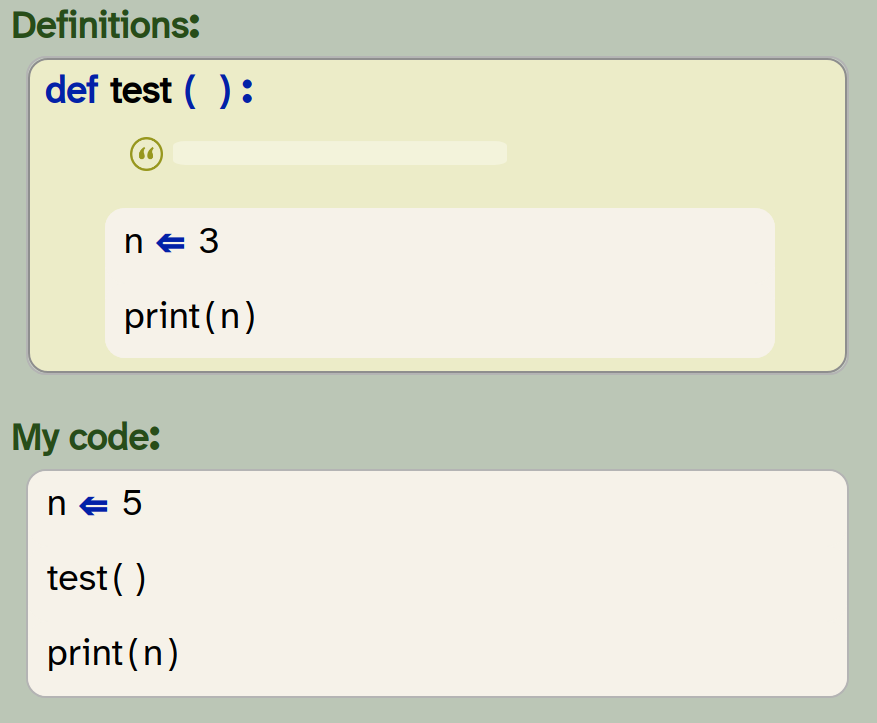
Exercise 7.18 For the code shown above, predict what the program will print.
Exercise 7.19 Create a new project for this experiment and type in the code shown above. Run the program and compare the output to your prediction. Were you right?
Exercise 7.20 Try to explain why the output is what it is.
The result of this experiment can be puzzling at first. The reason we see two different values printed is that Python keeps global and local variables completely separate. As you can see here, you can even have two variables with the same name! The assignment n ⇐ 5 creates a global variable, and the assignment n ⇐ 3 creates a local variable (because it is inside a function). The fact that these have the same name does not matter – they are two separate variables.
Now insert the declaration global n at the beginning of you function:
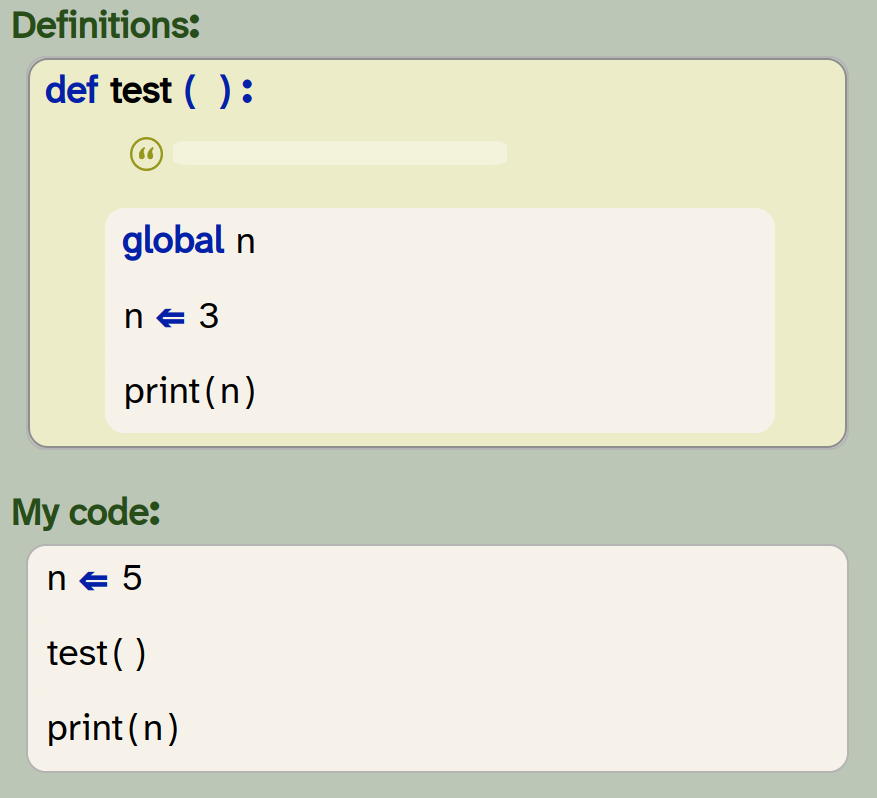
Exercise 7.21 Predict what will happen when you run your program after the change shown above.
Exercise 7.22 Try it out: make this change in your code and run your program. Discuss what you see.
Exercise 7.23 What happens when you change the assignment in the test function from n ⇐ 3 to n ⇐ n + 1? Predict the outcome, and then test it.
Exercise 7.24 What happens when you now remove the global n declaration again? Try it out.
When we use the global n declaration inside the function, we are saying that we want to use the global variable n, instead of creating a new, local variable.
The result of the last exercise can be quite confusing. The reason here is the following:
-
We now have no
globaldeclaration in our function. Therefore,nis a local variable. -
Local variables are created when the function starts. Initially, they have no value (until you assign a value to them).
-
In the assignment
n ⇐ n + 1, Python first evaluates the right-hand side of the assignment:n + 1. Here, we try to read the value ofn, but this variable does not yet have a value – we have not assigned one yet. Thus, it causes an error when we try to read this variable.
The error you see here is called an UnboundLocalError (you can see this in the error message). It is useful to remeber this error and its cause – you are likely to see it again.
The declaration global var_name used inside a function makes every use of the variable name var_name afterwards refer to the global variable var_name instead of referring to a local variable.
Exercise 7.25 In the space-rescue-v2 program, find a use of the global declaration. Explain why it is needed here.
Exercise 7.26 Remove the use of the global declaration from the program and run it. Explain the error you see.
Good programming practice: Keep variables local
A good rule to improve the quality of your code is to use local variables whenever you can. If a value is used only inside a function, you should use a local variable. Use global variables only when necessary. Use of global variables has the effect that your program is harder to understand, and harder to adapt. You can often avoid global variables by passing values into functions as parameters when you need the value.
7.4. Manipulating sounds
For the remainder of this chapter, we will work with sound files, and we will see that sounds, too, can be viewed as lists – in this case, lists of samples.
A sample is a reading of the sound input (the microphone), and it is stored as a number. When these samples are read and stored quickly enough, we get a sound recording, and we can play it back later. Thus, a stored sound is a list of samples, which is a list of numbers.
Start by opening a project with a sound in it. We have provided such a project in the Chapter07 folder; it is called sounds.
Exercise 7.27 Open the sounds project. Add a statement to play the sound in it.
7.4.1. Sounds as lists of samples
In our project, we have a sound object. We can get the list of samples that makes up this sound by using the sound’s get_samples method.
Exercise 7.28 Look up the get_samples method in the library documentation. It is a method in the Sound class. What is the type of each element in the list it returns? What is the range of possible values?
Exercise 7.29 Write some code to get the samples from the sound in the project. Print out the length of the list. How many samples does it contain?
Exercise 7.30 The sample rate is the number of samples that is recorded per second. Calculate and print the sample rate for our sound. You can do this by dividing the number of samples by the length of the sound in seconds. (You can see the length in seconds when you hover with the mouse pointer over the sound literal in the editor.)
A sound is stored as a list of samples. We can get the list of samples from a sound object using the get_samples() method.
7.4.2. Playing backwards
The first experiment we can do is to reverse the sound to play it backwards. We can do this by reversing our samples list – a first attempt might look like this:
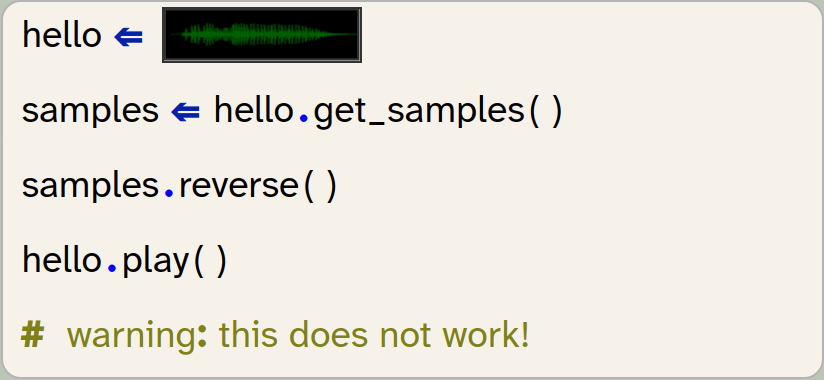
As the comment in the code snippet says: this does not work. The reason for this is that the get_samples() method gives us a copy of the sound’s samples. So by reversing the list, we are not changing the original sound.
We can fix this problem by creating a new sound from the reversed sample list and then playing the new sound:
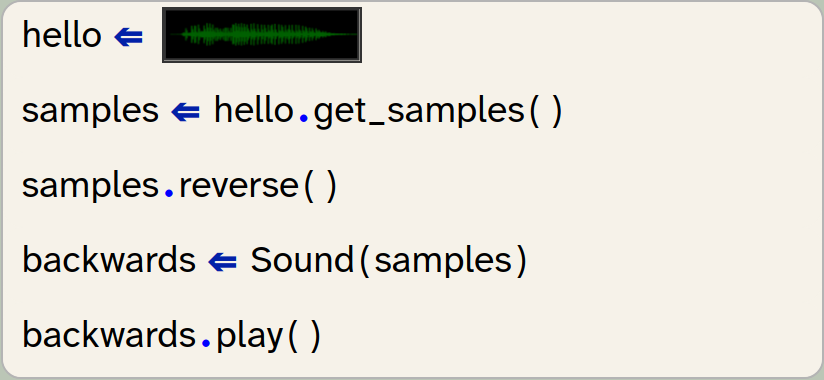
We see here that we can create a sound, using the Sound class’s constructor (writing the class name Sound with a parameter list), and providing the list of samples as the parameter.
A sound object can be created from a list of samples by using the statement Sound(sample_list).
Exercise 7.31 Implement the code shown above: reverse the sound and play it backwards.
In the following sections, we will do a series of exercises where we manipulate sounds. You can make this much more fun by recording and using your own sounds, instead of the one we provided.
7.4.3. Recording your own sounds
We have seen previously how we can record sounds directly in Strype. Delete the sound literal that is currently in your program, and leave the cursor in the value slot on the right-hand side of the assignment:

You can then press Ctrl-Shift-U to record your sound. Once you have done this, play the sound back (and re-record it if necessary, until you are happy with it).
When you record a sound from a microphone, it usually has some silence (or unwanted noise) at the beginning and end. Use the trimming function (the red handles at the sides of the sound graph, Figure 7.2) to cut off the unwanted parts; only the section between the red bars will be used. If we do not do this, the sound will appear to play with a slight delay, because it will play the initial silence as well.
Once you press OK, the sound will be inserted into your code.
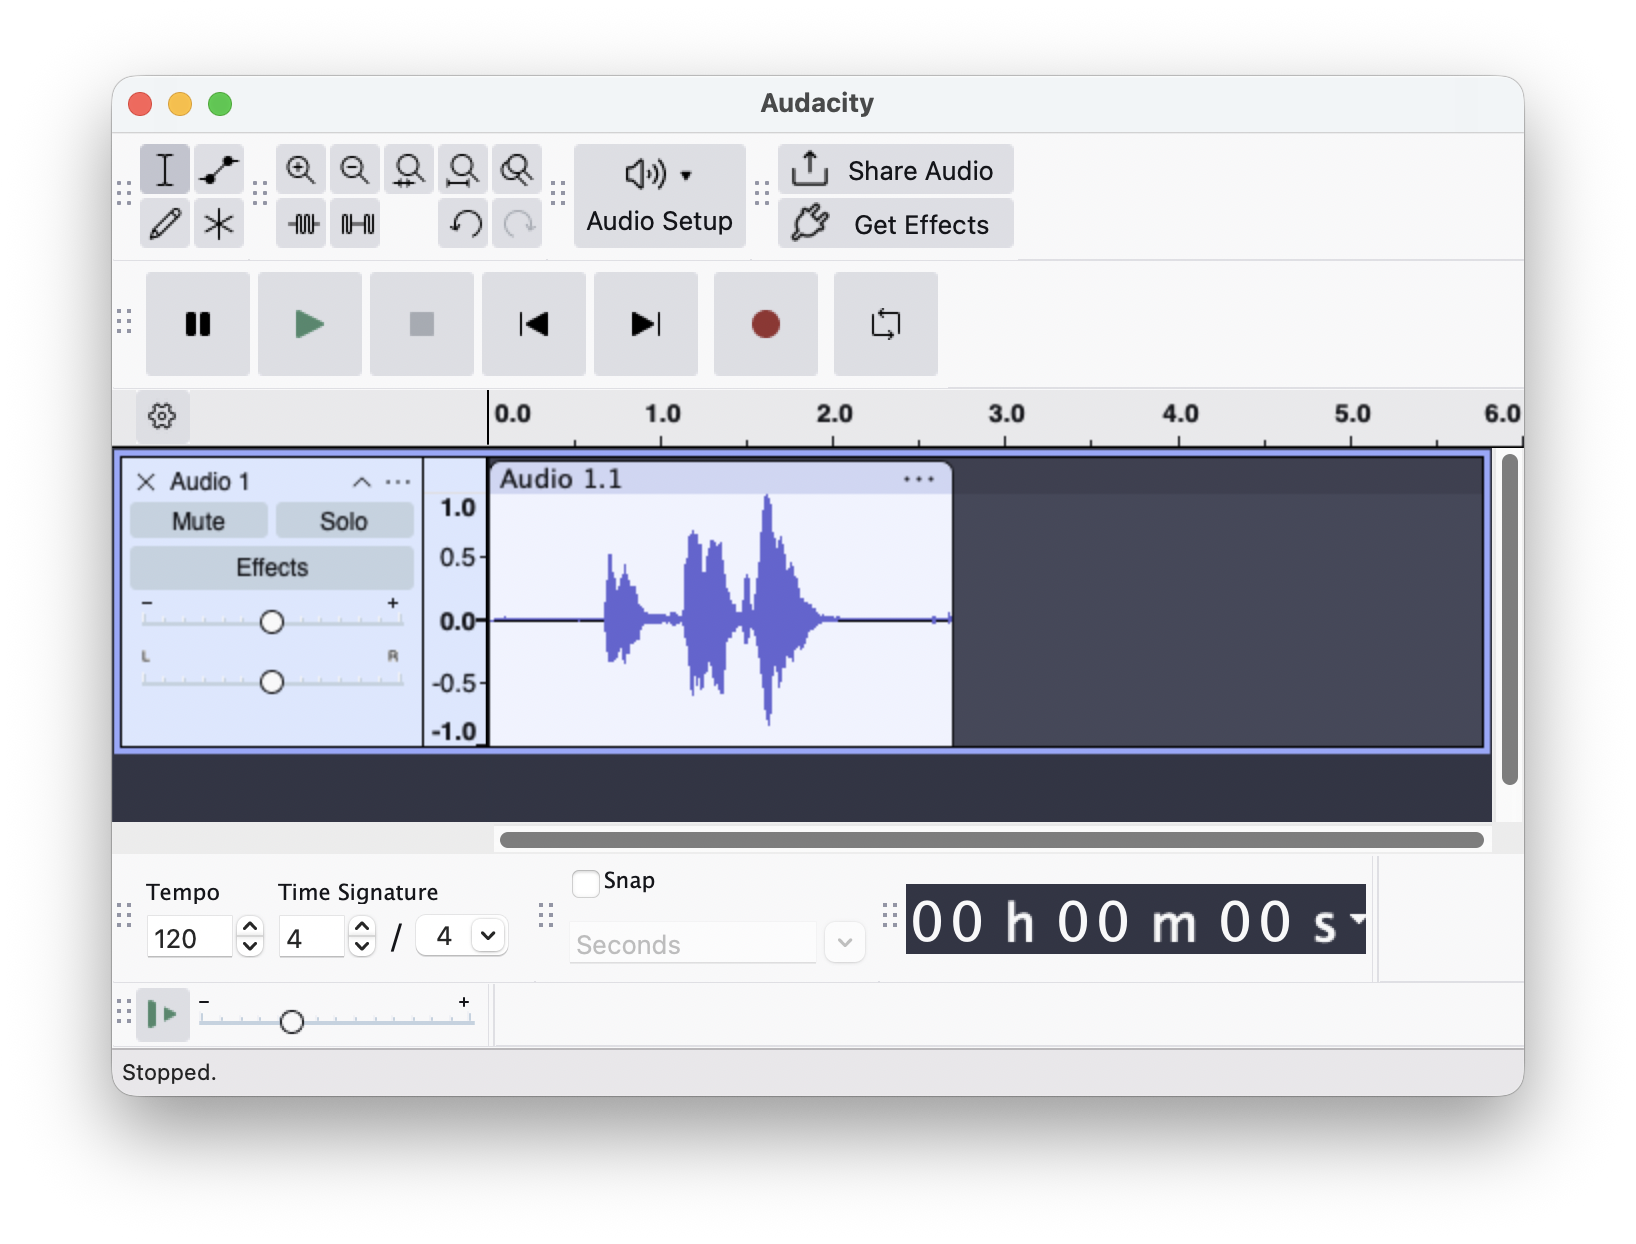
Exercise 7.32 Record your own sound, trim it, and insert it into your code. Play it forwards and backwards.
7.4.4. Repeating a sound effect
We are now ready to make modifications to our sound by modifying the sample list, and then creating a new sound from the new samples.
Let us start by duplicating the sound. We can duplicate a list by using the multiplication operator: *. For example:

will duplicate the list so that it contains its elements twice. The list then is:
[1,2,3,1,2,3]
We can also use the plus operator to append one list to the end of another:

Let us experiment with this. Write some test code for the exercises below.
Exercise 7.33 Create a short list of numbers. Use the * 2 operation to duplicate the list and print it out.
Exercise 7.34 Try the same with multipliers other than 2.
Exercise 7.35 Use the + operator to add two lists together. Print out the result.
Exercise 7.36 Let’s get back to out sound sample list. Duplicate the sample list and create a new sound with the new list. Play the sound. What happens, compared to the original sound?
We can join two lists together to form a single list by using the + operator: list1 + list2.
List elements can be repeated multiple times to form a new list by using the * operator: list1 * 3. For example, [0, 1, 2] * 3 will produce [0, 1, 2, 0, 1, 2, 0, 1, 2].
7.4.5. Stutter effect
An effect that is often used as part of music is to play the start of a word repeatedly before playing the whole word. For example, if your original sound is the word "Hello":
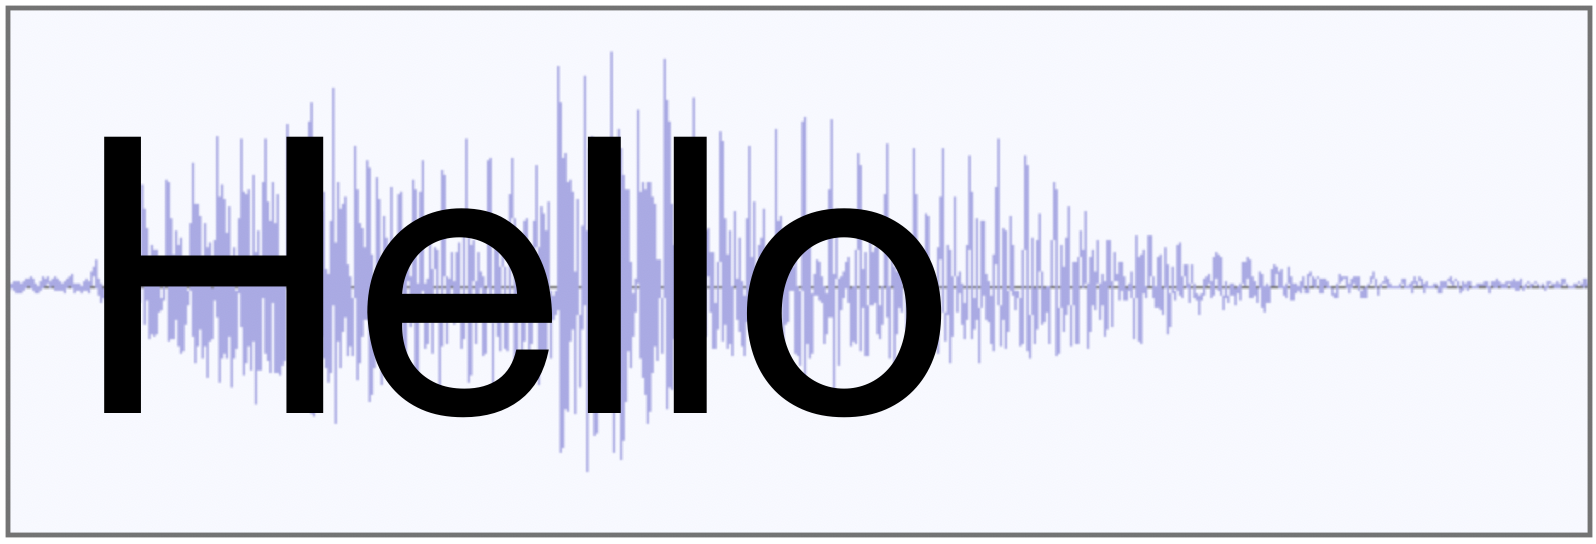
then the stutter effect turns it into this:
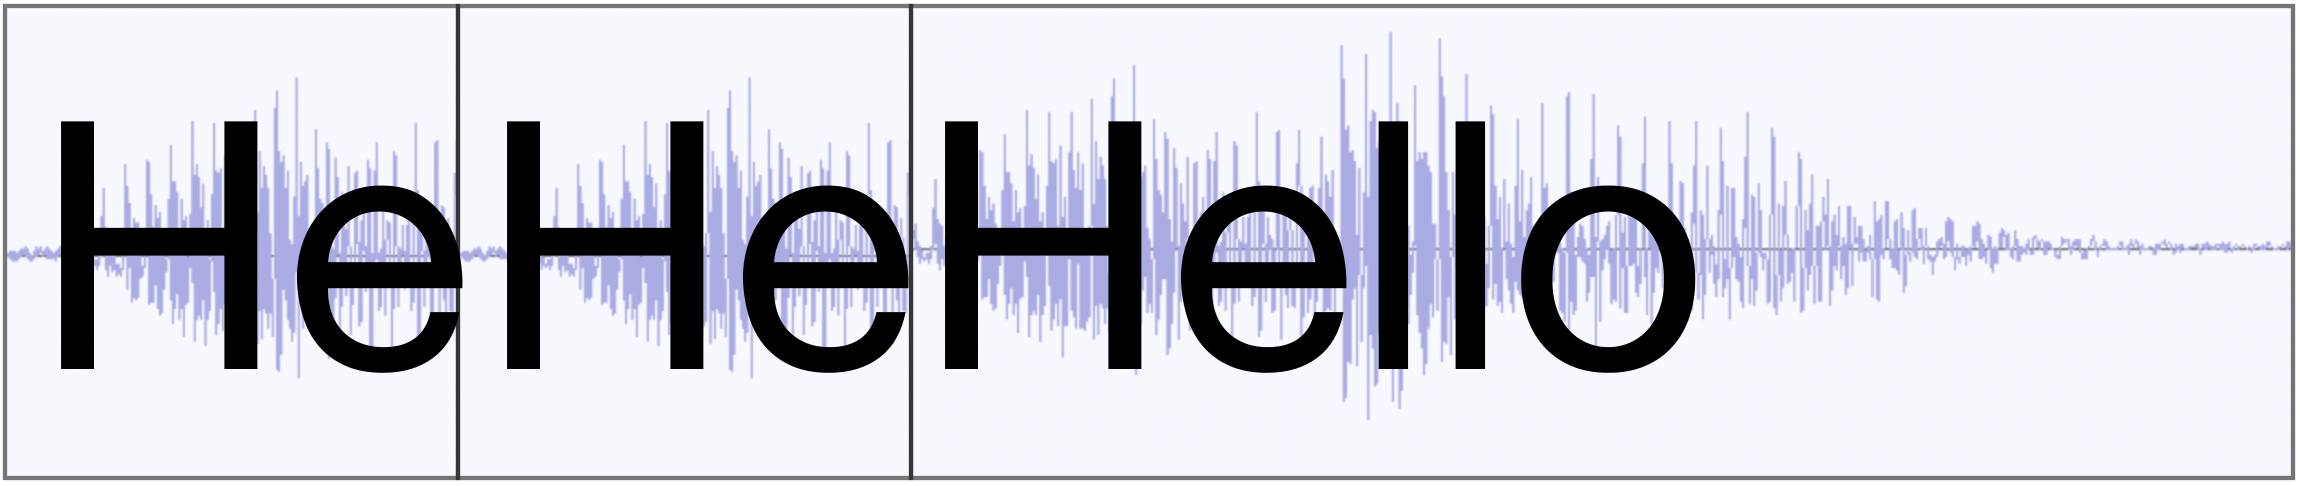
As you can see, we will have to take a copy of the first part of our sound, multiply it to play it several times, and then append the original sound.
Remember that we can use slicing to create a copy of a part of a list. For example samples[:9000] will create a list holding the first 9000 elements of the samples list.
Exercise 7.37 Implement the stutter effect in your own project. Use slicing to create the prefix sound, multiplication to repeat the prefix, and addition to append the whole sound. Test it and make sure that it works.
Exercise 7.38 Try the effect with different numbers of repetitions for the prefix.
Exercise 7.39 Make a function for producing and playing the stutter effect. The function should have two parameters: the original sound object, and a parameter called count which specifies how often the prefix sound should be repeated. For example, play_stutter(hello, 4) would play the hello sound with 4 repetitions of their partial word first. In your 'My code' section, just call this function.
Exercise 7.40 Add another parameter to your function to specify the length of the prefix part of the effect (the number of samples for the prefix). Test it.
Exercise 7.41 If you still have the code for the backwards playing in your project, it is time to clean up now: Make a separate function for backward playing as well and move your code into it.
Exercise 7.42 Add an infinite loop in your code (like in the game examples). In this loop, check the keyboard: if the 1 key is pressed, play your sound backwards. If the 2 key is pressed, play the stutter effect.
A version of this project with an implementation of these effects is available in the Chapter07 folder as sounds-v2.
Exercise 7.43 Make a program that plays different sound effects in reaction to different key presses.
7.4.6. Pitch change: double speed
Next, we will create a "cartoon voice" sound effect. This effect plays the sound sample at double speed. This has two consequences: the sound will be shorter, and the pitch will be higher. (The pitch is how high or low a voice sounds.)
Looking at our sound sample list, the idea is very simple: we can simply delete every second sample in our list. If we then play the remaining samples at the same frequency, the sound is half the length, and we can observe how this changes the pitch.
Thus, for our program, the obvious question becomes: How do we best create a list that includes only every second element from the original samples?
It turns out, slicing comes to the rescue again.
The slicing operator has a third optional parameter which we have not used yet. A full slice definition with this parameter looks like this:
list[start:end:step]
As we have seen previously, the first two parameters specify the beginning and end of the slice we wish to create. The third parameter is a step size: A step size of 2, for example, will select every second element, a step size of 3 selects every third element, and so on.
Consider, for example, the following code:

This code snippet will select elements from index 2 to index 9, with step size 2. Thus, it will print
[3, 5, 7, 9]
To fully understand this, we have to recall some details about lists and slices:
-
The first list index is 0, so by using 2 as the start of the slice, we are starting with the third element (not the second).
-
The end index of a slice (we have used 9) is not included in the slice.
-
The step with here is 2, so we get every second element.
Exercise 7.44 Assume a list my_list holds the numbers [4, 5, 6, 7, 8, 9, 10, 11, 12, 13, 14]. What is the list resulting from the expression my_list[2,9,2]? What is my_list[2,9,3]?
Exercise 7.45 Write a short test program to check your answer.
With just one more bit of information, we are ready to solve our problem: We know that we are permitted to leave out the start or end value of a slice. If we leave out the start, the slice starts at the beginning of the list; if we leave out the end value, the slice extends to the end.
The new bit of information is this: When we use a step value in a slice, we are permitted to leave out both the start and the end value. We then select elements at this step interval from the entire list. In other words

has the effect that every_second is a new list which holds every second element from our original list, starting with the first: [1, 3, 5, 7].
Since our original goal in this section was exactly this – creating a list with every second sample – this is now very straightforward.
Exercise 7.46 Implement a pitch_up function in your sounds project. Test it.
Slices from lists can include a step value. The syntax is list[start : end : step]. When we use a step value, the slice is created by copying elements from start to end, using the step size to advance. All three slice values are optional. If we want to use a step size across the entire list, we can write list[::step].
7.4.7. Pitch change: half speed
The next obvious thing to do is the opposite: Playing the sounds more slowly to lower the pitch. Once we have understood the pitch-up idea, it is quite obvious how we can do this: We just duplicate every sample in our list so that it appears twice in succession. In effect, the list [3, 7, 4] would become [3, 3, 7, 7, 4, 4]. If we do this to the samples list, the list is twice as long, the sound plays more slowly, and the pitch lowers.
Unfortunately, in this case, there is no ready-made operation in Python that achieves this in a single statement. As a result, we will have to write a loop that iterates through our original samples list and creates the new list we need.
The concept for this is quite straight forward: We iterate through the list of samples, and for every sample, add it twice to a new list:
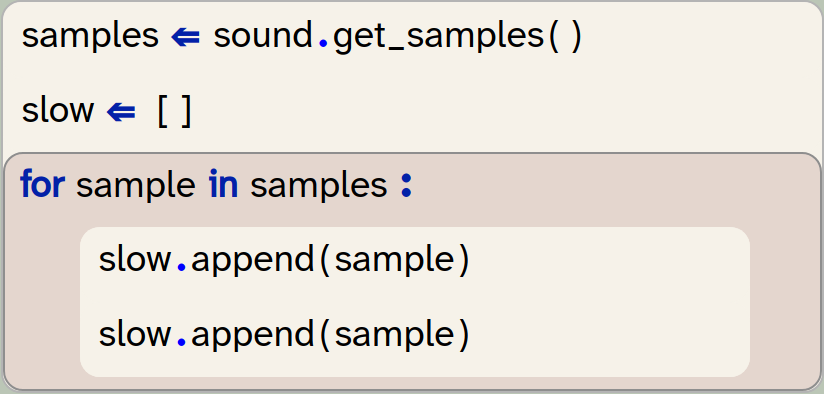
We are starting here with an empty list. The append method adds a single element to the end of the list, and we can see that we are doing it twice to duplicate every element.
We could add both elements in a single statement if we make a short 2-element list from our two samples and then attach this list, using the extend method:
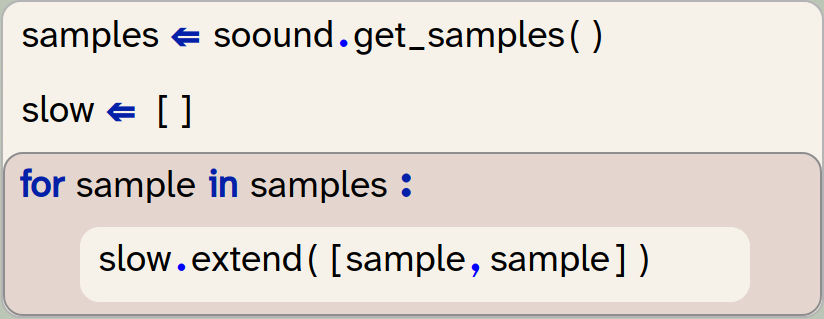
We have to be careful here: If we tried to add the [sample, sample] list using the append method, we would not get an error, but it would not do what we intend to do. It would instead add the 2-element list as a single element into our new list, which is not what we need. To add each element separately, we must use the extend method.
Exercise 7.47 The difference between append and extend can be quite subtle. Research and explain the difference between slow.extend([sample, sample]) and slow.append([sample, sample]). Draw a diagram to aid your explanation.
Exercise 7.48 Implement a function to play the sound at half speed.
We can append a single element to a list using the list.append(elem) method. We can append every element from another list by using the list.extend(list2) method.
There are various other interesting sound effect we can create, now that we have seen how changing the samples list can create a new sound. We will suggest a few at the end of this chapter. Before we do this, however, it would be useful to create a simple interface for the user to more easily activate these effects.
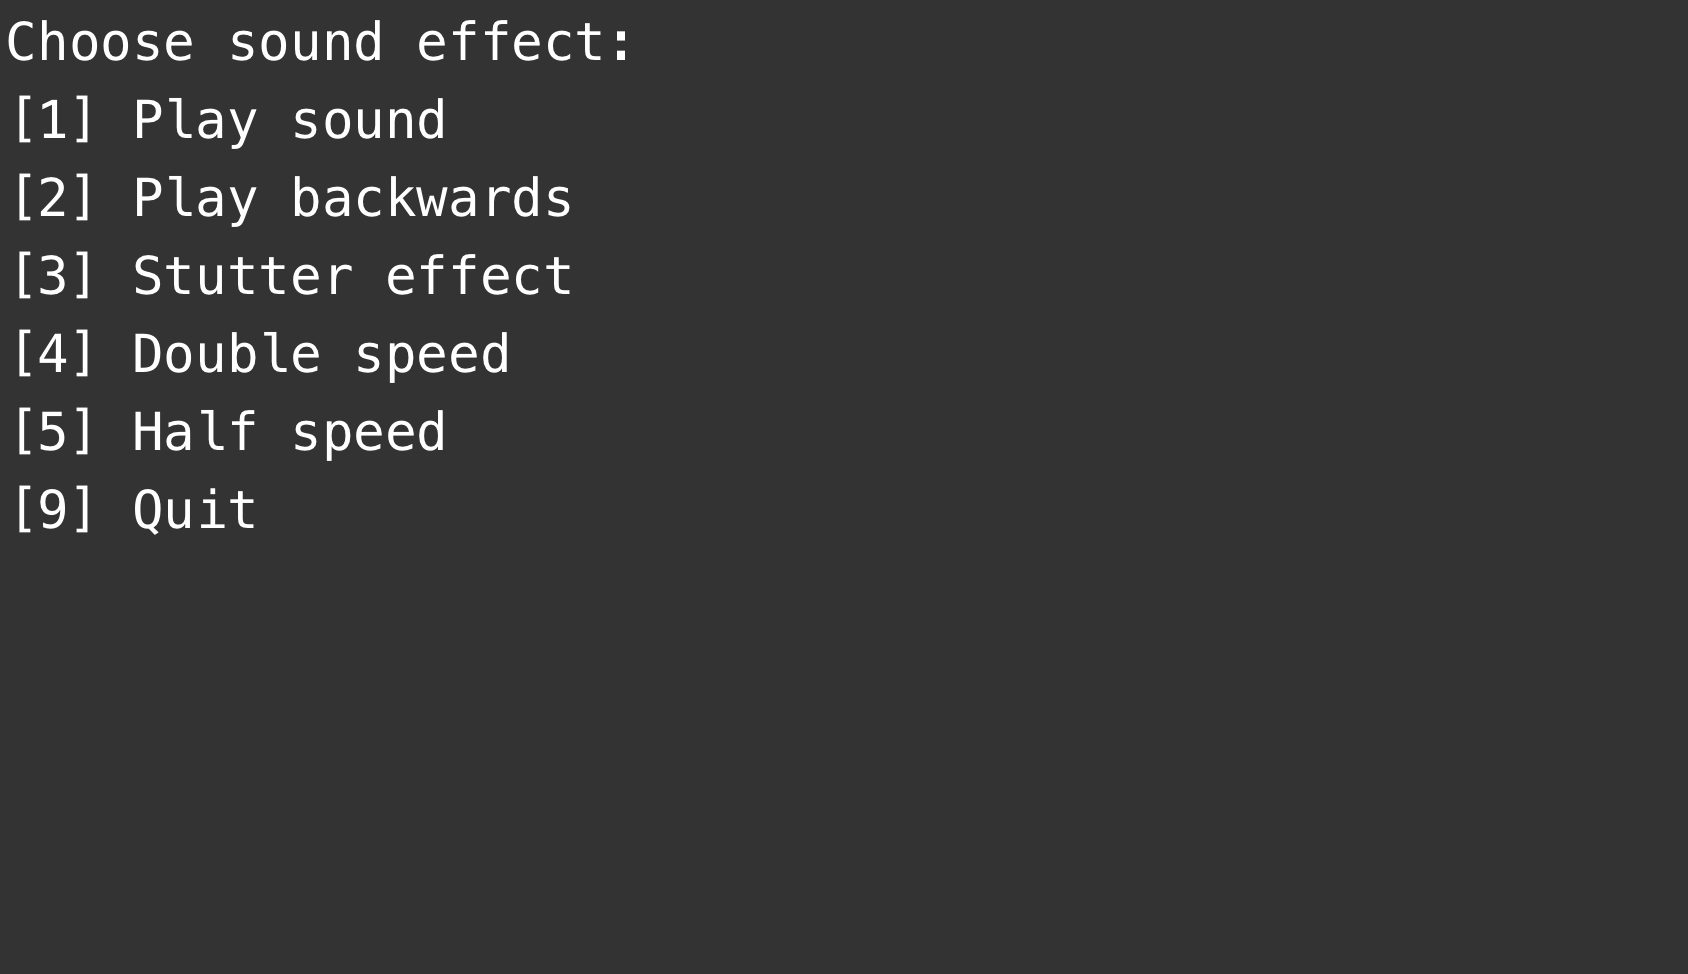
7.5. A simple text-based menu
In our current implementation, playing the sound effects was hard-coded in our program. Perhaps you wrote your code to play a single effect, disabling the calls that played the previous effects. Or perhaps you tried to play all effects one after the other – in this case, you will have discovered that the program does not actually wait for the sound to finish before continuing, and the sounds likely played overlapping. That is not a great effect.
It would be more useful to let the user choose an effect, in any order they like, from a list of available effects.
Implement such a choice now. Your task it to show a menu on the screen that looks something like the one shown in Figure 7.3.
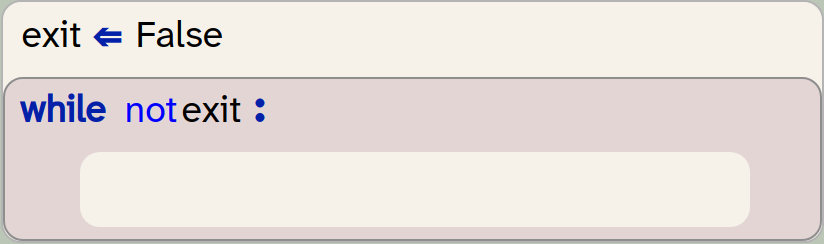
For the main structure, use a while loop with a boolean variable exit that controls how long the loop continues. Then, in the loop, you can react to key presses, playing sound effects when needed, or setting this variable to True to exit:
Exercise 7.49 Write a function to display the menu on screen. Make sure to choose an appropriate name for the function, and to write a good function comment. Call this function from your main code section.
Exercise 7.50 In your 'My code' section, write a loop that reacts to key presses (using the get_key() function from the strype.graphics library). If a specific key is pressed, play the appropriate effect. Do this for all the effects you have implemented.
A version of the program with these exercises implemented is available in sounds-v3.
There are, however, many more experiments that we can do with our sounds. Some things you can try are suggested in the following exercises, but you are also encouraged to think about your own effects and trying them out.
Exercise 7.51 Implement a change in volume. You can decrease the volume by decreasing the values of each sample, for example dividing each sample value by 2 or by 4. You can increase the volume by multiplying the sample values. (However, you should be careful not to increase any value above 1.0, since sample values must be in the range -1 to 1.)
Exercise 7.52 Implement an echo effect. You can do this by chopping off the last half of the sound and attaching it to the end of your original sound multiple times. But each time it is repeated, it should have a lower volume than before.
Exercise 7.53 Give your echo effect function a parameter that specifies how often it should echo. And make sure the reduction in volume is such that the last echo is just about audible.
Exercise 7.54 Give your user a choice of multiple different sounds to apply the effects to.
Exercise 7.55 Experiment with producing sounds from scratch by creating lists of numbers and playing them as sound samples.
Exercise 7.56 Use graphics to make an interface for this program. Use several actors showing icons for effects, and play the effect when the user clicks the icon.
Exercise 7.57 If you feel very adventurous (this is an advanced exercise): Create a visual waveform representation of your sound in your graphics interface, similar to the one used in Strype’s own built-in sound editing dialogue.
7.6. Summary
In this chapter, we have seen some more uses of lists in Python.
First, we have seen that the graphics world uses lists to manage the actors in it, and that we can obtain lists of actors from it (either a list of all actors, or lists of selected actors).
Then we have seen that sounds can also be represented as lists: lists of samples. Samples are numerical values, and by manipulating the list of samples, we can change a sound. Along the way, we have encountered several useful operations on lists, such as joining and repeating lists, and slicing with step values.

-
The graphics system maintains a list of actors. We can obtain a list of all actors, or of selected actors, by using the
get_actors()function. -
A variable written in capital letters is considered a constant. Values of constants should never be changed. Python does not enforce this, but it is bad practice to do so. Using constants can make your program more readable and easier to maintain.
-
A global variable is a variable declared at the outer level of your program (outside of function or class definitions). Global variables hold their value throughout the entire run of a program.
-
A local variable is a variable that is declared inside a function. It is created every time the function executes, and is destroyed when the function ends.
-
The declaration
global var_nameused inside a function makes every use of the variable namevar_nameafterwards refer to the global variablevar_nameinstead of referring to a local variable. -
A sound is stored as a list of samples. We can get the list of samples from a sound object using the
get_samples()method. -
A sound object can be created from a list of samples by using the statement
Sound(sample_list). -
We can join two lists together to form a single list by using the
+operator:list1 + list2. -
List elements can be repeated multiple times to form a new list by using the
*operator:list1 * 3. For example,[0, 1, 2] * 3will produce[0, 1, 2, 0, 1, 2, 0, 1, 2]. -
Slices from lists can include a step value. The syntax is
list[start : end : step]. When we use a step value, the slice is created by copying elements from start to end, using the step size to advance. All three slice values are optional. If we want to use a step size across the entire list, we can writelist[::step]. -
We can append a single element to a list using the
list.append(elem)method. We can append every element from another list by using thelist.extend(list2)method.

Piano
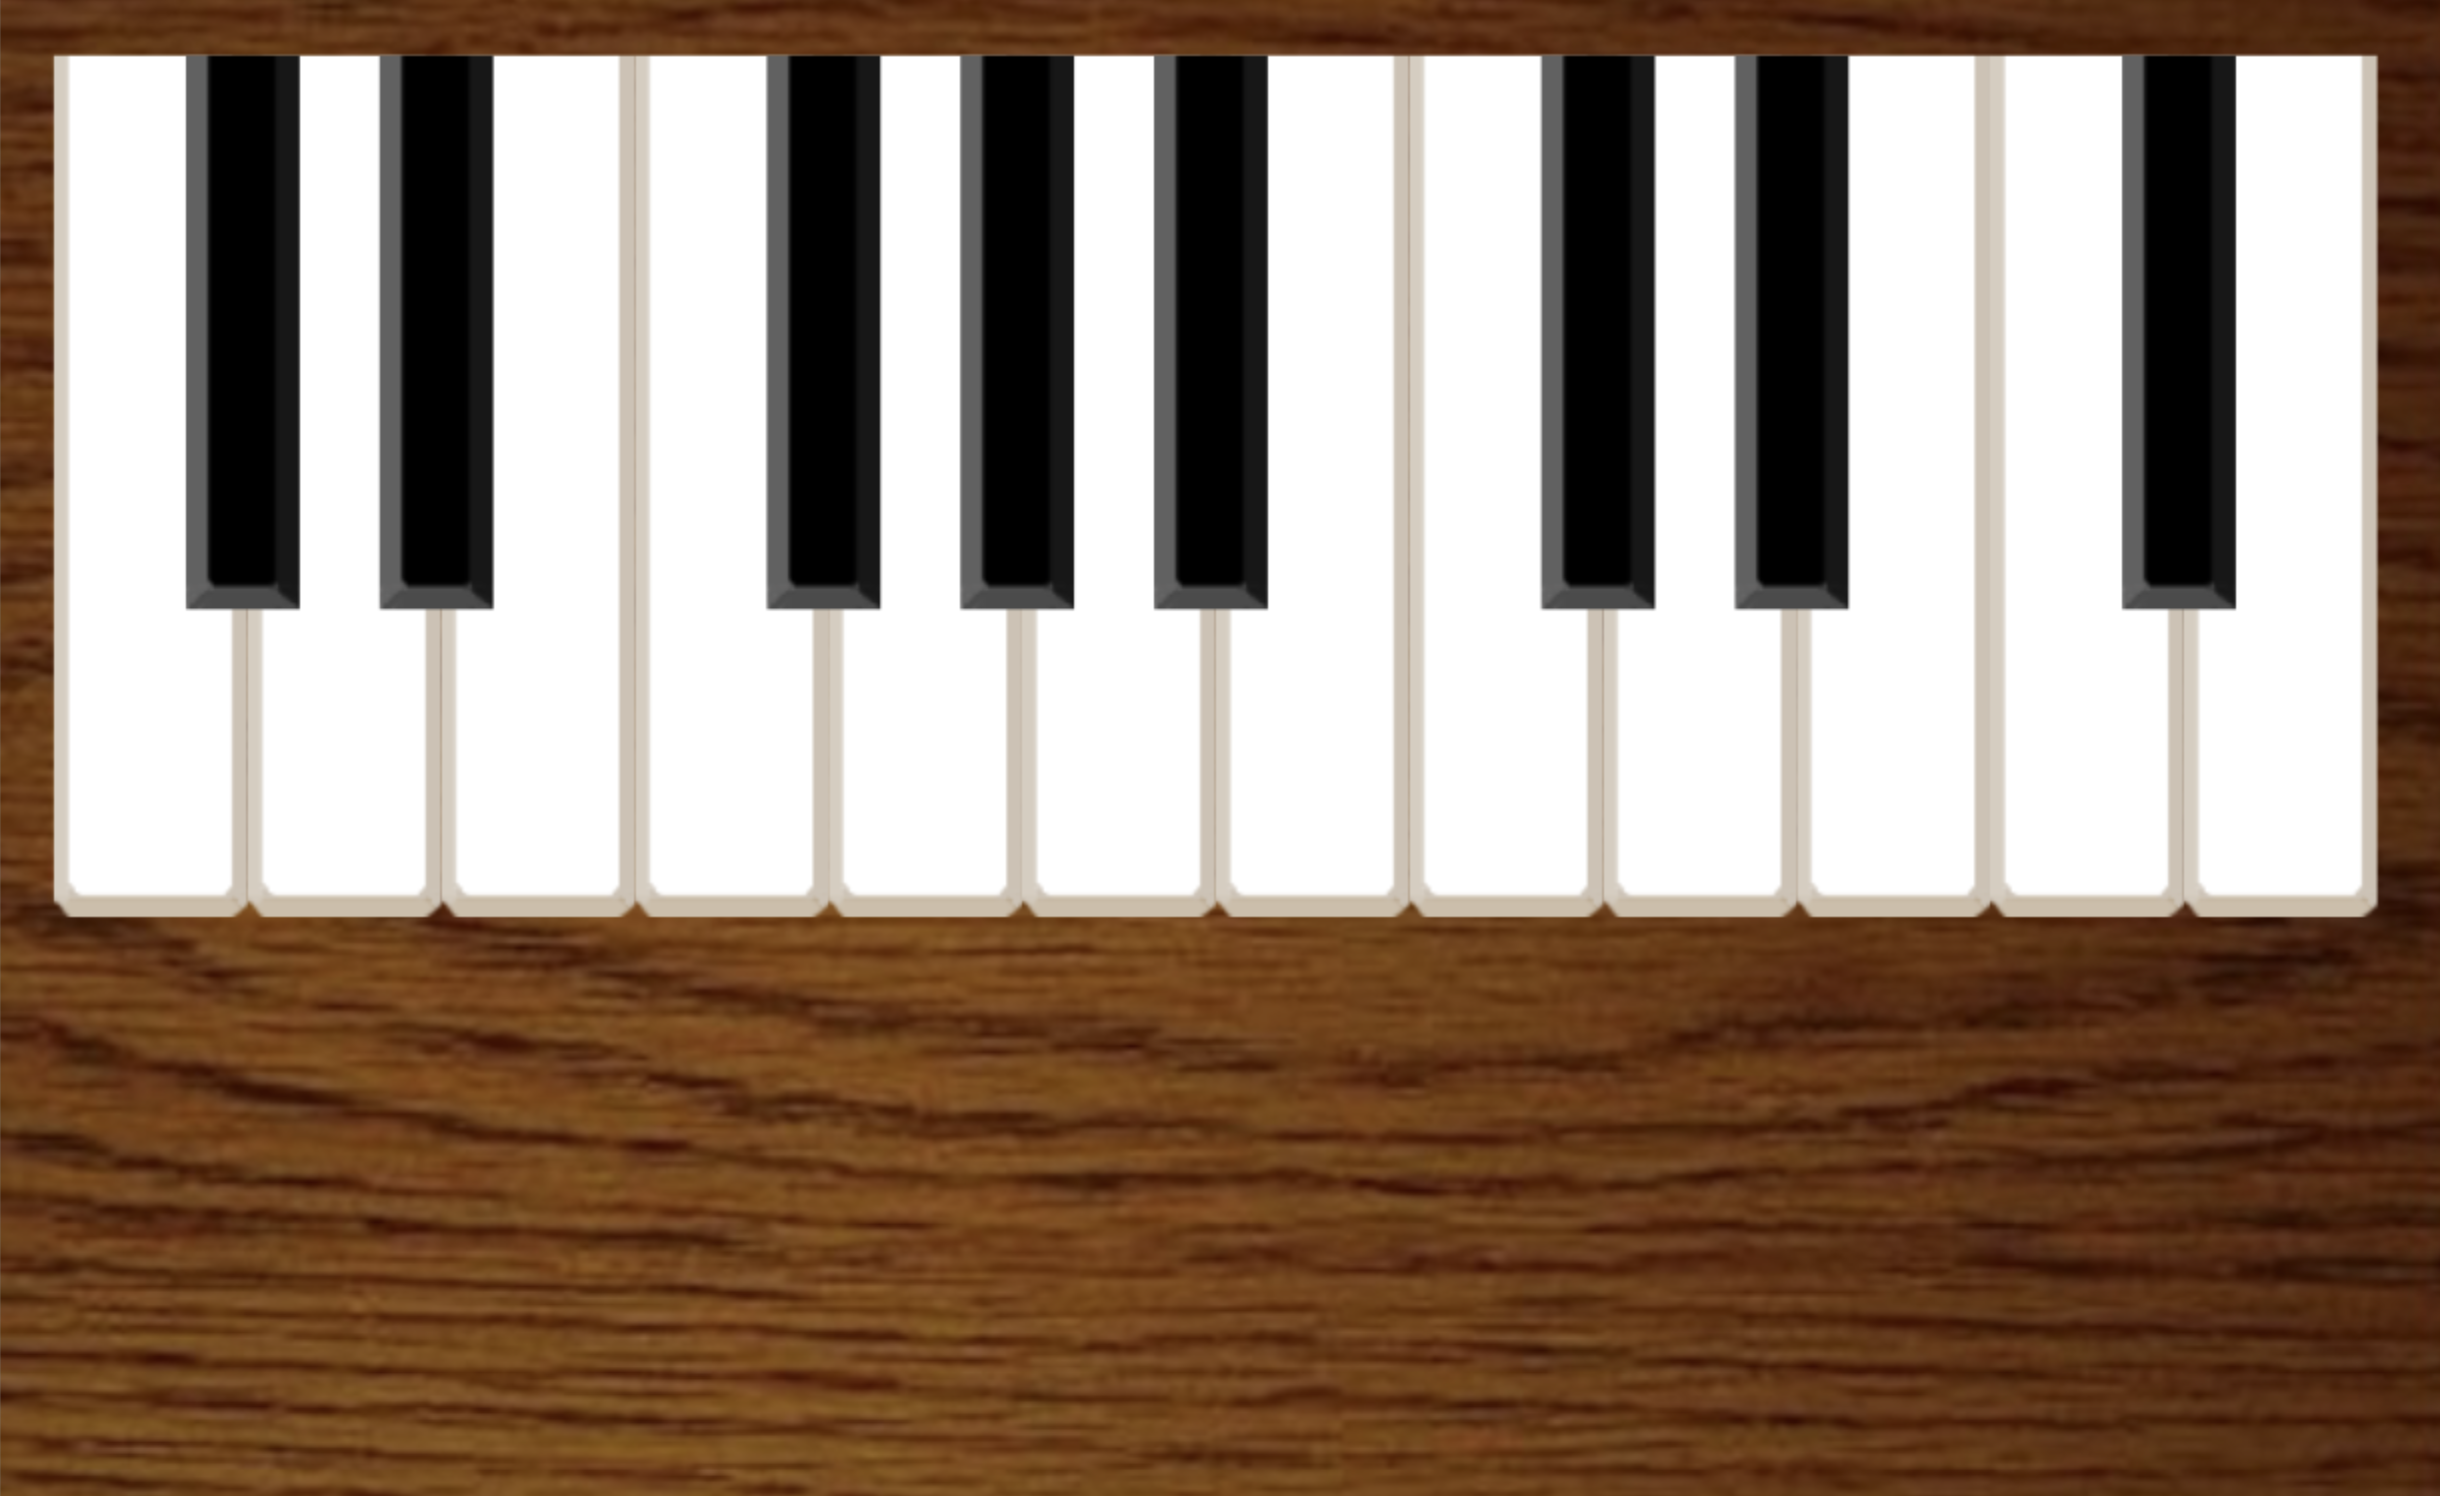 We worked a lot with lists in this chapter, and you may have got an understanding how to use lists and what they can do. Here, we have a project called
piano
which shows some other ways to use lists. The project implements a simple piano (which you can play with your keyboard), and in doing so it makes use of lists of strings, actors and sounds.
We worked a lot with lists in this chapter, and you may have got an understanding how to use lists and what they can do. Here, we have a project called
piano
which shows some other ways to use lists. The project implements a simple piano (which you can play with your keyboard), and in doing so it makes use of lists of strings, actors and sounds.
You may like to study this project code to see how this is done.
Breakout
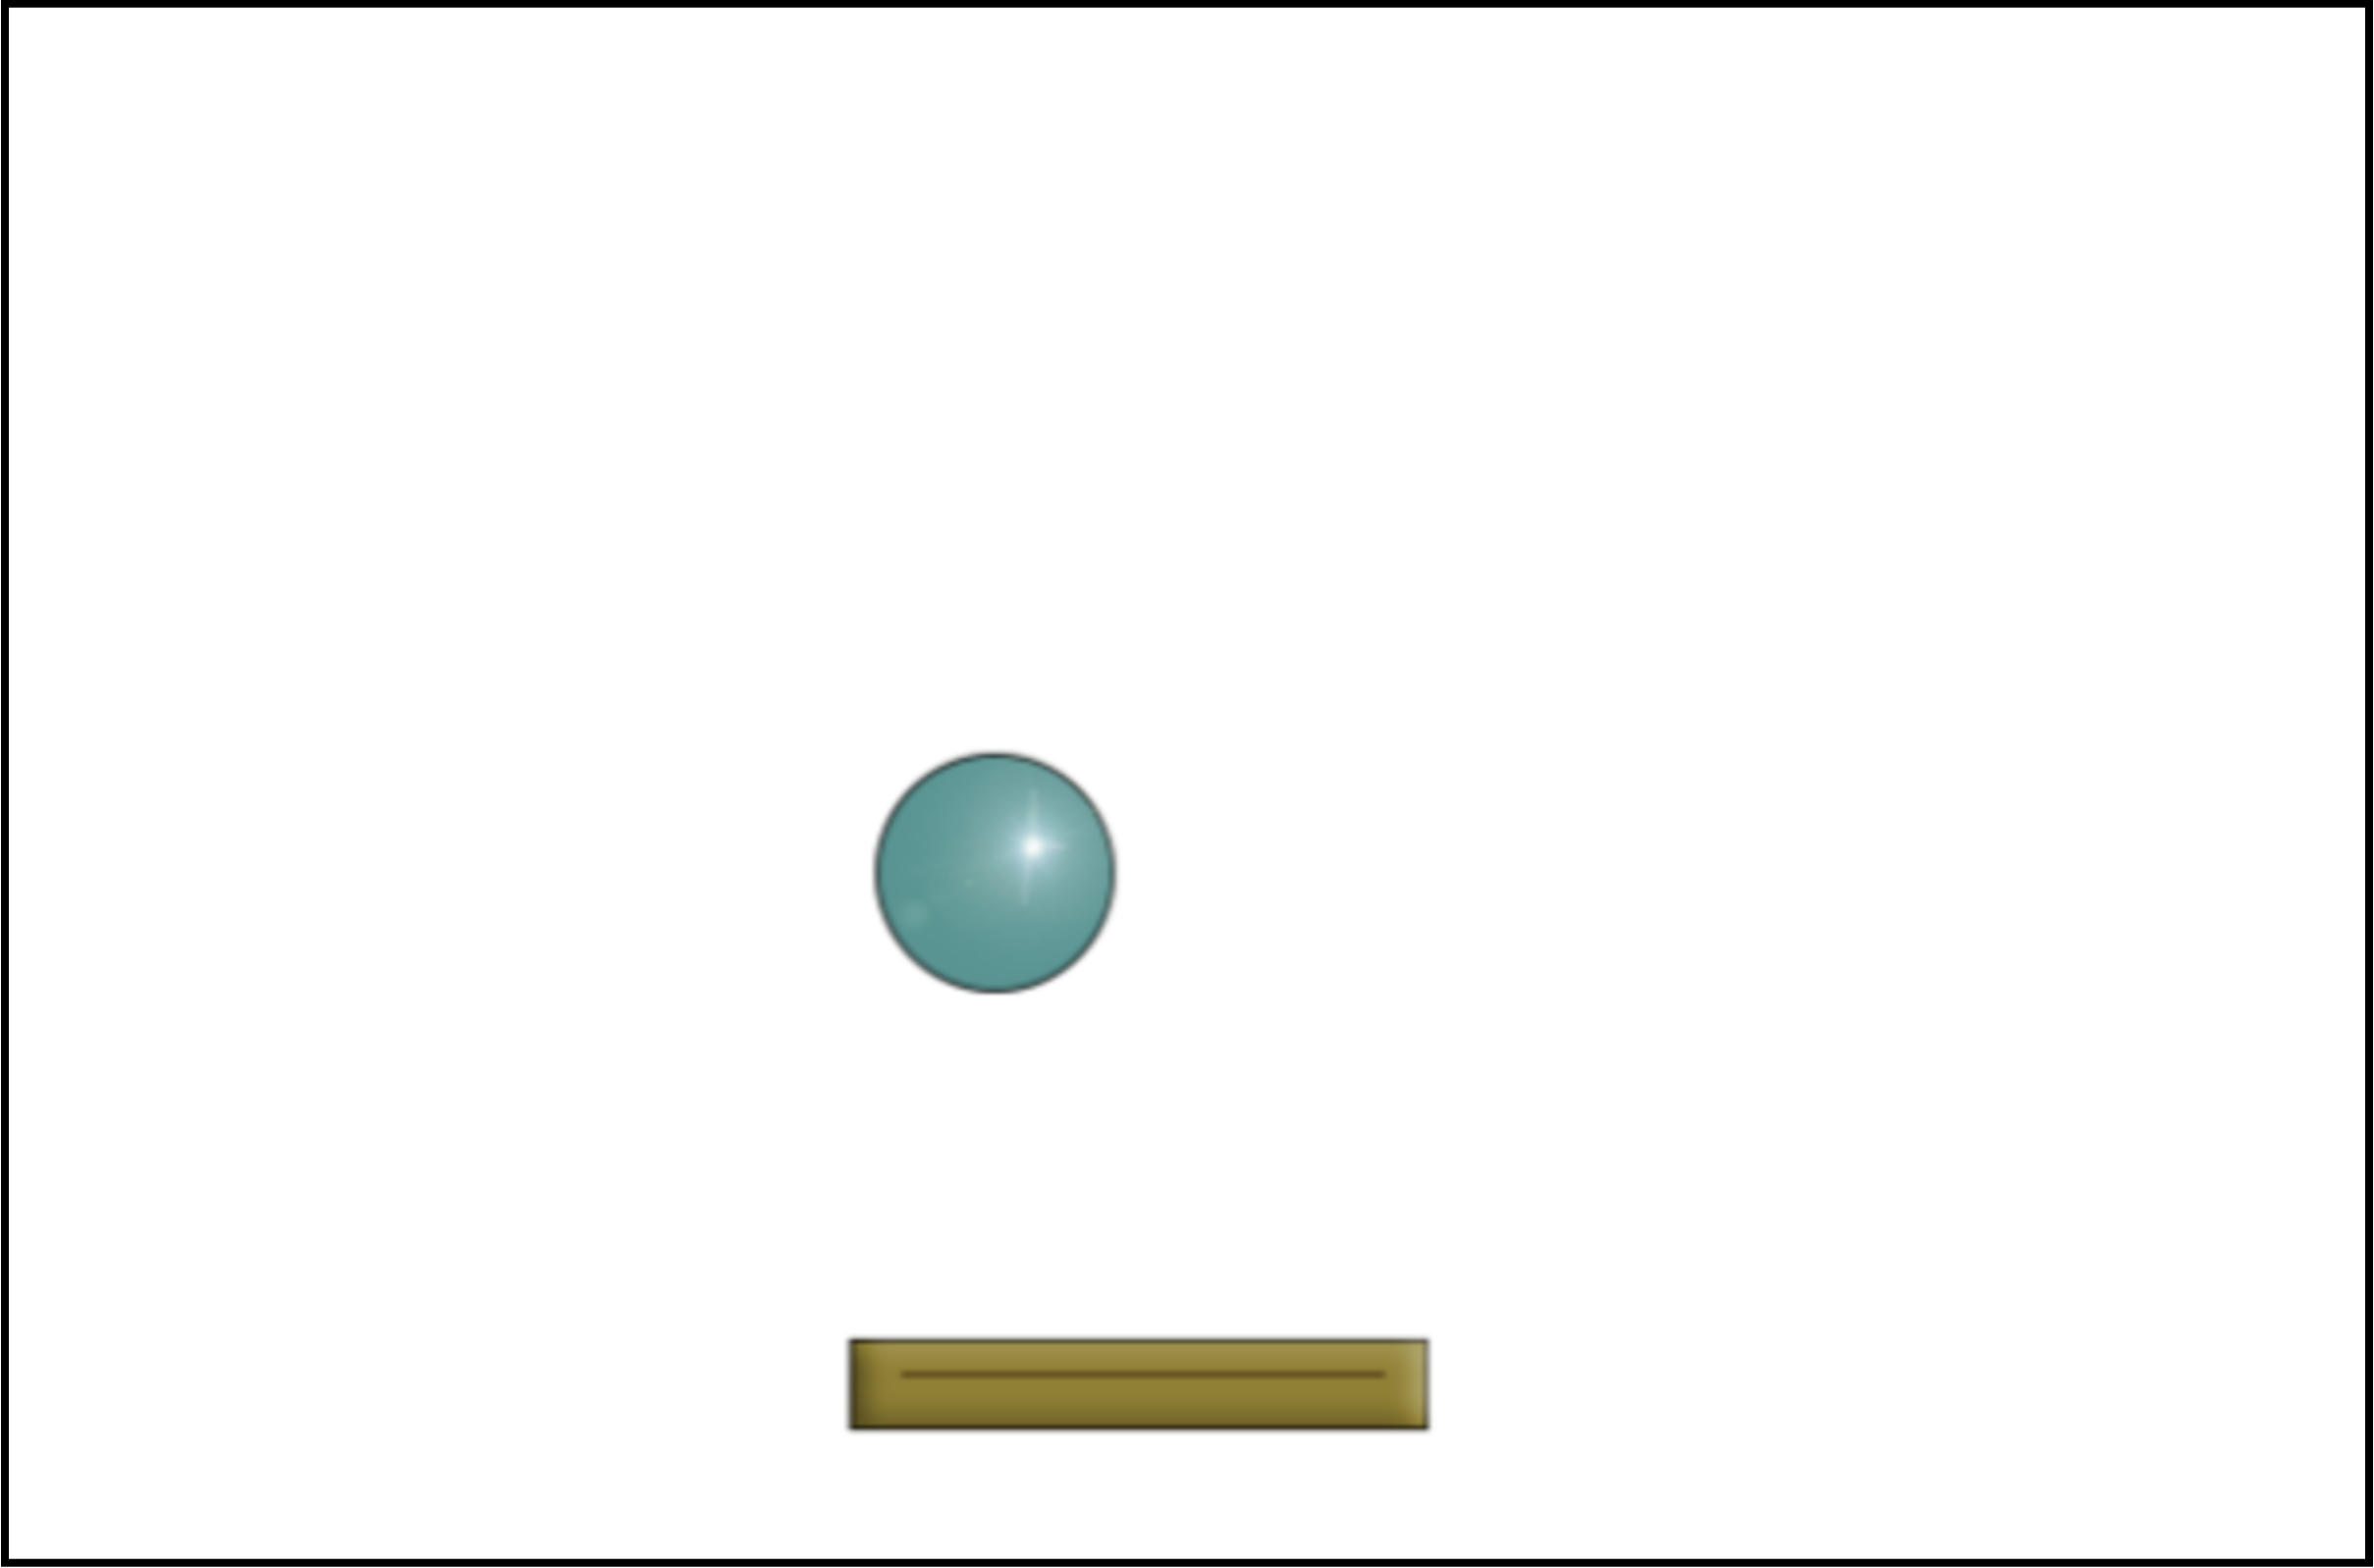 Breakout is another classic arcade game. (Again, search online for "breakout game" if you are not familiar with it.)
In this version, only the paddle and the ball have been implemented so far. To complete the game, you would have to add the rows of bricks at the top and implement the game logic. Of course, many visual and audio effects can be added.