Chapter 5. Creating a game
We are now, finally, ready to come back to our yellow-fish project to start turning it into a playable game.
If you have completed all the tasks in Chapters 1 and 2, you can continue with your project from those chapters. If you would like a fresh start, you can use the yellow-fish-v3 project from Chapter 2 as your starting point.
5.1. The plan
To make this game even a little bit interesting, we need to have a task, a goal, and some danger. For our yellow fish, we have already seen how we can make the fish the player character by letting the player control the movement of the fish. The task will be to eat: We will introduce some shrimp to our game, which the fish can eat. The goal of the game then is to eat all the shrimp on screen.
To make this a challenge, we will also add a shark: the shark likes to eat fish, so we need to stay away from it, otherwise we will be eaten by the shark. The aim of the game then is to manage to eat all shrimp without being first eaten by the shark.
5.2. Adding food
Our first task is to add some food to the game: a shrimp in our case. We can start by adding one single shrimp. This should now be quite easy: We can add a line of code to add the shrimp immediately after the line that adds the fish, with a very similar structure. We just use a different name for the variable, different coordinates and a different image:

Of course, if you have changed your player character and image in this project to a different actor, you can choose a different kind of actor for the food as well. If your player is, for example, a turtle, then the food could be a lettuce. Or if your player character is a spaceship, then the second character could be an astronaut. (In that case, it is not "food", and the player is not "eating" the second character, but rather picking them up from space.) You get the idea: whatever your game scenario is, choose an appropriate image for your second character. Whenever we write "shrimp" in the remainder of this chapter, use your own character instead.
In case you would like to stick with our fish/shrimp theme, you can find a shrimp image in the Chapter 5 section of the book projects in Strype.
Exercise 5.1 Add a shrimp to your project. Place it at a different location from the fish. Test to make sure that the fish and shrimp both appear on screen.
Exercise 5.2 Add a second shrimp at another location. Then add a third one.
5.3. Repetition – the for-loop
Let us say we would like to have 15 shrimp in our game. We could now go ahead and duplicate the line that creates the shrimp another 14 times, each time changing the world coordinates to different values. This would work, but it would be tedious.
Computers are good at doing things repeatedly, but that does not mean that we should need to write the same statement repeatedly. We can just tell the computer to execute a statement 15 times. (This will become even more important later on when we will execute statements not 15 times, but thousands of times. In that case, it is really not practical to write all the statements out one by one.)
 A loop is a statement that can execute another statement (or a set of statements) repeatedly, potentially many times. The loop body contains the statements which we wish to repeat, and the loop header determines how often it should run.
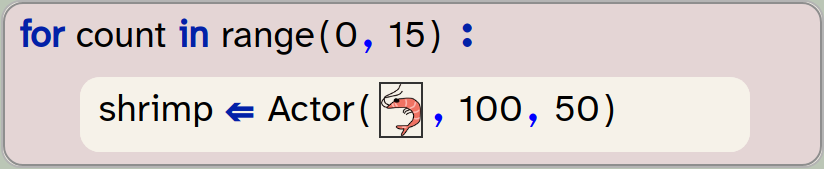
The type of Python statement to do something repeatedly is called a loop. Python has several different kinds of loop statement, and the one we will use here is called a for-loop. It looks like this:
Exercise 5.3 Remove all but one of the statements that create the shrimp. Place the remaining one in a for-loop as shown here. Run your program. What do you observe?
Exercise 5.4 How many shrimp are created by this loop? How many shrimp can you see on screen? Can you explain what you see?
The for-loop executes the statements within it repeatedly. (There can be more than one statement in the body.) How often it executes depends on the header of the loop. The loop we see above counts from 0 to 15, and for each count executes the loop body (the statement within the loop) once.
Let us discuss this in a bit more detail. The empty for-loop frame looks like this:
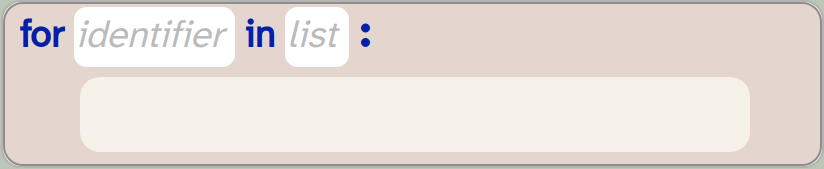
In the place of the expected variable, we can write the name of a variable we want to use for counting. We can make up the name for the variable ourselves, and a variable with that name will be created. In our example above, we have used count as the variable name, but we could have named the variable anything we like. (In programming, the variable name i is also often used as a loop counter.)
In the 'list' slot, a list of numbers is expected. Here, we use the range function: this function creates a list of numbers from a lower bound to an upper bound. In our case we have used 0 and 15, so we will get a list of numbers from 0 to 15. One important detail to be aware of is that the range includes the lower bound, but excludes the upper bound. So strictly speaking, the numbers we get are 0, 1, 2, …, 14. This suits us well, because it means that we are getting 15 different numbers (0 to 14), and the loop will run 15 times.
When the loop executes, it first assigns the first number (0) to the loop variable count and then executes the loop body once. Then it assigns the second number (1) to count and executes the body again. Then again for the third number, and so forth.
Once it has done this for the last number, the loop body will have been executed 15 times. For each run of the loop body, the count variable has a different value, and we can use this value to our advantage to solve our next problem.
A for-loop is a type of loop statement that uses a counter variable (called the loop counter) and a list. It executes the loop body once for each item in the list.
5.4. Using the loop counter
In the last exercise above, you will have noticed a problem: The code created 15 shrimp, but they were all placed at the same location. Because all shrimp were drawn exactly on top of each other, it made it look as if there was only one.
We can fix this by placing each shrimp at a different location. How do we do that if all 15 shrimp are created using the same statement?
The answer is not to use fixed values for the x- and y-coordinates, but to use variables instead.
As our first try, let us use the loop counter variable as the coordinates for both the x- and y-position:

Using this code, the x/y coordinates will be 0,0 for the first shrimp, 1,1 for the second, and so on. This way, the shrimp are not all drawn at the same location.
Exercise 5.5 Implement the loop as shown above, using the count variable. Run your program. What do you observe? Explain what you see.
Exercise 5.6 To space the shrimp out more, multiply the count variables by 20 when you use them for the coordinates. That is: write count * 20 as the actual parameter for the x- and y-coordinates.
Exercise 5.7 Experiment with values other than 20 for the multiplication.
Exercise 5.8 What effect does it have if you use different multipliers for x and y? What happens when you add or subtract a value from x or y?
Exercise 5.9 Make the row of shrimp start from the left edge of the screen.
Exercise 5.10 Arrange the shrimp in a straight line from the top left corner of the screen to the bottom right.
Exercise 5.11 Python allows us to call the range function with only one parameter, for example range (15). In this case, the parameter is the upper bound, and the lower bound is automatically set to zero. Change your program to use the one-parameter version of this function call.
In the exercises above, we have seen that we can use the * symbol for multiplication. Python has built-in operators for many frequently used mathematical operations; you can see a list of all available operators in Appendix D: Python operators.
For the purposes of our game, being able to place the shrimp at different locations is good, but placing them in such a regular pattern seems odd in our context. So let us make the next improvement: Let’s place the shrimp at random locations.
5.5. Creating random behaviour
Often, we want an element of randomness in our programs. In our case, we would like to place our shrimp at random locations, but we may also want other characters to move randomly, or have interesting things happen at random times. Randomness makes our game less predictable, and thus more fun to play.
In computer programs, all random behaviour is based on random numbers. Python can create random numbers, and we can then write code to translate this into any kind of random behaviour we need. We will see an example here for the random placement of the shrimp, and another example later in this chapter, when we want to make our shark move randomly.
Python provides a function called randint to generate and return random integers (whole numbers). We can call this function to receive a random number and assign it to a variable. For example, we can write an assignment statement like this:

The function call to randint returns a random number, and we assign this number to a variable called x.
The function takes two parameters, which are the lower bound and the upper bound of the random numbers we wish to receive. Both bounds are included in the possible range, so our example will produce numbers between 5 and 19, inclusive.
Python provides functions to generate random numbers. The randint function provides a random integer from a given range.
Exercise 5.12 Add the assignment statement with the randint function call to your own code, inside the for-loop. Run your program. What do you observe?
The exercise above shows us that we are not quite done yet: The code produces an error that tells us that randint is not defined. This is Python’s way of telling us that it does not know the randint method.
The reason for this is that the randint method is defined in a library. Python provides so many functions for different purposes that it might get confusing to make all of them available all the time. Instead, they are arranged into libraries, which we can import when we need them. Each library contains a set of functions for a specific purpose. Python provides a set of libraries by default with the language – these are referred to as the standard libraries. They are always available in every Python system. Other libraries can be added with explicit statements.
To make our randint function work, we have to first import it from a library.
5.6. Importing from a library
When we import from a library, we have the option of importing all the definitions in that library, or we can import specific functions.
We have seen an example of the first option in Chapter 1, when we looked at the import of the Strype graphics library. We saw the following import statement in the Imports section of our program:

In this case, we used the asterisk (*) to specify what we wish to import, which is a symbol meaning "everything". Thus, we imported the entire Strype graphics library.
We can now add the following statement to our Imports section:

This statement shows us that Python has a standard library called random (which contains various functions dealing with random numbers), and from there we can import a function called randint. In this import statement, we import just a single function from the library.
As a general rule of thumb, we should import separate named functions whenever we need just one or two functions from a library, and we import everything when we need access to a large number of definitions from the same library.
Exercise 5.13 Add the import statement for randint to the Imports section of your program as shown above. Run your program. This should now work. If it does not, then you made an error that you need to fix. You will not see any effect of the random number yet, but you should not see an error either.
5.7. Random placement
It is now time to use our random numbers for random placement of our shrimp.
Exercise 5.14 Add a second assignment of a random number to a variable. This time, call the variable y. Add this line directly below the assignment to x. Make sure both lines are inside your for-loop.
Exercise 5.15 Use your variables x and y as the actual parameters for the x- and y-coordinates in the creation of your Actor.
Exercise 5.16 Experiment with different values for the upper and lower bounds of your random numbers. Remember that the x-coordinates of the Strype world range from -399 to 400, and the y-coordinates from -299 to 300 (see Figure 1.6). What would be reasonable bounds for your random numbers?
Exercise 5.17 Start and stop your program multiple times to convince yourself that the shrimp are placed in different random locations each time.
If you have successfully completed the exercises, you now have a version of your program that has a keyboard controlled player character and several actors of a second type at random locations. If you would like to compare your version to ours, you can find a version of the program in this state in the book projects as yellow-fish-v4.
In our version, we have made one additional change: instead of defining the variables x and y and assigning random numbers to them, we have written the call to the random number function directly into the parameter list of the Actor creation:

This is an alternative way to achieve the same thing: we can write a function call that returns a value directly into a parameter list, and the result of the function will be used as the actual parameter.
Which version of the program you prefer is a matter of personal preference – both are good ways to achieve the same goal.
5.8. Summary
In this chapter, we have added an important step to our game: more characters for us to interact with.
We have seen how we can use a for-loop to create several actors without writing separate statements for each one. We have also seen that we can import functions from the random module to generate random numbers. These numbers allow us to implement random behaviour in our programs.
We are now ready to make our fish eat the shrimp – we will do that in the next chapter.

-
A loop is a statement that can execute a statement (or a set of statements) repeatedly, potentially many times. The loop body contains the statements which we wish to repeat, and the loop header determines how often it should run.
-
A for-loop is a type of loop statement that uses a counter variable (called the loop counter) and a list. It executes the loop body once for each item in the list.
-
Python provides functions to generate random numbers. The randint function provides a random integer from a given range.

Particles
 Here is a project that shows a special effect. It is called
particles,
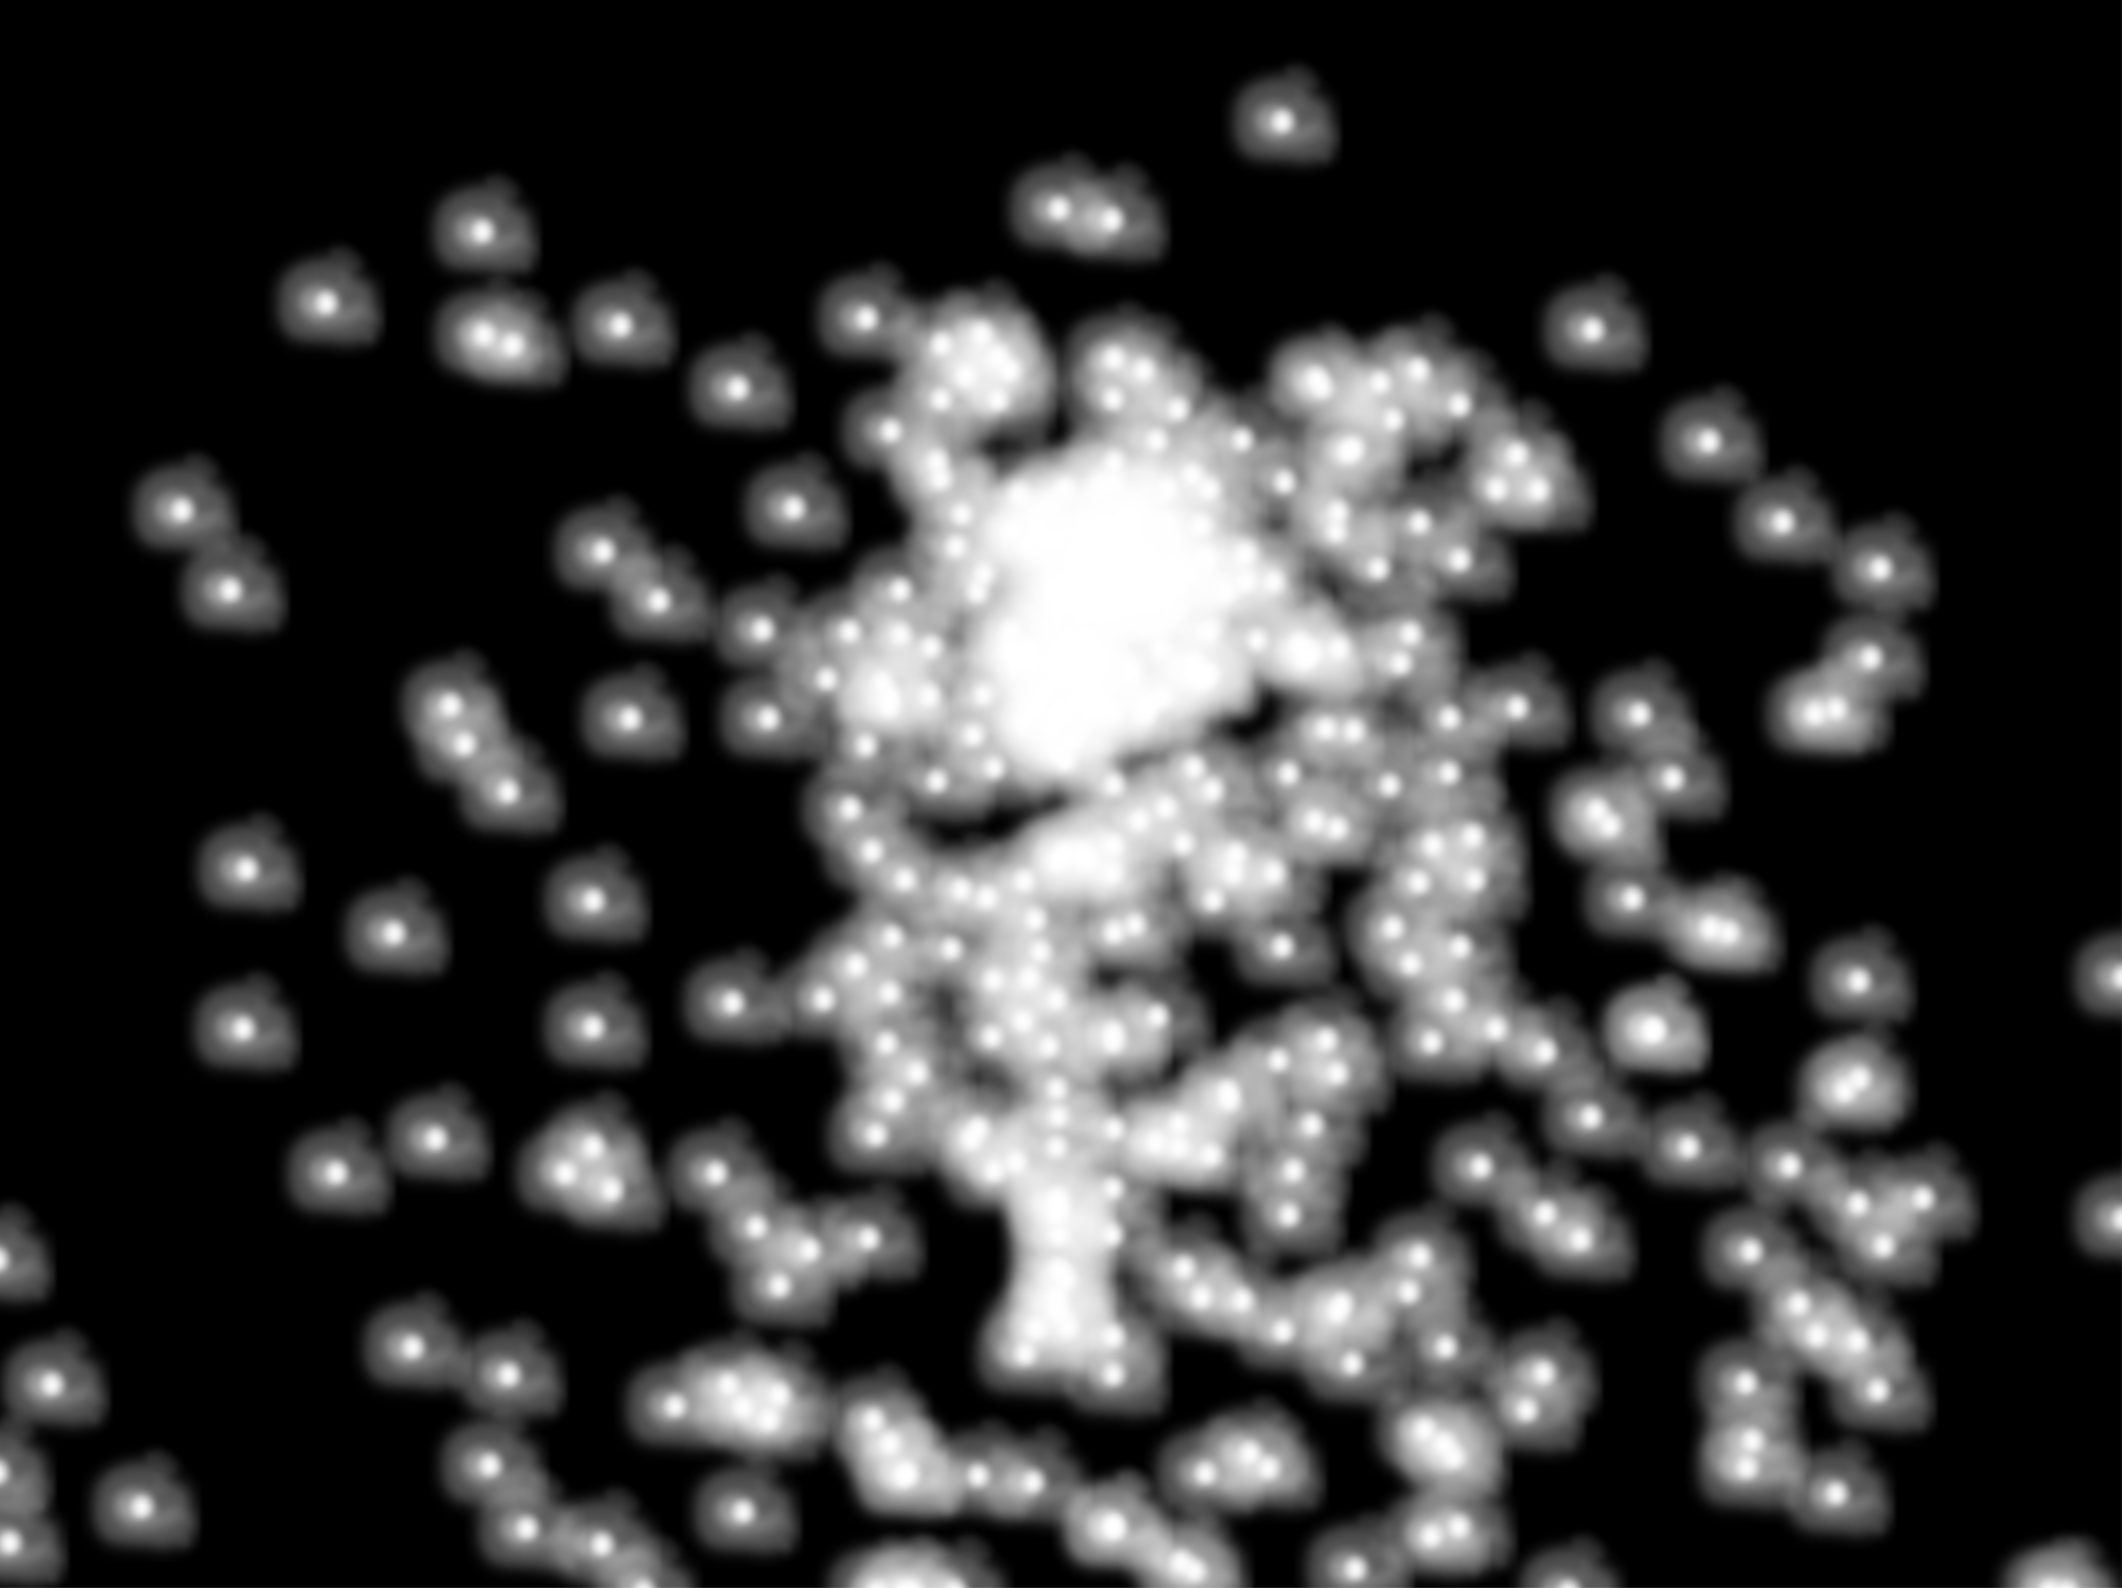
and it shows a sparkler effect around the mouse position. It demonstrates a few useful things: it shows how to create lots of actors to create a visual effect (and make them disappear just as quickly), it shows how to implement a gravity effect (the sparkles fall down, and accelerate as they do), and it demonstrates how to use a Gaussian distribution fors random numbers (where more extreme numbers are less likely). It also shows how to read the mouse coordinates to use them in your program.
Here is a project that shows a special effect. It is called
particles,
and it shows a sparkler effect around the mouse position. It demonstrates a few useful things: it shows how to create lots of actors to create a visual effect (and make them disappear just as quickly), it shows how to implement a gravity effect (the sparkles fall down, and accelerate as they do), and it demonstrates how to use a Gaussian distribution fors random numbers (where more extreme numbers are less likely). It also shows how to read the mouse coordinates to use them in your program.
Altogether it might give you ideas for visual effects you may like to add to your own games.